
Fusion Development for Hospitality Apps Part 3: Expanding the Application by Working with Form Data
5.00/5 (1 vote)
How to insert data into Dataverse using the Dataverse API
This three-part series demonstrates how a citizen developer and professional developer can work together through fusion development. The series builds an application that suits a hotel’s business needs, enabling the hotel staff to quickly check in a guest and update the company’s central reservations database.
By storing data in Dataverse, a citizen developer can build a fully-functional UI without deep technical knowledge. Meanwhile, we can set up information updates in the backend SQL database by monitoring changes in Dataverse. This design decouples the UI from the backend, like in the image below:

In the previous articles, we established the path from the employee checking in a guest to propagating the check-in to an API endpoint. In the image above, this moves from the right column to the middle, then to the left).
This article moves data in the opposite direction, from the left column to the middle, then to the right. We’ll propagate new data from the backend to the client and, in turn, to the employee. These actions get data into the Dataverse.
Another table in the SQL database stores information about a customer’s previous visits. The goal is for professional developers to propagate information about the guest’s earlier visits to Dataverse for the Power Apps app to display. Customer service agents can then use this historical information to personalize the guest’s current hotel stay.
Using the Dataverse API
Using Dataverse APIs for this project is a two-step process. We obtain an access token, then use the access token to insert data into the Dataverse table.
Obtaining an Access Token
There are a few items to set up before obtaining an access token for Dataverse. The links provide more details on how to perform each of these tasks. Here’s a summary of the key points:
First, register an application in Azure Application Directory (Reference Document steps 1–4).

Then, assign the Dataverse permission (Dynamics CRM) to the registered application (Reference Document steps 6-8).

Next, go to OAuth for Dataverse and click Certificates & secrets in the menu. Create a Secret for the application and note the Secret ID.

Then, in Overview, note the Application (client) ID and Tenant ID.

Now, update the following values to true in the Manifest: allowPublicClient and oauth2AllowImplicitFlow.

Then, create an application user in the Power Platform admin center using the application ID.

In this tutorial, we’ll use Postman to show how to ensure these API calls remain platform agnostic. This Microsoft article explains how C# developers can connect using official C# libraries.
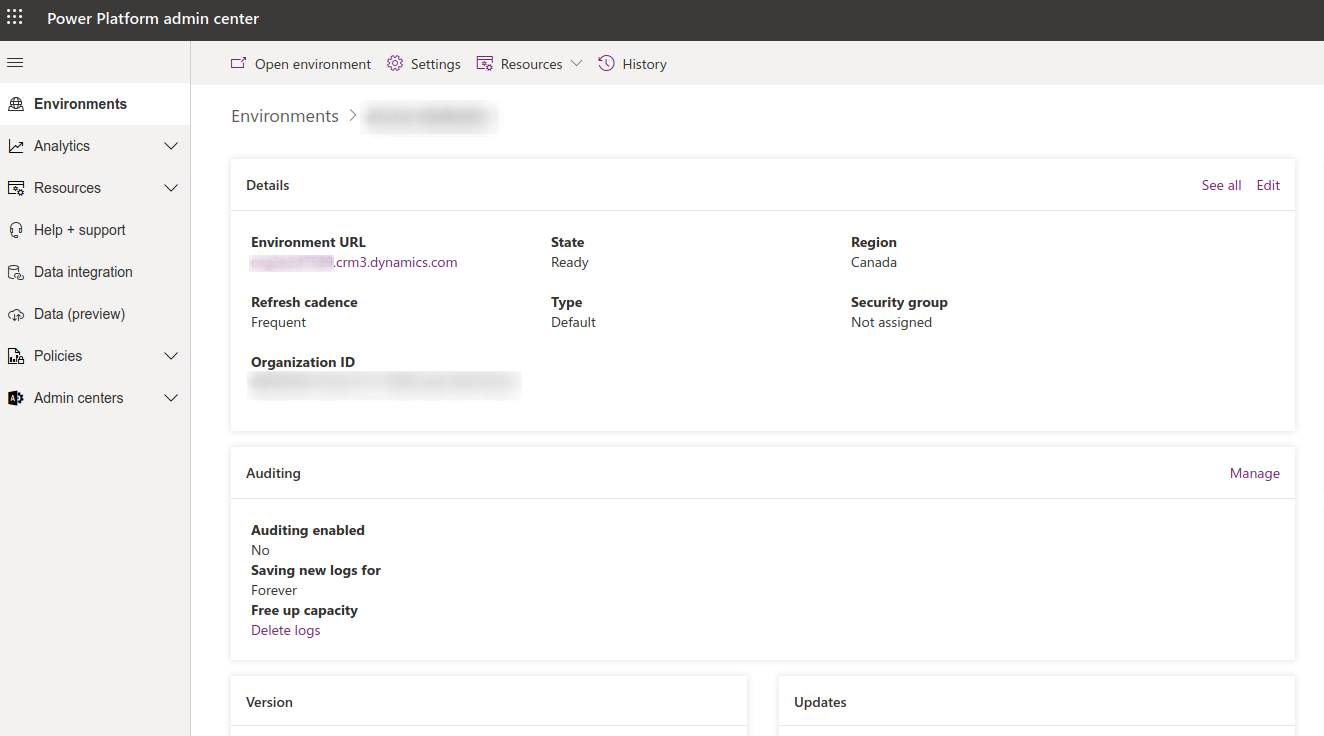
Obtain the service URL from the Power Platform admin center regardless of the method. Select the appropriate environment to view the environment URL on the screen.
To obtain the access token, make a POST call to https://login.microsoftonline.com/{tenantId}/oauth2/v2.0/token:
POST /ce22f12e-9766-4af6-bc48-cc0b4a012c9a/oauth2/v2.0/token HTTP/1.1
Host: login.microsoftonline.com
Content-Type: application/x-www-form-urlencoded

client_id={client_id}&grant_type=client_credentials
&client_secret={client_secret}&scope=https://{service_url}//.default

{client_id}, {client_secret} and {service_url} are values obtained from previous steps.
Then, make the GET call to receive an access token for future API calls.

Next, start putting information out to Dataverse for the Power App.
Inserting Previous Visits via API Calls
With an access token, the app can now make API calls to insert information about a guest’s previous visits into Dataverse.
There are two design options: insert data into the existing reservation table and have the Power App filter based on whether a record has a check-in date, or create a new Dataverse table to store previous visit information.
The SQL database still has the same table as before, with one additional table to store information about the guest’s experience.

The second option requires less Power Apps maintenance. The citizen developer doesn’t need to know the intricate details about how the backend determines if a reservation is new. Option two also avoids potential conflicts caused by the citizen developer and professional developer writing to the reservations table.
So, create this new Dataverse Table in New table:
Display name: Previous Visit
Plural Display Name: Previous Visits
Name: previousvisits

Primary Name Column
Display name: Reservation Code
Name: reservationcode

Columns:
Customer Name: Text
Check Out Date: Date And Time
Rating: Whole Number
Comments: Text

Note the table and column names have a unique prefix in front, ensuring the names are unique across environments.
The application will use these full table names to make insert calls.
To insert a row in the Previous Visits table, make the following POST call with the access token ({access token}).
POST {service_url}/api/data/v9.2/cxxxx_previousvisits HTTP/1.1
Authorization: Bearer {access token}
Content-Type: application/json; charset=utf-8
Accept: application/json
{
"cxxxx_reservationcode": "CRB967348",
"cxxxx_customername": "Sample Guest",
"cxxxx_checkoutdate": "2022-01-12T15:06:26Z",
"cxxxx_rating":7
}
In the code above, replace cxxxx with the prefix Power Apps generated for the environment. Note that the table name should be plural with an “s” at the end.
Next, switch the method to GET to verify that an entry has been created.
Similarly, insert new reservations by writing data to cxxxx_reservations table:
POST /api/data/v9.2/cxxxx_reservations HTTP/1.1
Host: {service_url}
Authorization: Bearer {access token}
{
"cr7ec_reservationcode": "CRX767348",
"cr7ec_customername": "Fourth Test"
}
Now, add functionality in the UI app to display information about a guest’s previous visits.
Expanding the UI Application
The following section covers modifying the Power Apps application. The citizen developer can perform these tasks themselves.
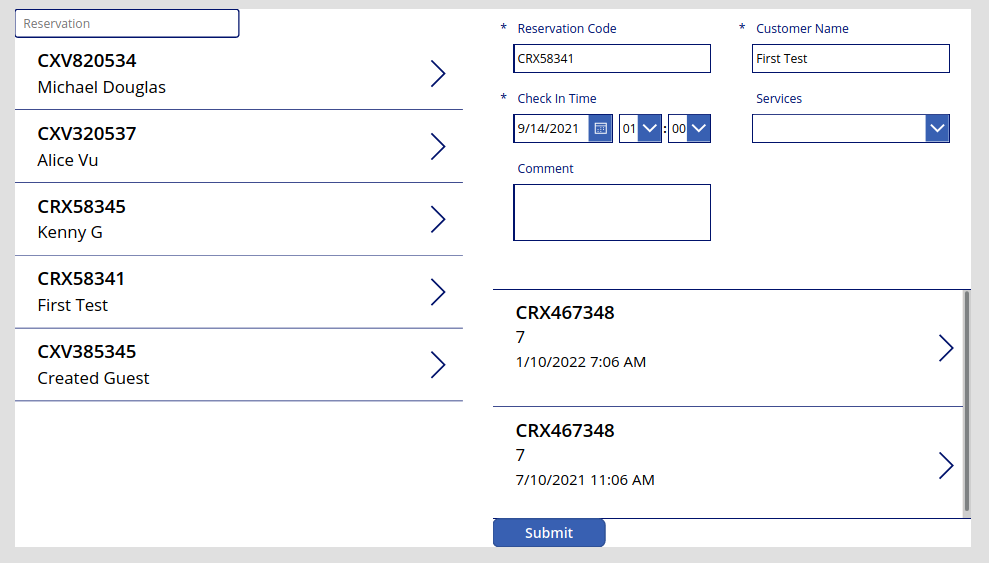
There are many options for displaying related information about a guest. In this tutorial, we’ll present them as a vertical gallery on the same screen.
This screenshot is a reminder of the existing app’s look and features:

We modify the app to look like this screenshot:
Making the Changes
First, click on the Data tab and add the Previous Visits table to the app to update the Power App.
Then, click on Tree view, select the vertical container on the right, and insert a vertical gallery inside the container.
On the new gallery, make the Data Source “Previous Visits.”
Then, choose appropriate fields and layout. For example, the screenshot above uses the “Title, Subtitle, and body” layout to display reservation code, rating, and checkout date.
This gallery will currently display all visits from all guests. Recall that the first article set a variable “selectedItem” to be the reservation the employee selects.

So, filter the gallery using selectedItem. In the Data section of the Advanced tab, change Items to the following:
Filter('Previous Visits', 'Customer Name'=selectedItem.'Customer Name')
This setting tells the gallery to only display items from the “Previous Visits” table for the same customer making the reservation.
It is more desirable to compare using IDs, but that is outside of the scope of this series. To learn more, check out Relationship in Dataverse tables.
Next Steps
In this tutorial, we saw how we can insert data into Dataverse using the Dataverse API. A citizen developer can easily add a UI to connect to the new data.
This series demonstrated how citizen developers and professional developers can work together to fulfill a business need. When an employee checks in a guest, Dataverse saves the data, and a Function app transfers the data to the SQL database. When new data enters the SQL database, a professional developer can also change the data in Dataverse using Dataverse APIs.
This fusion development approach enables everyone to focus on what they do best. The citizen developer uses their knowledge of business needs and customer service excellence to build the UI. Then, the professional developer focuses on maintaining the data integrity between the UI app and the backend.
Meanwhile, the hotel guests benefit from a more relaxed check-in process and return for a personalized experience.
The Power Apps ecosystem enables no-code and low-code citizen developers to create functional apps and helps professional developers save time to build more advanced features.
Expand this hotel reservations app with new features or create something new from scratch using Power Apps.
To learn how to accelerate foundational app development, check out The Developer’s 7-Step Guide to Low-Code App Development.