
Writing a P2P Snippet sharing Extension for Visual Studio 2010 (VSX 2010)
4.50/5 (6 votes)
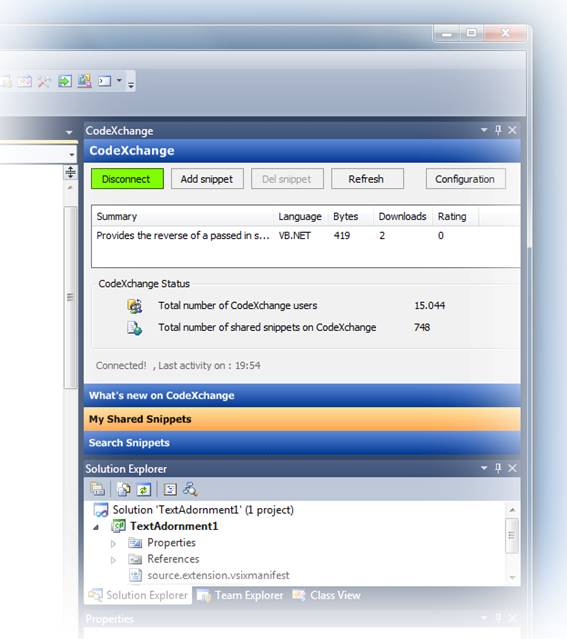
CodeXchange is a simple Visual Studio extension which allows you to create, edit and share snippets with your peers without leaving the Visual Studio 2010 IDE.
- Download CodeXchange Addin source - 1.28 MB
- Download CodeXchange Addin binary from the Visual Studio Gallery
Overview
Any modern application these days is designed with extensibility in mind. This allows developers and even the end user to replace existing pieces or add their own custom functionality.
When extending an existing application we have basically two ways of doing this: Macros and plug-ins. Macros are small interpreted programs created with scripting languages that run within applications such as Excel and PowerPoint while Plug-ins are compiled applications created against the application plug-in mechanism and have access to a rich set of APIs that enables developers to create and build new tools quickly, without having to start from scratch.
Visual Studio is no exception; it provides a very rich object model to automate tasks, add new features like project wizards, tools or even support any kind of compiler.
Introduction
Since version 2005 Visual Studio includes a code snippet feature. Snippets are small pieces of generic reusable code. They improve the developer’s efficiency and accuracy because they reduce typing and help code reuse.
Visual Studio stores your snippets on the file system ([My Documents]\Visual Studio [Version]\Code Snippets\Visual C#\My Code Snippets to be exact) using xml syntax. That’s fine but if you are like me you probably have more than one development machine which make a little more complex to maintain your snippets synchronized between your computers and almost impossible to share it with your friends or coworkers. Wouldn’t be great to have a centralized database so you could have all your snippets available all the time everywhere? If your answer is yes CodeXchange is for you!
For those of you who don't know CodeXchange you can visit its website at www.codexchange.org and learn what is all about. All software is free so this is not some kind of cheap commercial.
Our extension will be a very simple CodeXchange client based on its public web services located at http://www.codexchange.org/api/v1/CodeXchangeservice.asmx. Because the purpose of this article is building the extension I have placed all the irrelevant client code on a different assembly which exposes a Windows Forms 2.0 UserControl that will be hosted on a Visual Studio tool window.
Background
This extension is an improvement over a previous addin I wrote for Visual Studio 2005, In this article I will document the porting effort to Visual Studio 2010 as well as the changes required to take advantage of the new features introduced in the last iteration of Visual Studio.
In this article we will learn how to:
- Use the ‘Visual Studio Package’ project wizard to create a skeleton extension
- Provide the appropriate metadata
- Create a Toolbox window and host a Windows Forms control on it
- Expose new menu commands
- Add menu items to the ‘Code window’ context menu
- Add toolbox items to the Visual Studio 2010 toolbox
- Package the extension as a VSIX package
- Publish our extension in the new Visual Studio Gallery
Prerequisites: Before we start coding
Before getting started you will have to download and install all the required tools, it includes of course Visual studio 2010, you can download the RC from here http://msdn.microsoft.com/en-us/vstudio/dd582936.aspx
You will also need the Visual Studio 2010 SDK which includes project templates, documentation, samples and all the tools required to build and deploy Visual Studio extensions , download it from here http://www.microsoft.com/downloads/details.aspx?FamilyID=4659f71d-4e58-4dcd-b755-127539e21147&displaylang=en
Creating the project file step by step
The SDK will install several new project templates [1]:
- Editor Viewport adornment: The editor classifier allows the text of the edit to be interacted with and changed in a number of ways. The logic behind what text is changed is totally at the discretion of the extension developer. The changing of the text can be something as simple as changing the color, to changing the size, opacity, etc.
- Editor Classifier: The editor classifier allows the text of the edit to be interacted with and changed in a number of ways.
- Editor Margin: Similar to the Viewport Adornment, except the editor is aware of its presence, and handles it with scrollbars accordingly. Very similar to the WPF DockPanel in that the content must be placed on the Left, Right, Top, or Bottom.
- Editor Text Adornment Very similar to the editor classifier in that you can interact with the text of the editor. The result, however, is a WPF UIElement that is rendered in the IDE. This can be placed anywhere relative to the location of the text.
- Visual Studio Package: is the most complete plugin type, and it lets you extend just about anything at all in VS.
Let’s get started!
- On the File menu, point to New, and then click Project.
- In the New Project dialog box, expand Other Project Types, and then click Extensibility.
- In the Templates pane click Visual Studio Studio Package.
- In the Location box, type the file path for your new Extension.
- In the Name box, type the name for the extension and then click OK to start the wizard.

Choose your preferred language and click next, currently extensions can be written using C#, Visual Basic or Visual C++ only.

This is the basic information about our extension. This information will be used to appear in the about dialog box and will be persisted on the registry

This is a important step, We will check the “Menu Command” and “Tool Window” option which will generate the basic skeleton for adding new menus to Visual Studio as well as floating tool window , by default the tool window will be hosting a WPF user control , later we will modify the code to host our Windows Forms UserControl.

After the last step of the Package wizard a new project will be created and ready for you to customize. When you expand the ‘References’ node you will have an approximate idea about the amount of classes, interfaces and services Visual Studio expose. Version after version more stuff is nicely wrapped in .NET friendly types, despite large parts of the IDE are being rewritten in managed code (like for example the new WPF based code editor) sometimes Visual Studio shows its COM heritage and requires dealing with COM style interfaces.

The first thing you should do is edit the VSIX manifest file which is a xml file describing your extension, thankfully a nice visual editor will make the process easier. Just double click the source.extension.vsixmanifest from the Solution Explorer. I won’t go into too much detail about each field.

- Icon - The image that will be shown in the VS Extension Manager
- Preview Image - A preview image that will be shown in the VS Extension Manager
- Version - VS will prompt to automatically update (download and install) your extension if this field is incremeted
Adding and managing menus
Our extension will be registering 4 different menu commands:
- cmdidCodeXchange : Will be added to the View -> Other windows menu and will show/hide the CodeXchange tool window
- cmdidInsertFromCodeXchange : Will be added to the ‘Code Window’ context menu and will connect to the online repisitory
- cmdidContributeToCodeXchange : Insert from codexchange
- cmdidConnectToCodeXchange : Contribute to codexchange
To add new menu commands first of all you must edit the PkgCmdID.cs generated by the project wizard, add a new unique entry for every command:
static class PkgCmdIDList
{

    public const uint cmdidCodeXchange =    0x101;
    public const uint cmdidInsertFromCodeXchange = 0x102;
    public const uint cmdidContributeToCodeXchange = 0x103;
    public const uint cmdidConnectToCodeXchange = 0x104;

};
Next step will be adding and defining our menus in the .vsct file. The Visual Studio Command Table (.Vsct) file is a xml based file that describes the set of command exposed by the VSPackage.In the solution explorer double click Sand.Services.CodeXchange.VS2010Addin.vsct and in the <Symbols> section add one <IDSymbol> element for every command, The value must match those we used in PkCmdID.cs
<GuidSymbol name="guidCodeXchangeVS2010AddinCmdSet" value="{b0b84c23-3315-457c-b057-8457b5344521}">
  <IDSymbol name="MyMenuGroup" value="0x1020" />
  <IDSymbol name="cmdidCodeXchange" value="0x0101" />
  <IDSymbol name="cmdidInsertFromCodeXchange" value="0x0102" />
  <IDSymbol name="cmdidContributeToCodeXchange" value="0x0103" />
  <IDSymbol name="cmdidConnectToCodeXchange" value="0x0104" />
</GuidSymbol>
Now, we need to group 3 of our 4 commands to show them on the ‘Code window’ context menu, the other command will be shown in the View->Other windows sub-menu, find the <Groups> section and add the following:
<Groups>

  <Group guid="guidCodeXchangeVS2010AddinCmdSet" id="MyMenuGroup" priority="0x0600">
    <Parent guid="guidSHLMainMenu" id="IDM_VS_CTXT_CODEWIN"/>
  </Group>

</Groups>
Add the commands and configure them:
<Button guid="guidCodeXchangeVS2010AddinCmdSet" id="cmdidCodeXchange" priority="0x0100" type="Button">
  <Parent guid="guidSHLMainMenu" id="IDG_VS_WNDO_OTRWNDWS1"/>
  <Icon guid="guidImages" id="bmpPic1" />
  <Strings>
    <CommandName>cmdidCodeXchange</CommandName>
    <ButtonText>CodeXchange</ButtonText>
  </Strings>
</Button>

<Button guid="guidCodeXchangeVS2010AddinCmdSet" id="cmdidInsertFromCodeXchange" priority="0x0100" type="Button">
  <Parent guid="guidCodeXchangeVS2010AddinCmdSet" id="MyMenuGroup"/>
  <Icon guid="guidImages" id="bmpPic2" />
  <Strings>
    <CommandName>cmdidInsertFromCodeXchange</CommandName>
    <ButtonText>Insert snippet from CodeXchange</ButtonText>
  </Strings>
</Button>

<Button guid="guidCodeXchangeVS2010AddinCmdSet" id="cmdidContributeToCodeXchange" priority="0x0100" type="Button">
  <Parent guid="guidCodeXchangeVS2010AddinCmdSet" id="MyMenuGroup"/>
  <Icon guid="guidImages" id="bmpPic3" />
  <Strings>
    <CommandName>cmdidContributeToCodeXchange</CommandName>
    <ButtonText>Contribute snippet to CodeXchange</ButtonText>
  </Strings>
</Button>

<Button guid="guidCodeXchangeVS2010AddinCmdSet" id="cmdidConnectToCodeXchange" priority="0x0100" type="Button">
  <Parent guid="guidCodeXchangeVS2010AddinCmdSet" id="MyMenuGroup"/>
  <Icon guid="guidImages" id="bmpPic4" />
  <Strings>
    <CommandName>cmdidConnectToCodeXchange</CommandName>
    <ButtonText>Connect to CodeXchange</ButtonText>
  </Strings>
</Button>
And finally map our command in C# code so we can enable or disable them depending on the extension state and handling its execution:
/* Extension menus */
OleMenuCommand menuShowToolWin = null;
OleMenuCommand menuInsertFromCodeXchange = null;
OleMenuCommand menuContributeToCodeXchange = null;
OleMenuCommand menuConnectToCodeXchange = null;
// Add our command handlers for menu (commands must exist in the .vsct file)
OleMenuCommandService mcs = GetService(typeof(IMenuCommandService)) as OleMenuCommandService;
if (null != mcs)
{
    // Create the command for the tool window
    CommandID commandID = null;

    commandID = new CommandID(GuidList.guidCodeXchangeVS2010AddinCmdSet, (int)PkgCmdIDList.cmdidCodeXchange);
    menuShowToolWin = new OleMenuCommand(
        ExecuteMenuCommandCallback,
        ChangeCallback,
        BeforeStatusQueryCallback,
        commandID);

    /* Add the show/hide tool window command */
    mcs.AddCommand(menuShowToolWin);

    commandID = new CommandID(GuidList.guidCodeXchangeVS2010AddinCmdSet, (int)PkgCmdIDList.cmdidInsertFromCodeXchange);
    menuInsertFromCodeXchange = new OleMenuCommand(
        ExecuteMenuCommandCallback,
        ChangeCallback,
        BeforeStatusQueryCallback,
        commandID);

    /* Add the 'Insert from CodeXchange' command */
    mcs.AddCommand(menuInsertFromCodeXchange);

    commandID = new CommandID(GuidList.guidCodeXchangeVS2010AddinCmdSet, (int)PkgCmdIDList.cmdidContributeToCodeXchange);
    menuContributeToCodeXchange = new OleMenuCommand(
        ExecuteMenuCommandCallback,
        ChangeCallback,
        BeforeStatusQueryCallback,
        commandID);

    /* Add the 'Contribute to CodeXchange' command */
    mcs.AddCommand(menuContributeToCodeXchange);

    commandID = new CommandID(GuidList.guidCodeXchangeVS2010AddinCmdSet, (int)PkgCmdIDList.cmdidConnectToCodeXchange);
    menuConnectToCodeXchange = new OleMenuCommand(
        ExecuteMenuCommandCallback,
        ChangeCallback,
        BeforeStatusQueryCallback,
        commandID);

    /* Add the 'Connect to CodeXchange' command */
    mcs.AddCommand(menuConnectToCodeXchange);
}
Not all commands will be always available, for example, “insert from codexchange” does not make sense if we are not really connected to the online database. To enable/disable a command we will use the BeforeStatusQueryCallback, this callback is executed every time the IDE requests the current state of the command.
private void BeforeStatusQueryCallback(object sender, EventArgs e)
{
    OleMenuCommand command = sender as OleMenuCommand;

    if (command.CommandID.ID == (int)PkgCmdIDList.cmdidCodeXchange)
    {
        // This command is always available
        command.Enabled = true;
    }

    if (command.CommandID.ID == (int)PkgCmdIDList.cmdidInsertFromCodeXchange)
    {
        // This command is only available if we are logged to the online repository
        command.Visible = command.Enabled = toolwndCodeXchange.CodeXchange.IsConnected;
    }

    if (command.CommandID.ID == (int)PkgCmdIDList.cmdidConnectToCodeXchange)
    {
        // This command is only available if we are logged to the online repository
        command.Visible = command.Enabled = !toolwndCodeXchange.CodeXchange.IsConnected;
    }

    if (command.CommandID.ID == (int)PkgCmdIDList.cmdidContributeToCodeXchange)
    {
        // This command is only available if we are logged to the online repository
        // and some text is selected on the active editor
        if (toolwndCodeXchange.CodeXchange.IsConnected)
        {
            //check if any text is highlighted or disable the menu
            if (GetSelectedText().Length > 0)
                command.Enabled = true;
            else
                command.Enabled = false;
        }
        else
        {
            command.Enabled = false;
        }
    }
}
Handling command execution
private void ExecuteMenuCommandCallback(object sender, EventArgs e)
{
    OleMenuCommand command = sender as OleMenuCommand;

    if (command.CommandID.ID == (int)PkgCmdIDList.cmdidCodeXchange)
    {
        // Show the CodeXchange VS tool window
        ShowToolWindow();
    }

    if (command.CommandID.ID == (int)PkgCmdIDList.cmdidConnectToCodeXchange)
    {
        if (toolwndCodeXchange.CodeXchange.IsConnected == false)
            toolwndCodeXchange.CodeXchange.Connect();
    }

    if (command.CommandID.ID == (int)PkgCmdIDList.cmdidContributeToCodeXchange)
    {
        // Get active document currently selected text
        string selectedText = GetSelectedText();

        toolwndCodeXchange.CodeXchange.AddCodeSnippet(selectedText);
    }

    if (command.CommandID.ID == (int)PkgCmdIDList.cmdidInsertFromCodeXchange)
    {
        // Ensure the tool window is currently visible
        ShowToolWindow();

        // Show search user interface
        toolwndCodeXchange.CodeXchange.SwithToSearchMode();
    }
}
Manipulating the source code editor
CodeXchange is about inserting code from the online repository to our local source code files. When the user wants to paste a snippet to the currently opened document we will open a new UndoContext. UndoContexts are a group of operations represented as a single transaction. Once we have the undo context opened we will create a new EditPoint and insert the code. Once we are done we will automatically indent the code with the SmartFormat method and the last step will be closing our previously created UndoContext.
//Check to see if UndoContext object is already open.
if (dte2.UndoContext.IsOpen == true)
    dte2.UndoContext.Close();

// Open a new undo context
dte2.UndoContext.Open("Snippet inserted from CodeXchange", true);

// remeber we opened an undo context
undoContext = true;

EditPoint start = tsSelection.TopPoint.CreateEditPoint();
EditPoint endpt = tsSelection.BottomPoint.CreateEditPoint();

//Insert source code to document....
endpt.Insert(
    System.Environment.NewLine +
    e.Snippet.Code +
    System.Environment.NewLine);
endpt.StartOfDocument();
start.EndOfDocument();
endpt.SmartFormat(start);

//If UndoContext was already open, don't close it.
if (undoContext == true)
{
    //Close the UndoContext object to commit the changes.
    dte2.UndoContext.Close();
}
Creating the tool window
The project wizard has created a class inheriting from ToolWindowPane which is the base class for tool windows inside the IDE. We will modify the constructor to create a new instance of our CodeXchange user control and will return an instance of it by overriding the Window public property from the base class ToolWindowPane.
public class CodeXchangeToolWindow : ToolWindowPane
{
    private CodeXChangeControl _control;

    ///
    /// Standard constructor for the tool window.
    ///
    public CodeXchangeToolWindow() :
        base(null)
    {
        _control = new CodeXChangeControl();
    }

    ///
    /// This property returns the handle to the user control that should
    /// be hosted in the Tool Window.
    ///
    override public IWin32Window Window
    {
        get { return (IWin32Window)_control; }
    }
}
We are done; remember that tool windows are loaded by demand, an instance of our control will be created the first time the user requires the tool window to be shown.
Adding toolbox items to the toolbox
Having access to your snippet list by using the CodeXchange tool window is the way the extension was designed to be used, in fact is the only way to do things like preview, delete or edit your published code snippets, tool windows are great but sometimes we hide them to save space. To address this situation we will be adding shortcuts to the snippets inside the toolbox. The user should be able to insert any of them just by dragging it on the source file.
// Get a refence to the IVsToolbox interface.
IVsToolbox  tbs = GetService(typeof(IVsToolbox)) as IVsToolbox;

// For each snippet add a toolbox item
foreach (Snippet snippet in toolwndCodeXchange.CodeXchange.UserContributedSnippets)
{
    TBXITEMINFO[] itemInfo = new TBXITEMINFO[1];
    OleDataObject tbItem = new OleDataObject();

    itemInfo[0].bstrText = snippet.Summary;
    itemInfo[0].dwFlags = (uint)__TBXITEMINFOFLAGS.TBXIF_DONTPERSIST;

    tbItem.SetText(snippet.Code, TextDataFormat.Text);

    tbs.AddItem(tbItem, itemInfo, "My CodeXchange Snippets");
}
The final result:

Note: The CodeXchange Snippets toolbox strip will be only visible when the active document is a text based editor.
Testing and debugging your Visual Studio 2010 extension
The first thing you will notice when you try to run your newly created project is that a new instance of Visual Studio is launched. Your extension will be automatically installed into this new instance called "Experimental instance" which is basically an isolated copy of Visual Studio with its own extensions, settings etc ... This will allow you to test your project without breaking your main development environment. The debugging session will end as soon as you close it.
Packaging your extension as a VSIX
In previous versions of Visual Studio addins were installed from a msi installation package. Visual Studio 2010 introduces a new techonology for deploying packages called VSIX. A VSIX file is just a standard zip file with the extension (.vsix) that conforms to the Open Package Convention http://msdn.microsoft.com/en-us/magazine/cc163372.aspx . It contains the extension and all the metadata, resource files, images and manifest files required by Visual Studio to install and manage the extension. When you build the project Visual Studio will generate it for you.
Sharing your extension in the Visual Studio gallery
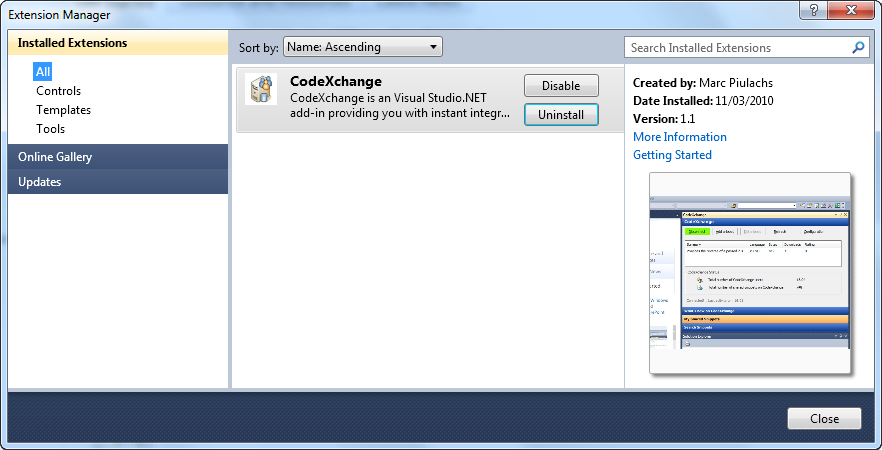
Sharing your extension is as easy as publishing the .vsix file we just created, to install your extension the user will have to double click and follow the wizard. Visual Studio 2010 includes a new feature called ‘Extension manager’ which will help you to install, update and remove extensions with ease. Extensions can also be downloaded from within the IDE using the new visual studio gallery.
For more detailed information about the new Visual Studio gallery visit: http://visualstudiogallery.msdn.microsoft.com/en-us/
The CodeXchange Extension can also be downloaded from the Visual studio Gallery: http://visualstudiogallery.msdn.microsoft.com/en-us/3b9d5e70-055c-4228-abc1-3723cd5f78f2
Ideas and future improvements
No project is perfect and this one is not the exception, there’s always room for improvement and here is a list of things that are currently missing or could be improved:
- Implement a new eye candy interface for the CodeXchange control using WPF inset of Windows Forms 2.0
- Better integration with the existing Visual Studio snippet architecture.
- Implement a local storage as a snippet cache that allows working offline
Conclusions
Visual Studio 2010 is a big improvement over previous versions. With its huge and mature extensibility model provides even greater opportunities for creating rich powerful extensions and tools.
The CodeXchange sample client presented with this article does not pretend to implement the complete command set providing instead support for the basic features. You can use this code to create your own customized client or use it as reference and guide for your own projects. Have fun!
References
- Visual Studio 2010 Extensibility Development Center (http://msdn.microsoft.com/en-us/vsx/default.aspx)
- MSDN Forums (http://social.msdn.microsoft.com/Forums/en-US/category/visualstudioprerelease)
- Visual Studio 2010 Extensions with a little MEF by Joe Seymour
History
* Initial draft (V1.0) 3/10/2010
Acknowledgments
Thanks to DotNetPark for generously hosting the codexchange website and database
Final notes
English is not my native language, so please excuse any mistakes. This is my first article for CodeProject, so any suggestions and/or feedback will be appreciated. Thanks for reading till here! If you can add anything or have suggestions and/or tips, please post a message below and if you like, don't forget to vote for it. :)