
Some new features in Visual Studio.NET 2005
4.22/5 (20 votes)
Aug 19, 2004
6 min read
204045
1918
An article on the new features in Visual Studio.NET 2005
Introduction
Since involving in Microsoft Visual Studio .NET 2005 Beta 1 volunteer test program, I found that there are some new powerful features and functionality in Visual Studio.NET 2005. All these features are based on Microsoft Visual Studio .NET 2005 Beta 1 release, and subjected to change.
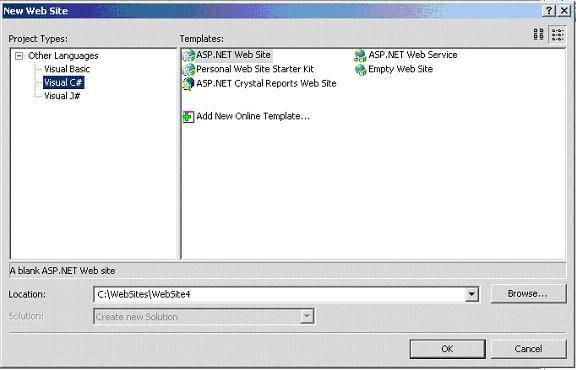
1. New Project creation category
In VS.NET 2005 Beta 1, the creation of new project is separated as Web Site for Web-based application and Project for non Web-based application. Figure 1, 2, 3 shows the screen shot of the new project creation wizard. Comparing to the previous Visual Studio.NET 2002/2003, which the project creation wizard mixes up web-based and non web-based application projects together, this feature provides a clear interface for the developer to create their own specific type project more easily.
Figure1 The screen shot of creating a new project in VS.NET 2005 IDE

Figure2 The screen shot of creating a new non web-based project in VS.NET 2005 IDE

Figure3 The screen shot of creating a new web-based project in VS.NET 2005 IDE
2. The new class diagram view in the Visual Studio.NET 2005 IDE
In Visual Studio.NET 2005 IDE, a new feature of class diagram view is provided for the developer easily to take the architecture, design and review jobs. The developer can easily add class into the class diagram by right-clicking the class in class view tab window. Figure 4 shows the feature of class diagram. The class diagram information can be saved in class diagram file (.cd file), which is XML syntax file and currently only can be opened and displayed correctly by Visual Studio.NET 2005 IDE.
The following is a sample content of .cd file.
<?xml version="1.0" encoding="utf-8"?>
<Diagram xmlns:xsi="http://www.w3.org/2001/XMLSchema-instance"
xmlns:xsd=http://www.w3.org/2001/XMLSchema
MajorVersion="1" MinorVersion="1"
xmlns="http://www.microsoft.com/VisualStudio/EnterpriseTools/
ClassDesigner/V1.1/DiagramSchema.xsd">
  <View FilterFieldProperty="false" LastOpened="true" Name="Main">
    <AbsoluteBounds X="0" Y="0" Height="8.5" Width="11" />
    <Font Name="Tahoma" Size="0.1145833358168602" />
    <Class Collapsed="true">
      <AbsoluteBounds X="0.75" Y="0.75" Height="0.45" Width="1.5" />
      <TypeIdentifier>
        <FullName>DGDemo.DGDemo</FullName>
        <FileName>DGDemo.cs</FileName>
        <HashCode>AAAAAAAAACAAEAAAAACBAAACAAAgAAAAAAAABAAAAAA=</HashCode>
      </TypeIdentifier>
    </Class>
    <Class Collapsed="true">
      <AbsoluteBounds X="0.75" Y="2.5" Height="0.45" Width="1.5" />
      <TypeIdentifier>
        <FullName>DGDemo.XComboBoxColumn</FullName>
        <FileName>XComboBoxColumn.cs</FileName>
        <HashCode>AAAABBgAAAAAEQAEAQAAAQAiAAAAAAAAAAIAAACBAAA=</HashCode>
      </TypeIdentifier>
    </Class>
    <Class Collapsed="true">
      <AbsoluteBounds X="3.5" Y="0.75" Height="0.45" Width="1.5" />
      <TypeIdentifier>
        <FullName>DGDemo.XTextBoxColumn</FullName>
        <FileName>XTextBoxColumn.cs</FileName>
        <HashCode>AQAAABAAAAAAAQAAAAAACAAiAAAAAAAAAAAAAAAAAAA=</HashCode>
      </TypeIdentifier>
    </Class>
  </View>
</Diagram>
Figure4 The screen shot of class diagram

3. The separation of program “main” entry from the main form class in C# Windows application
In C# Windows Application project, Visual Studio.NET 2005 defines the program static entry “main” function in a static “Program” class, removed it from the main “Form” class. The static “Program” class is saved normally in Program.cs. This is a brand new feature, which made the code more organized, clearly, effectively and easy to maintain. Inside the new “Program” class, a couple of new (default) application properties are automatically generated by the IDE for the application, such as “EnableVisualStyles” and “EnableRTLMirroring”. “EnableVisualStyles” enables Windows XP visual styles for the application. “EnableRTLMirroring” activates mirroring of the application automatically. The following code shows the difference of “main” entry in source code created by VS.NET 2003 and VS.NET 2005 Beta 1
//(VS.NET 2003 code)

namespace DGDemo
{
    public class DGDemo : System.Windows.Forms.Form
    {
            ………
            ………
            ………
        [STAThread]
        static void Main()
        {
            Application.Run(new DGDemo());
        }
    }
}
//(VS.NET 2005 Beta 1 code)
namespace WindowsApplication1
{
static class Program
{
[STAThread]
static void Main()
{
Application.EnableVisualStyles();
Application.EnableRTLMirroring();
Application.Run(new Form1());
}
}
}
4. Partial Class Definition in C# and XXX.Design.cs file in C# Windows project
The “partial” key word in C# class definition is not existed in
previous Visual Studio.NET 2002/2003. This kind new class definition can split
the definition of a class (or a struct, or an interface) over two or more source
files. Every source file contains a part of the class definition, and when the
application is compiled, all parts are combined together. Programmer can use
this new feature on large projects, spreading a class over separate files allows
multiple programmers to work on it simultaneously. This will make team working
more effectively and easier to debug. When working with automatically generated
source, code can be added to the class without having to re-create the source
file. Visual Studio uses this approach when creating Windows Forms, Web Service
wrapper code and so on. The programmer can create code that uses these classes,
without having to edit the file created by Visual Studio. The following shows
the sample code with regard to “partial” key word.
namespace WindowsApplication1
{
    partial class Form1 : Form
    {
        public Form1()
        {
            InitializeComponent();
             }
    }
}
Another related new feature in C# Windows project is the xxx.design.cs
file for UI design layout. In Visual Studio.NET 2005 IDE, for the C# Windows
application, all source code related to UI deisgn layout can be automatically
generated by the IDE and put in the xxx.design.cs; the xxx.design.cs file is
hidden from the IDE Project Solution Explorer window, and the source code of
xxx.design.cs can not be viewed directly from IDE. The following is the source
code of Form1.Designer.cs generated by VS.NET 2005: // The source code of Form1.Designer.cs
namespace WindowsApplication1
{
partial class Form1
{
/// <summary>
/// Required designer variable.
/// </summary>
private System.ComponentModel.IContainer components = null;
/// <summary>
/// Clean up any resources being used.
/// </summary>
protected override void Dispose(bool disposing)
{
if (disposing && (components != null))
{
components.Dispose();
}
base.Dispose(disposing);
}
this.leftRaftingContainer =
new System.Windows.Forms.RaftingContainer();
this.rightRaftingContainer =
new System.Windows.Forms.RaftingContainer();
this.topRaftingContainer =
new System.Windows.Forms.RaftingContainer();
this.bottomRaftingContainer =
new System.Windows.Forms.RaftingContainer();
this.dataGridView1 = new System.Windows.Forms.DataGridView();
this.dataGridViewTextBoxColumn1 =
new System.Windows.Forms.DataGridViewTextBoxColumn();
this.dataGridViewTextBoxColumn2 =
new System.Windows.Forms.DataGridViewTextBoxColumn();
this.dataGridViewCheckBoxColumn1 =
new System.Windows.Forms.DataGridViewCheckBoxColumn();
((System.ComponentModel.ISupportInitialize)(
this.leftRaftingContainer)).BeginInit();
((System.ComponentModel.ISupportInitialize)(
this.rightRaftingContainer)).BeginInit();
((System.ComponentModel.ISupportInitialize)(
this.topRaftingContainer)).BeginInit();
((System.ComponentModel.ISupportInitialize)(
this.bottomRaftingContainer)).BeginInit();
((System.ComponentModel.ISupportInitialize)(
this.dataGridView1)).BeginInit();
this.SuspendLayout();
//
// leftRaftingContainer
//
this.leftRaftingContainer.Dock =
System.Windows.Forms.DockStyle.Left;
this.leftRaftingContainer.Name = "leftRaftingContainer";
//
// rightRaftingContainer
//
this.rightRaftingContainer.Dock =
System.Windows.Forms.DockStyle.Right;
this.rightRaftingContainer.Name = "rightRaftingContainer";
//
// topRaftingContainer
//
this.topRaftingContainer.Dock =
System.Windows.Forms.DockStyle.Top;
this.topRaftingContainer.Name = "topRaftingContainer";
//
// bottomRaftingContainer
//
this.bottomRaftingContainer.Dock =
System.Windows.Forms.DockStyle.Bottom;
this.bottomRaftingContainer.Name = "bottomRaftingContainer";
//
// dataGridView1
//
this.dataGridView1.Columns.Add(this.dataGridViewTextBoxColumn1);
this.dataGridView1.Columns.Add(this.dataGridViewTextBoxColumn2);
this.dataGridView1.Columns.Add(this.dataGridViewCheckBoxColumn1);
this.dataGridView1.Dock = System.Windows.Forms.DockStyle.Fill;
this.dataGridView1.Location = new System.Drawing.Point(0, 0);
this.dataGridView1.Name = "dataGridView1";
this.dataGridView1.Size = new System.Drawing.Size(388, 145);
this.dataGridView1.TabIndex = 16;
//
// dataGridViewTextBoxColumn1
//
this.dataGridViewTextBoxColumn1.HeaderText = "First Name";
this.dataGridViewTextBoxColumn1.Name = "FName";
//
// dataGridViewTextBoxColumn2
//
this.dataGridViewTextBoxColumn2.HeaderText = "Last Name";
this.dataGridViewTextBoxColumn2.Name = "LName";
//
// dataGridViewCheckBoxColumn1
//
dataGridViewCellStyle1.Alignment =
System.Windows.Forms.DataGridViewContentAlignment.MiddleCenter;
this.dataGridViewCheckBoxColumn1.DefaultCellStyle =
dataGridViewCellStyle1;
this.dataGridViewCheckBoxColumn1.HeaderText = "Hired";
this.dataGridViewCheckBoxColumn1.Name = "Hired";
//
// Form1
//
this.AutoScaleBaseSize = new System.Drawing.Size(5, 13);
this.ClientSize = new System.Drawing.Size(388, 145);
this.Controls.Add(this.dataGridView1);
this.Controls.Add(this.leftRaftingContainer);
this.Controls.Add(this.rightRaftingContainer);
this.Controls.Add(this.topRaftingContainer);
this.Controls.Add(this.bottomRaftingContainer);
this.Name = "Form1";
this.Text = "Form1";
this.Load += new System.EventHandler(this.Form1_Load);
((System.ComponentModel.ISupportInitialize)(
this.leftRaftingContainer)).EndInit();
((System.ComponentModel.ISupportInitialize)(
this.rightRaftingContainer)).EndInit();
((System.ComponentModel.ISupportInitialize)(
this.topRaftingContainer)).EndInit();
((System.ComponentModel.ISupportInitialize)(
this.bottomRaftingContainer)).EndInit();
((System.ComponentModel.ISupportInitialize)(
this.dataGridView1)).EndInit();
this.ResumeLayout(false);
this.PerformLayout();
}
#endregion
private System.Windows.Forms.RaftingContainer leftRaftingContainer;
private System.Windows.Forms.RaftingContainer rightRaftingContainer;
private System.Windows.Forms.RaftingContainer topRaftingContainer;
private System.Windows.Forms.RaftingContainer bottomRaftingContainer;
private System.Windows.Forms.DataGridView dataGridView1;
private System.Windows.Forms.DataGridViewTextBoxColumn
dataGridViewTextBoxColumn1;
private System.Windows.Forms.DataGridViewTextBoxColumn
dataGridViewTextBoxColumn2;
private System.Windows.Forms.DataGridViewCheckBoxColumn
dataGridViewCheckBoxColumn1;
}
}
5. DataGridView component
DataGridView is a
brand new control introduced in Visual Studio.NET 2005 so that the data table
presentation feature is much easier to be implemented in C# Windows application.
In previous Visual Studio.NET 2002/2003, the DataGrid control is
not easy to be used in C# Windows application, the DataGrid control
object with sophisticated UI features has to be created manually in the Form
source code, the following code shows the source code of a datagraid object with
editing and dropdown list feature in a Form created within Visual Studio.NET
2003 //
// The Datagid demo sample code created with VS.NET 2003
//
public class DGDemo : System.Windows.Forms.Form
{
private System.Windows.Forms.DataGrid MydataGrid;
private System.Data.DataSet MyDataSet;
private System.Windows.Forms.DataGridTableStyle MyDGStyle;
---
---
public DGDemo()
{
---
---
createDataGrid();
}
---
---
private void CreateDataGrid()
{
MyDataSet = new DataSet("MyDataSet");
// Create DataTable.
DataTable myTable = new DataTable("PetInfo");
// Create two columns, and add them to the table.
DataColumn cFirst = new DataColumn("First Name", typeof(string));
DataColumn cLast = new DataColumn("Last Name", typeof(string));
myTable.Columns.Add(cFirst);
myTable.Columns.Add(cLast);
// Add the table to the DataSet.
MyDataSet.Tables.Add(myTable);
// Populate the tables.
DataRow newRow1;
newRow1 = myTable.NewRow();
newRow1["First Name"] = "Black1";
newRow1["Last Name"] = "Bear1";
myTable.Rows.Add(newRow1);
DataRow newRow2;
newRow2 = myTable.NewRow();
newRow2["First Name"] = "Black2";
newRow2["Last Name"] = "Bear2";
myTable.Rows.Add(newRow2);
DataRow newRow3;
newRow3 = myTable.NewRow();
newRow3["First Name"] = "Black3";
newRow3["Last Name"] = "Bear2";
myTable.Rows.Add(newRow3);
DataGridColumnStyle GridFNameColumn;
DataGridColumnStyle GridLNameColumn;
MyDGStyle = new DataGridTableStyle();
MyDGStyle.MappingName = "PetInfo";
CurrencyManager curMgr =
(CurrencyManager)this.BindingContext[MyDataSet, "PetInfo"];
GridFNameColumn = new XTextBoxColumn();
((XTextBoxColumn)GridFNameColumn).Initialize();
GridFNameColumn.MappingName = "First Name";
GridFNameColumn.HeaderText = "First Name";
GridFNameColumn.Width = 140;
MyDGStyle.GridColumnStyles.Add(GridFNameColumn);
GridLNameColumn = new XComboBoxColumn();
//((XComboBoxColumn)GridLNameColumn).Initialize();
((XComboBoxColumn)GridLNameColumn).AddItemString("BigBear");
((XComboBoxColumn)GridLNameColumn).AddItemString("SmallBear");
((XComboBoxColumn)GridLNameColumn).AddItemString("BearBoy");
((XComboBoxColumn)GridLNameColumn).AddItemString("BearGril");
((XComboBoxColumn)GridLNameColumn).AddItemString("BearBaby");
((XComboBoxColumn)GridLNameColumn).AddItemString("BearSister");
((XComboBoxColumn)GridLNameColumn).Initialize();
GridLNameColumn.MappingName = "Last Name";
GridLNameColumn.HeaderText = "Last Name";
GridLNameColumn.Width = 140;
MyDGStyle.GridColumnStyles.Add(GridLNameColumn);
MyDGStyle.AllowSorting = true;
MyDGStyle.RowHeadersVisible = true;
MydataGrid.TableStyles.Add(MyDGStyle);
MydataGrid.SetDataBinding(MyDataSet,"PetInfo");
((XComboBoxColumn)GridLNameColumn).AttachParentObject(MydataGrid, curMgr);
}
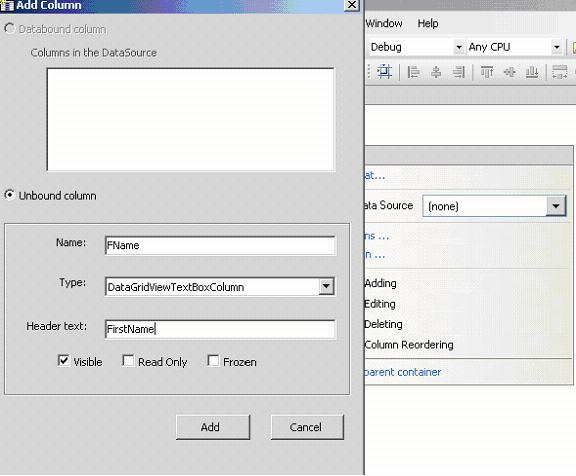
In the new VS.NET 2005, DataGridView control provides a visual
table layout for displaying data. All datagridview control creating works are
just dragging and dropping into the IDE design layout window. Figure5 The screen
shot of dragging Datagridview control from toolbox

Datagridview control

Datagridview control's column type editing


6. Some other new UI controls
MaskedTextBoxThis new control can verify user’s input without custom validation logic and can be applied to decide whether accept or reject user’s input.MenustripThis control defines menu system for a form.FlowLayoutPanelandTableLayoutPanelIn VS.NET 2005 Beta 1, the Panel control become two separate parts ofFlowLayoutPanelandTableLayoutPanel.FlowLayoutPanelcontrol can define its contents in flow direction, or you can useTableLayoutPanelcontrol can define its contents in table direction, a grid with rows and columns.DataConnectorThis control will provide data connecting to data source.DataNavigatorThis is a data navigation control which can be put on the form interface.SoundPlayerThis control can play a sound from a .wav file.ActiveDocumentHostThis control can host an active document, such as MS Word document, Excel worksheet, Sound, Visual drawing, Media clip, Video clip, MS Photo editor, MS PowerPoint, WordPad etc.PropertyGridThis control provides a user interface to browse the properties of an object.WebBrowserThis control can browse web page or provide integrated HTML-based user assistance.