
WPF MVVM step by step (Basics to Advance Level)
4.81/5 (198 votes)
An article presented by ShivPrasad Koirala which covers complete step by step tutorial on WPF MVVM Architecture like Leveraging PRISM, Simple 3 layer example and GLUE code problem, Adding actions, Decoupling actions and so on.
Simple 3 layer example and GLUE code problem
Level 1:- Simplest MVVM example – Moving behind code to a class
Level 2:- Adding bindings– moving to ZERO behind code
Level 3:- Adding actions and “INotifyPropertyChanged” interface
Level 4:- Decoupling actions from view model
Demonstration of WPF MVVM in video format
Introduction
Life is all about evolution we start as kid’s, learn along the way to become mature adults. The same holds true for software architecture, you start with a base structure and then evolve as per requirements and situations.
If you ask any .NET developer what is the minimum basearchitecture,the first thing which flashes is “3 LAYER ARCHITECTURE”. In this architecture we divide the project in to 3 logical pieces UI , business layer and data access layer. Each of these layers handles and owns certain responsibility.

UI handles the presentation responsibility, business layer handles validations and data access layer handles SQL. The advantages of 3 layer architecture are as follows:-
- Contained changes: -Changes in one layer do not replicate across other layers.
- Reusability: -Increased reusability because each layers are separate, self-contained and individual entities.
MVVM is an evolution of 3 layer architecture. I know I do not have a history to prove this but that’s how I have personally evolved and viewed MVVM. So we will start first with a basic 3 layer architecture, understand the problem of 3 layer architecture and see how MVVM solves the problem and then graduate to create a professional MVVM code . Below is the road map for the rest of the article.

Simple 3 layer example and GLUE code problem
So the first step is to understand 3 layer architecture, problem and then see how MVVM solves the problem.
Now Perception and reality are two different things. When you look at three layer architecture block diagram you get a perception that the responsibilities are properly distributed with each layer. But when you actually start writing code you see that some layers are forced to perform EXTRA WORK which probably they should not be doing (violatingS of SOLID principles). In case you are new to SOLID start from this SOLID principle video.

This extra work isthe code which sits between UI - Model and Model - data access. Let’s term this code as “GLUE” code. There are primary two kinds of logics which will go in the “GLUE” code:-
I can be short sighted so if you have more scenarios please put in the comments below.
- Mapping logic( Binding logic): -Every layer is connected with other layers via properties, methods collections. For example a textbox called as “txtCustomerName” on the UI layer will be mapped to “CustomerName” property of the customer class.
txtCustomerName.text = custobj.CustomerName; // mapping code
Now who ownsthe above bindingcode logic,UI or the model?, developers normally push this code to the UI layer.
- Transformationlogic: -The data formats in each of these layers are different. For example a model “Person” class can have a property called as “Gender”which has value “F” ( Female) and “M” ( Male) but in the UI layer we would like to see this value as a check box which shows “checked” (true) for male and “unchecked” for female. Below is a sample of transformation code.
if (obj.Gender == “M”) // transformation code
{chkMale.IsChecked = true;}
else
{chkMale.IsChecked = false;}
Most of the developers end up writingthe “GLUE” code in to UI layer. To be very specific this code normally is foundin the behind code i.e. in the .CS file. So if it’s “XAML” and then “XAML.CS” will have the glue code, if its “ASPX” then “ASPX.CS” will have the glue code and so on.
The question is: - Is the GLUE code the responsibility of UI?. Let’s see a simple 3 layer example of WPF application and the GLUE code in more detail.
Below is a simple “Customer” model class which has three properties “CustomerName”, “Amount” and “Married” field.

But when this model is displayed on the UI it looks something as shown below.So you can see it has all the fields of the model plus it has some extra things as well, look at the color label and the married check box.

Below is a simple table where at the left hand side we have the model fields and at the right hand side we have the UI fields. In between we have column which talks about the mapping and conversion logic.
You can see the first two fields do not have any conversion logic they just have mapping logic and the other two fields have mapping as well as conversion logic.
| Model | GLUE CODE | UI |
| Customer Name | No conversion needed only Mapping | Customer Name |
| Amount | No conversion needed only Mapping | Amount |
| Amount | Mapping + Conversion logic. | > 1500 = BLUE < 1500 = RED |
| Married | Mapping + Conversion logic. | True – Married False - UnMarried |
This conversion and mapping logic normally go in the behind code i.e. “XAML.CS”. Below is the behind code of the above customer screen, you can see the mapping code, color decision code and gender data format code. I have included the comments so that you can know which code is a mapping code and which code is a transformation code.
lblName.Content = o.CustomerName; // mapping code
lblAmount.Content = o.Amount; // mapping code

if (o.Amount > 2000) // transformation code
{
lblBuyingHabits.Background = new SolidColorBrush(Colors.Blue);
}
else if (o.Amount > 1500) // transformation code
{
lblBuyingHabits.Background = new SolidColorBrush(Colors.Red);
}
if (obj.Married == "Married") // transformation code
{
chkMarried.IsChecked = true;
}
else
{
chkMarried.IsChecked = false;
}
Now some questions around GLUE code:-
- SRPViolation: -Is this GLUE code the responsibility of the UI ?. If you see the current situation,change in amount value also need’s change in UI code. Now why do I need to change my UI if there is a data change. There is a bad code smell here. UI should only change when I am changing styles , colors , positioning etc.
- Reusability: -If I want to use the same color logic and gender transformation for a edit screen as shown below ?, How do I do it ?. Do I copy paste and create duplicate code ?.

What if I want to go one step ahead and use the GLUE code across different UI technologies like MVC , Windows form or mobile.

But this reusability across cross UI technologies is practically impossible because UI behind codeis very much tied with the UI technology.
For example below is the behind code which is inheriting from the “Window” class. “Window” class is very much tied up with WPF UI technology. So if we want to use this logic in Web application or MVC how can we create an object of this class and consume it.
public partial class MainWindow : Window
{
// Behind code is here
}
So how can we reuse the behind code, how can we respect SRP ?.
Level 1:- Simplest MVVM example – Moving behind code to a class
I think most the developers would already know how to solve the problem. No marks for guessing it move the behind code (GLUE Code) to a class library. A class library which represents the UI properties and actions. Any code when moved to a class library can be compiled in to a DLL and add referenced in
any type of .NET project (Windows, Web etc.) later. So in this section we will create the simplest MVVM example and in the later section we will graduate this example to create a professional MVVM sample.

So let’s create a new class “CustomerViewModel” which will have all the “GLUE”code.CustomerViewModel” class represents your UI so we would like to keep the properties of the class in synch with the UI naming conventions. You can see in the below figure how “CustomerViewModel” class is having properties like “TxtCustomerName” which maps with “CustomerName” , “TxtAmount” maps with “Amount” and so on.

Below goes the actual code for the class.
public class CustomerViewModel
    {
        private Customer obj = new Customer();

        public string TxtCustomerName
        {
            get { return obj.CustomerName; }
            set { obj.CustomerName = value; }
        }

        public string TxtAmount
        {
            get { return Convert.ToString(obj.Amount) ; }
            set { obj.Amount = Convert.ToDouble(value); }
        }


        public string LblAmountColor
        {
            get
            {
                if (obj.Amount > 2000)
                {
                    return "Blue";
                }
                else if (obj.Amount > 1500)
                {
                    return "Red";
                }
                return "Yellow";
            }
        }

        public bool IsMarried
        {
            get
            {
                if (obj.Married == "Married")
                {
                    return true;
                }
                else
                {
                    return false;
                }
            }

        }}
Some important points to note about the “CustomerViewModel” class:-
- Properties are named with UI naming convention like “TxtCustomerCode” so that this class looks a real replica of the UI.
- This class takes care of type casting code as well to make the UI more light weight. See the code of the “TxtAmount” property. The “Amount” property of the model is numeric but the type casting is done in the view model class. In other words this class taking all the responsibility of the UI thus making the UI behind code negligible.
- All transformation code goes in this class look at the “LblAmountColor” and “IsMarried” property.
- Allproperty data type is kept as simple string’s so that it can be consumed in wide range of UI technology. If you see the “LblAmountColor” property its exposing color value in “string” which makes this class reusable in any type of UI as we are sticking to least data type denominator.
Now that the “CustomerViewModel” class has all the behind code logic we can create object of this class and bind it with the UI elements. You can see in the below code we have only mapping code there is no transformation logic “GLUE” code.
private void DisplayUi(CustomerViewModel o)
{
lblName.Content = o.TxtCustomerName;
lblAmount.Content = o.TxtAmount;
BrushConverter brushconv = new BrushConverter();
lblBuyingHabits.Background = brushconv.ConvertFromString(o.LblAmountColor) as SolidColorBrush;
chkMarried.IsChecked = o.IsMarried;
}
Level 2:- Adding bindings– moving to ZERO behind code
The level 1 approach is great but now that we know the issues of behind code, is it possible to achieve zero behind code in WPF. That’s where WPF bindings and commands come in to picture.
WPF is known for its greatness ofbindings, commands and declarative programming. Declarative programming means rather than writing the full C# code you can use XAML and express you C# code. Binding’s help to connect one WPF object with other WPF object so that they can receive / send data.
If you see the current mapping C# code it has 3 steps:-
- Import: - The first thing we need to do is import the “CustomerViewModel” namespace.
- Create object: - The next thing we create the object of the “CustomerViewModel” class object.
- Binding code: - Finally we bind the WPF UI with the view model object.
Below is the table which shows C# code and the respective WPF XAML code for the same.
| C# code | XAML code | |
| Import | using CustomerViewModel; | xmlns:custns="clr- namespace:CustomerViewModel;assembly=Custo merViewModel" |
| Create object | CustomerViewModelobj = new CustomerViewModel(); obj.CustomerName = "Shiv"; obj.Amount = 2000; obj.Married = "Married"; |
<Window.Resources>
<custns:CustomerViewModel
x:Key="custviewobj"
TxtCustomerName="Shiv" TxtAmount="1000" IsMarried=”true”/>
|
| Bind | lblName.Content = o.CustomerName; |
<Label x:Name="lblName"  Content="{Binding
TxtCustomerName,
Source={StaticResourcecustviewobj}}"/>
|
You do not need to write binding code , we can select the UI elements , press F4 and specify bindings as shown in the below figure. This step will insert the binding code in the XAML.

To specify mapping you can select “StaticResource” and then specify binding between view model object and UI element.

If you see the behind code of your XAML.CS it has no GLUE code, neither transformation or mapping nature code. The only code which is present is the standard WPF code which initializes the main WPF UI.
public partial class MVVMWithBindings : Window
{
        public MVVMWithBindings()
        {InitializeComponent();}
 }
Level 3:- Adding actions and “INotifyPropertyChanged” interface
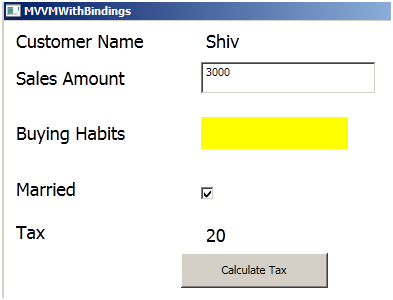
Applications are not just about textboxes and labels it also has actions like buttons, mouse events etc. So let’s add some UI elements like buttons and see how the MVVM class evolves. So to the same UI we have added a “Calculate tax” button, when the user presses this button depending on the “Sales Amount” it will calculate tax and display the same on the screen.

So in order to achieve the above functionality let’s start from the model class first by adding a simple “CalculateTax()” method. When this method is hit, it calculates tax based on the salary range and stores the value in a property called as “Tax”.
public class Customer
{
....
....
....
....
private double _Tax;
public double Tax
{
get { return _Tax; }
}
        public void CalculateTax()
        {
    if (_Amount > 2000)
            {
                _Tax = 20;
            }
            else if (_Amount > 1000)
            {
                _Tax = 10;
            }
            else
            {
                _Tax = 5;
            }
        }
}
As view model is a wrapper class around model class we need to create a method in view model which will invoke the “Calculate” method of model.
public class CustomerViewModel
{
        private Customer obj = new Customer();
....
....
....
....
        public void Calculate()
        {
            obj.CalculateTax();
        }
}
Now we would like to invoke this “Calculate” method from the view using XAML programming rather than using the behind code. Now through XAML you cannot invoke “Calculate” method straight forward you need to use WPF command class.
If you want to send data to the view model class using properties we need to use bindings and if you want to send actions from the view we need to use commands.
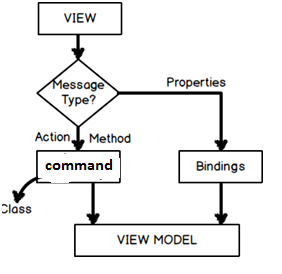
All actions from the view elements are sent to the command class so the first step is to create the command class. To create a command class we need to implement “ICommand” interface as shown in the below code.
There are two methods which must be implemented “CanExecute” and “Execute”. In “Execute” we put the actual logic which we want to execute when the action ( button click , right click etc) happens. In “CanExecute” we put the validation logic which decides “Execute” code should run or not.

public class ButtonCommand : ICommand
{
        public bool CanExecute(object parameter)
        {
      // When to execute
      // Validation logic goes here
        }

        public event EventHandler CanExecuteChanged;

        public void Execute(object parameter)
        {
// What to Execute
      // Execution logic goes here
    }
}
Now all the action calls first come to the command class and then it’s routed to the view model class. In other words the command class needs to house the view model class.

Below is the shortened code snippet. There are four important points to noted about the code snippet:-
- The view model object is created as a private member level object.
- This object will be passed by the view model class through the constructor.
- For now we have not added validation logic in “CanExecute” it returns always true.
- In the “Execute” method we have called the “Calculate” method of the view model class.
public class ButtonCommand : ICommand
    {
        private CustomerViewModel obj; // Point 1
        public ButtonCommand(CustomerViewModel _obj) // Point 2
        {
            obj = _obj;
        }
        public bool CanExecute(object parameter)
        {
            return true; // Point 3
        }
        public void Execute(object parameter)
        {
            obj.Calculate(); // Point 4
        }
    }
In the above command code the view model object is passed via the constructor. So the view model class needs to create a command object and expose this command object using “ICommand” interface. This “ICommand” interface will be consumed and call in the WPF XAML. Some important points regarding the “CustomerViewModel” class with respect to consuming the command class :-
- The command class is a private member level object of the “CustomerViewModel” class.
- In the view model class constructor the current object instance is passed to the command class. When we explained the command class code in the previous section we said the command class constructor takes the view model class instance. So in this section we are passing the current instance to the command class.
- The command object is exposed as “ICommand” interface instance so that it can be consumed in XAML.
using System.ComponentModel;

public class CustomerViewModel
{
…
…
private ButtonCommand objCommand; //  Point 1
        public CustomerViewModel()
        {
            objCommand = new ButtonCommand(this); // Point 2
        }
        public ICommand btnClick // Point 3
        {
            get
            {
                return objCommand;
            }
        }
….
….
}
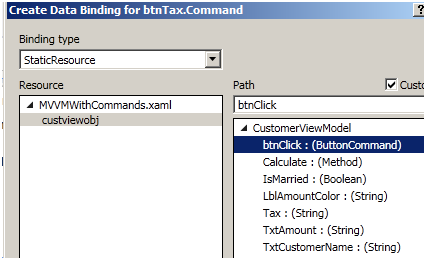
Add a button to your UI so that you can connect the button action to the “ICommand” method exposed. Now go to the properties of the button, scroll to the command property, right click on it and click create data binding.

Then select static resource and attach the “ButtonCommand” with the button.
When you click on calculate tax button it executes “CalculateTax” method and stores the tax value in the “_tax” variable. For “CalculateTax” method code read previous section “Level 3:- Adding actions and INotifyPropertyChanged interface”.
In other words the UI will not be automatically notified about the tax calculation. So we need to send some kind of notification from the object to the UI saying that tax values have changed and the UI has reload the binding values.
So in the view model class we need to send anINotify event to the view.

To enable notification in your view model class we need to do three things. All three things are pointed in the below code with comments like point 1 , point 2 and point 3.
Point 1 :- Implement “INotifyPropertyChanged” interface as shown in the below code. Once you implement the interface it creates an object of “PropertyChangedEventHandler” event.
Point 2 and 3 :- In the “Calculate” method raise event using “PropertyChanged” object and in that provide for which property is the notification. For instance in this case it’s for “Tax” property. To be on the safe side we will also check if the “PropertyChanged” object is not null.
public class CustomerViewModel : INotifyPropertyChanged // Point 1
{
….
….
        public void Calculate()
        {
            obj.CalculateTax();
            if (PropertyChanged != null) // Point 2
            {
                PropertyChanged(this,new PropertyChangedEventArgs("Tax"));
            // Point 3
            }
        }

        public event PropertyChangedEventHandler PropertyChanged;
}
If you run the application you should be able to see how on the button click “Tax” value gets updated.
Level 4:- Decoupling actions from view model
So till now we have created a simple screen with MVVM which has both properties and command implemented. We have a view whose UI input elements i.e. textbox is connected to view model using bindings and any kind of actions like button clicks are connected using commands. View model talks with model internally.

But in the above architecture there is one problem the command class is having aHEAVY COUPLING with the view model.If you remember the command class code ( i have pasted the same again below) in the constructor we are passing the view model object , which means that this command class cannot be reused with other view model class.
public class ButtonCommand : ICommand
    {
        private CustomerViewModel obj; // Point 1
        public ButtonCommand(CustomerViewModel _obj) // Point 2
        {
            obj = _obj;
        }
......
......
......

}

But now let’s thing logically “What’s anaction?” at the end of the day. It’s an event which comes from the end user like mouse clicks (right or left) , button clicks , menu clicks , function key press etc. So there should be a way to generalize these actions and attach it in a more general way to the view models.
If you think logically actions are logics which are wrapped in to methods and functions. So what’s the generalized way of point to “methods” and “functions” … think , think , think ….. “DELEGATES” , “DELEGATES” and “DELEGATES”.
We would need two delegates one for “CanExecute” and the other for “Execute”. The “CanExecute” returns a Boolean so used for validation and depending on the validations it enables and disables the user interface. The “Execute” will execute when the “CanExecute” is true.
public class ButtonCommand : ICommand
    {
        public bool CanExecute(object parameter) // Validations
        {
        }
        public void Execute(object parameter) // Executions
        {
        }
    }
So in other words we need two delegates one a function which returns Boolean value and the other an action which returns void. So how about creating a “Func” and an “Action”. Both of these guys “Func” and “Action” are ready made delegates.
In case you are new to action and func you can see this video for the same

So by using the delegate architecture let’s try to create a generalized command class. We have made three changes to the command class ( below is the code for the same) and I have marked them as Point 1, 2 and 3:-
Point 1 :- We have removed the view model object from the constructor and we are accepting two delegates one is “Func” and other is “Action”.“Func” for the validation i.e. when the action will execute and the “Action” what to execute. Both these delegate values are passed via the constructor and set to private respective delegate variables internally.
Point 2 and 3 :-The Fun delegate ( WhentoExecute ) is called “CanExecute” and in execute the action “Whattoexecute” is called.
public class ButtonCommand : ICommand
{
private Action WhattoExecute;
private Func<bool> WhentoExecute;
        public ButtonCommand(Action What , Func<bool> When) // Point 1
        {
            WhattoExecute = What;
            WhentoExecute = When;
        }
public bool CanExecute(object parameter)
        {
            return WhentoExecute(); // Point 2
        }
public void Execute(object parameter)
        {
            WhattoExecute(); // Point 3
        }
}
In the model we already knew what to execute i.e. “CalculateTax” , we have also a put a simple function and named it “IsValid” which will validate if the “Customer” class is valid or not.
public class Customer
    {
public void CalculateTax()
        {
if (_Amount > 2000)
            {
                _Tax = 20;
            }
else if (_Amount > 1000)
            {
                _Tax = 10;
            }
else
            {
                _Tax = 5;
            }
        }

public bool IsValid()
        {
if (_Amount == 0)
            {
return false;
            }
else
            {
return true;
            }
        }
    }
From the view model class we are passing both methods and function in the command constructor one for the “Func” and one for the “Action”.
public class CustomerViewModel : INotifyPropertyChanged
{
private Customer obj = new Customer();
privateButtonCommandobjCommand;
publicCustomerViewModel()
        {
objCommand = new ButtonCommand(obj.CalculateTax,
obj.IsValid);
        }
}
This makes the architecture much better and decoupled as this command class can be attached with any view model in a generic way.Below is the improvised architecture, do notice how the view model is talking with the command class via delegate ( func and action).

Level 5:- Leveraging PRISM
Finally a framework would be great if it can bring down some work in our MVVM code.PRISM is one of those frameworks which comes to rescue. The main use of PRISM is for modular development but it has a nice “DelegateCommand” class which can be used rather than creating our own command class.
So the first thing is download PRISM from http://www.microsoft.com/en-in/download/details.aspx?id=42537, compile the solution and reference two DLL’s “Microsoft.Practices.Prism.Mvvm.dll” and “Microsoft.Practices.Prism.SharedInterfaces.dll”.
You can now get rid of your custom command class and import “Microsoft.Practices.Prism.Commands” namespace and use the delegate command as shown in the below code.
public class CustomerViewModel : INotifyPropertyChanged
{
private Customer obj = new Customer();
private DelegateCommand  objCommand;
public CustomerViewModel()
        {
objCommand = new DelegateCommand(obj.CalculateTax,
                                        obj.IsValid);
        }
…………
…………
…………
…………

}
}
Demonstration of WPF MVVM in video format
I have also demonstrated from scratch how to implement MVVM with WPF in the below youtube video.

For further reading do watch the following interview preparation and step by step videos :-
- Software Architecture Interview Questions
- C# Design Pattern step by step Tutorial
- Association VS Composition VS Aggregation
- Garbage Collection Interview Questions
- Stack VS Heap, Boxing VS Unboxing, Value Type VS Reference Type
- Azure DevOps Step by Step Tutorial
- SQL Server Tutorial
- MSBI Installation Step by Step
- C# Is vs As Keywords
- C# Throw vs Throw ex
- C# Concurrency vs Parallelism
- C# String are Immutable
Visit my profile below for more videos.