Introduction
Visual Studio has a COM interface which allows anyone to manipulate its UI from their own code. Even better, it provides a wizard for creating projects to hook into this interface. However, there are some tricks to play if you want your add-in to have a custom icon. In addition, some of the naming conventions used in the wizard-generated code can be improved considerably.
I began by creating a new project. In the New Project dialog, I found the “Visual Studio .NET Add-in” project buried in “Extensibility Projects” under the “Other Projects” category:

Clicking on OK starts the Add-in Wizard. After the intro page, you can choose whether to use C#, VB, or Visual C++/ATL. Since I’m old-fashioned, I chose C++. The next page offers two hosting environments for the add-in: VS Macros and VS.NET. To keep things simpler, I chose only VS.NET.
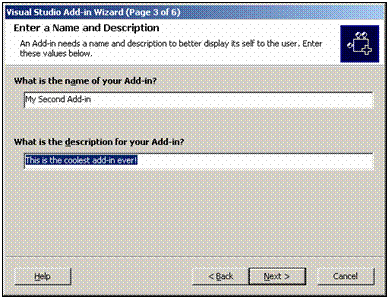
The third of six pages lets you provide a name and description for your add-in. Here is where you choose a slick product name for your program. It might be useful to copy the description to the clipboard with Ctrl-C after you type it in, since you can then avoid retyping it when we edit the RGS file a few steps later.
If you want to have a menu item with an icon for your add-in, you must choose Yes for the option to create a Tools menu item in the next dialog. I also set the access privileges to allow all users to use the add-in once it is installed. This is important in that it affects where the Registry entries I discuss later will be made.
The other two options on this page are not really relevant to this project, so I left them unchecked.
Page five lets you create settings for an ‘About’ dialog box. This term is confusing to me since as far as I can tell, there is no actual ‘About’ dialog generated by the wizard. In addition, the icon that they display never shows up, in my experience. Although some programmers have reported success in embedding a custom icon in their app using an AboutDialogIconData item (or some variant of this) in their Registry settings for the add-in, it is, in my opinion, easier to set things up, as I will describe them here, with the icon in a separate DLL. This is well-documented, and perhaps somewhat more robust than pasting hex-dumps into a text file, again in my opinion. I know some folks live for stuff like that! So, my recommendation is to not check the box that says “Yes, I would like my Add-in to offer…”. Otherwise, you will have to remove those items from the Registry information in the Setup project.
Page six is a summary page which lets you review your choices before any files are created. Clicking Finish makes it all happen.
Normally, I try to build a wizard-generated project as soon as possible after finishing the wizard, to make sure everything works before I start breaking things. For this project, however, since you are creating a self-registering component which interacts with the same IDE you are using to build it, hold off on that until you are done with all of your changes.
When the wizard finishes, you will be looking at the File System page for the Setup/Deployment sub-project of the generated solution. There is really nothing useful to do here, so I immediately close it and move on to the needed changes.
The first change is in the RGS file. To edit it, go to the Solution Explorer and open the Resource Files folder. The file will be named AddIn.rgs.
What I want to do here is to change the generic “Connect Class” descriptions to something that gives a little information about my add-in. In addition, I want to add information so that the class will self-register with all of the information needed to run.
I changed “Connect Class” to read “MyAddIn Connect Class”. The information present just creates the ProgramID, CLSID, and Typelib entries. I want to add the rest of the information needed to register this class as a VS.NET add-in, which looks like this:
HKLM
{
   NoRemove 'Software'
   {
   NoRemove 'Microsoft'
      {
         NoRemove 'VisualStudio'
         {
            NoRemove '7.1'
            {
               NoRemove 'AddIns'
               {
                  ForceRemove 'MyAddIn.Connect'
                  {
                     val FriendlyName = s 'My VS .Net AddIn'
                     val Description = s 'This is the coolest AddIn ever!'
                     val LoadBehavior = d 0
                     val CommandLineSafe = d 0
                     val CommandPreload = d 1
                     val SatelliteDllName = s 'MyAddinUI.dll'
                     val SatelliteDllPath = s '%MODULEPATH%'
                  }
               }
            }
         }
      }
   }
}
HKCU
{
   NoRemove 'Software'
   {
      NoRemove 'Microsoft'
      {
         NoRemove 'VisualStudio'
         {
            NoRemove '7.1'
            {
               'PreloadAddinState'
               {
                  val MyAddIn.Connect = d 1
               }
            }
         }
      }
   }
}
Just add these lines right after the existing ones. You can paste the same description as you typed earlier (Where did that text go? Who knows?). The entries for the satellite DLL name a DLL you will be creating later. This DLL exists solely to hold the bitmap which will be displayed for your add-in. The MODULEPATH replaceable parameter will be filled in when the component registers with the path to your UI DLL (well, almost; see the description later).
The entries under HKCU are needed to make Visual Studio properly initialize the control the first time it starts after you install the add-in. Visual Studio apparently caches information about installed add-ins, and if this entry is not present, the user will have to manually enable the add-in before it will appear.
OK, since you just chose the name for the DLL and it’s fresh in your mind, this is a good time to create the thing itself. Add a VS C++ Win32 project to your solution with the same name as the add-in plus “UI”. Make sure that you specify the location for the new project to be the same directory as the main add-in project (see the dialog shot below). Click on OK, and on the Application Settings dialog that follows, click “Application Settings” (duh) and make the application type DLL.
Now, go to Resource View, and add a Bitmap resource to the project. I do this by right-clicking on the new project, choosing Add…Resource, and then Bitmap…New. Change the properties of the new bitmap to be the following:
- Filename: MyAddinUI.bmp
- Height: 16
- ID: 1
- Width: 16
Now, go draw your bitmap. You might prefer to use another resource creator and then import the bitmap from it.
OK, once you have the bitmap created, the next step is to make sure the DLL ends up in the right place. From the online docs:
SatelliteDllPath and SatelliteDllName – Optional. The name and description entries in the Registry can be localized. If their values begin with a pound sign (#) immediately followed by a parseable integer, then the string value displayed in the Add-in Manager is the value of this specified resource ID in the satellite DLL. The satellite DLL is determined by one or two additional Registry entries:
SatelliteDllPath – If present, the value is a string that is a full pathname to a directory, ending in a backslash (\) character. The Add-in Manager looks for the satellite DLL in a location determined by the concatenation of SatelliteDllPath, the locale ID of the installed machine, the backslash, and SatelliteDllName.SatelliteDllName - The value is a string that names a file. The directory containing the file is either the directory containing the DLL that manifests the Add-in, or it is the computed directory described for SatelliteDllPath.
The satellite DLL search algorithm is to take the prefix directory and the file name, then start a search in the following order:
- Look for <BasePath>\shell UI locale\<DLLName>
- If failed, look for <BasePath>\User's preferred OS Locale\<DLLName>
- If failed, look for <BasePath>\User's setup OS Locale\<DLLName>
- If failed, look for <BasePath>\1033\<DLLName>
- If failed, look for <BasePath>\<DLLName>
From this, it seems that it would be OK to put the UI DLL into the same directory as the main DLL (which is what is going to go into MODULEPATH in the RGS file). This does not appear to work; that is, case (5) doesn’t seem to happen. As a result, I recommend putting the DLL into a ‘1033’ directory under the main DLL. Here is how to arrange for that to happen.
Go to the Project settings for MyAddinUI. Under General, set the Output Directory to “..\Debug\1033”. Then, switch the configuration to Release, and change the Output Directory to “..\Release\1033”. Leave the Intermediate Directory alone. This will put the MyAddInUI.dll into a subdirectory in the same directory as MyAddIn.dll. This is what you want for the add-in to run after it is built.
To ensure that the install project does the same thing as the DLL regsvr32 response, I mark the DLL as self-registering in the install project. I do this by going to “Primary Output from MyAddIn (Active)” under the MyAddinSetup project, and under Properties, change the Register item to “vsdrpCOMSelfReg”:
While you are there at the installation project, fill in sensible things for the Author, Description, URLs, etc. In particular, I change the Product Name and Title from “MyAddinSetup” to “MyAddin”, or even “My VS CodeFixer AddIn”. Now, add the UI DLL to the setup project. Right click on the project, and choose View…File System. Then, right click on the Application Folder and choose Add…Folder. Name the new folder 1033. Now, right-click on that folder and select Add…Project Output. Select the MyAddinUI project, and then PrimaryOutput, and then choose OK. (I don’t know how to use the Resource Satellite DLLs item in this list; presumable, you could designate the MyAddInUI DLL as a Resource Satellite DLL of the main project somehow, but who knows how?)
OK, now it’s time to soup-up the registration code for our app. If you go to connect.h, you should see a line like this:
DECLARE_REGISTRY_RESOURCEID(IDR_ADDIN)
somewhere around line 24. If you go to the definition of DECLARE_REGISTRY_RESOURCEID, you will find that it defines a function, UpdateRegistry. By replacing the default ATL implementation of this function, you can add more variables to the RGS script. In the example code below, I have commented out DECLARE_REGISTRY_RESOURCEID from the .h file and substituted it with an inline definition of UpdateRegistry.
static HRESULT WINAPI UpdateRegistry(BOOL bRegister) throw()
{
USES_CONVERSION;
TCHAR szModulePath[_MAX_PATH];
TCHAR szModuleDir[_MAX_PATH];
_ATL_REGMAP_ENTRY szEntries[] = {
{ L"MODULE", 0 },
{ L"MODULEPATH", 0 },
{ 0, 0 },
};
HINSTANCE hInstance = _AtlModule.GetResourceInstance();
GetModuleFileName(hInstance, szModulePath, _MAX_PATH);
_tcscpy(szModuleDir, szModulePath);
for (size_t i = _tcslen(szModuleDir)-1; i >= 0; i--)
{
if (szModuleDir[i] == '\\')
{
szModuleDir[i+1] = '\0';
break;
}
}
szEntries[0].szData = T2OLE(szModulePath);
szEntries[1].szData = T2OLE(szModuleDir);
return
ATL::_pAtlModule->UpdateRegistryFromResource(IDR_ADDIN,
bRegister, szEntries);
}
This function produces two strings; one has the path to the DLL including its filename, which will replace the %MODULE% parameter in the RGS script; the other has just the directory path.
There is one final step before your add-in will display its own icon, as opposed to one lifted from the MS Office DLLs. In connect.cpp is a function, OnConnection, which must be modified. The modification to allow custom icons is in the 5th and 6th parameters of the call to AddNamedCommand. Simply change VARIANT_TRUE to VARIANT_ FALSE, and change 59 to 1.
Just as a matter of compulsiveness, I also change the string “Connect Class” in AddIn.idl to be “MyAddIn Connect Class” so it agrees with the RGS.
Now, you can build your solution. If you (or I) haven’t missed a step, you should get a successful build.
Here are the problem issues I encountered while getting this to work:
- Funky code in the
connect::OnConnection routine. - Lack of MFC support.
- Self-register.
- Debugging: if you enable the command in the debuggee instance of VS, it doesn’t stick and, in fact, won’t appear since the
PreLoadAddinState flag has been cleared. - Counter-intuitive method for storing the icon.
- Poor docs for adding RGS replaceable parameters.
- Poor docs for adding binary data to RGS files.
- Stupid resource editor.
Moxxis lives in New Mexico and writes code for scientific and industrial applications.


 General
  News
News  Suggestion
  Question
  Bug
Bug  Answer
  Joke
Joke  Praise
  Rant
Rant  Admin
Admin 


