
Data Driven Web Testing With Visual Studio 2008 Team System
3.79/5 (6 votes)
How to create a data driven web test using Visual Studio 2008 Team System

Introduction
Web tests are one of the many testing options available in Visual Studio 2008 Team System (VSTS). By utilizing web testing, you can create a set of repeatable tests that confirm your web application is working correctly. VSTS makes creating web tests easy, by recording step-by-step what you do in your browser window, and then playing back those actions when you run your test. But web tests don't stop there. With a couple of clicks of your mouse, you can turn a web test into a data-driven web test, allowing you to test multiple data values, while still using a single web test. And finally, for when you need even more control over the actions taken by your web test, you can create a coded web test, which is a web test written in C# or VB.NET.
We will be looking at all three types of web tests in this article. Our sample application consists of two simple ASP.NET pages and a SQL Express database. You'll need to have either Visual Studio 2008 Team System Testing Edition or Visual Studio 2008 Team Suite, along with SQL Express, in order to run the sample application and web tests. We will start by creating a simple web test to test the login functionality of the application. Next, we'll use a comma-delimited file to turn our simple web test into a data-driven web test. But as you'll see, we'll run into a slight problem. We will ultimately overcome this problem through the use of a coded web test.
Creating A Web Test
Running The Application
Before you can create your web test, you need to make sure the example web application will run for you. Open the solution in Visual Studio, and from the menu select Debug -> Start Debugging. This will start the ASP.NET Development Server, running on a certain port, such as 2062. It will also open your default web browser to the starting page of the web application. The URL should look something like this:
http://localhost:####/Default.aspx
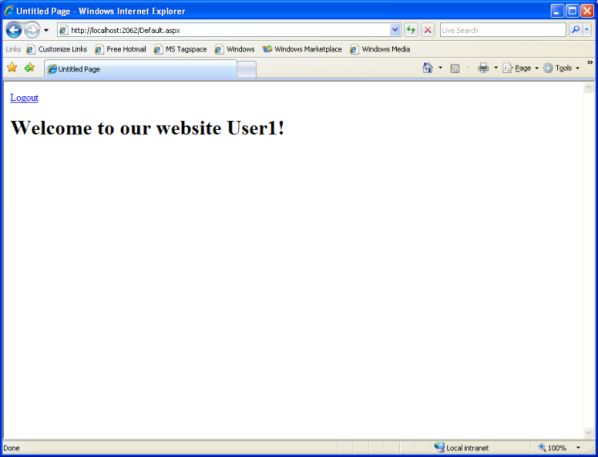
Make a note of the ####, as this is the port number being used by the development server, and we will need it later in the example. The default.aspx page should display a single link with the text Login. Clicking the Login link should display a Log In page. Enter User1 as the User Name and network! as the password, and click the Log In button. You should return to the Default.aspx page. This time, you should see a link with the text Logout, and a message Welcome to our website User1!, as shown in the following image:
Great, the sample application is working! Close the web browser to stop debugging and return to Visual Studio.
Creating The Web Test
Now that we know the application works, next we need to create our web test. You will notice there are two projects in Solution Explorer in Visual Studio, MembershipExample, which is the web application, and WebTestsProject. WebTestsProject is a special form of project in Visual Studio called a Test Project. You use a Test Project to store your tests, from unit tests to web tests to manual tests. To get started, simply right-click on the WebTestsProject Test Project and select Add -> New Test. This opens the Add New Test Window. Select Web Test, and give it a name of MyLoginTest.webtest. When you click OK, Internet Explorer will open. You'll notice a window docked to the left side of IE, named Web Test Recorder. This recorder is going to track everything you do in IE.
Enter http://localhost:####/Default.aspx in the address bar, where #### is the port number you recorded earlier. You'll notice in the recorder that it records the page you visited. You have the ability to pause and resume recording at will. You can also add comments to your recording, to help keep track of what you are doing. Click the folder icon in the recorder, which is the Add Comment button and enter Navigated to default.aspx page in the comment window. When you click OK, you'll see your comment appear under the page you just navigated to in the recorder.
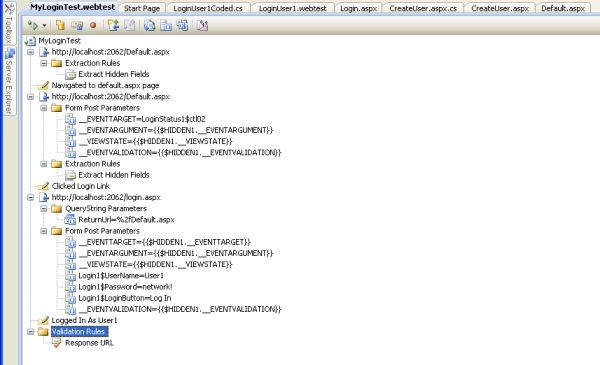
Click the Login link, and then add a comment Clicked Login Link. Enter User1 as the UserName and network! as the password and click Log In. Add a comment Logged In As User1. Your web browser should now contain something similar to this:
Notice all the information that the web test is gathering for you. Click the Stop button in the Web Test Recorder to stop and close IE, and return you to Visual Studio. You'll now see your web test in Visual Studio, in the MyLoginTest.webtest tab:
Running The Web Test
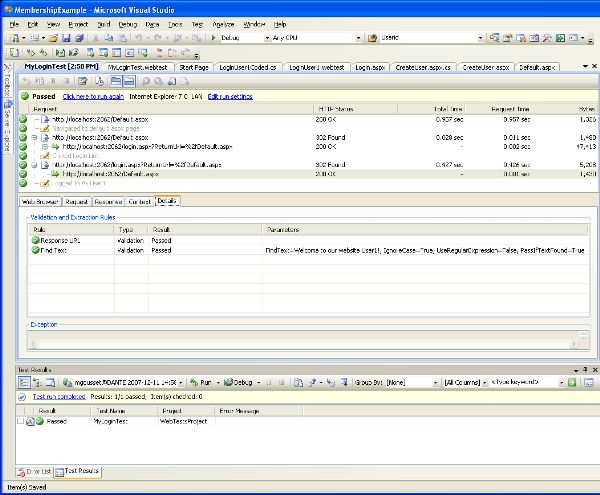
The first thing you want to do is run your web test, to make sure it recorded correctly. At the top of the MyLoginTest.webtest tab is a green arrow button. Click the button to run the web test. The test will run and should complete successfully. You should see something similar to the following:
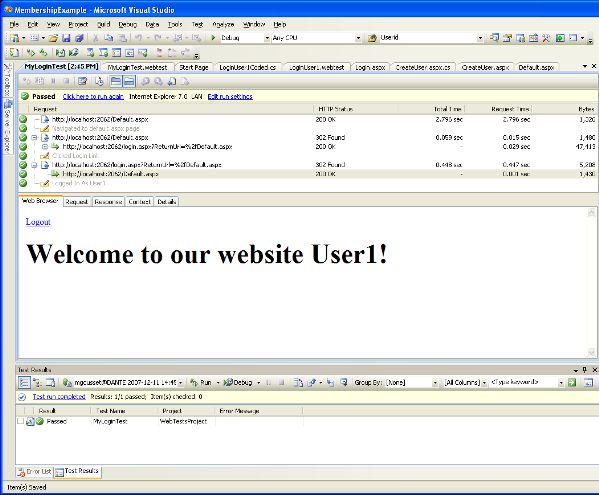
You can click through the web test results to see all the detailed information that is captured for you. For each request, you can see the request, the response, hidden field information, total request time, and a variety of other information. Each request should have a green check mark beside it, indicating that it passed, and there should be a green check mark at the top of the test results, indicating that the test passed. Now go back to the MyLoginTest.webtest tab.
Adding A Validation Rule
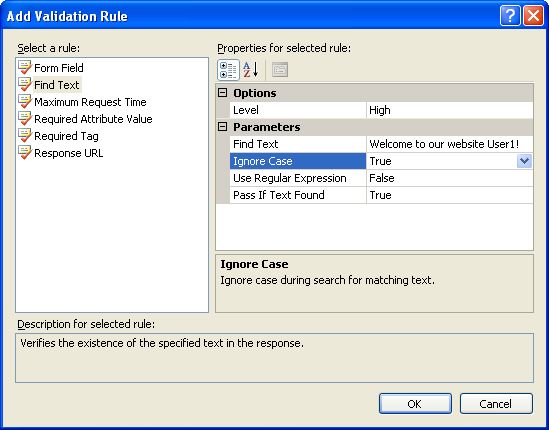
Now that we know the web test works, we want to add a rule to make sure the application is working as expected. We are going to add a Validation Rule. A validation rule is used to verify that an application is working. In our case, we are going to use a validation rule to make sure that the phrase Welcome to our website User1! appears on the default.aspx page after a successful login.
In the MyLoginTest.webtest tab, right-click on the third request (http://localhost:####/login.aspx) and select Add Validation Rule. This opens the Add Validation Rule window. You have multiple rule options to choose from. Select the Find Text rule. In the Properties for this rule, enter Welcome to our website User1! in the Find Text property. Set the Ignore Case property to True. The window should appear similar to this:
Click the OK button to save this rule. You'll notice in your web test, under the request, a new folder called Validation Rules with the rule we just created in it.
Click the green arrow on the web test to run the test again. The test should pass. In the test results, select the last request, and then select the Details tab. You can see your validation rule has passed:
Drive Your Web Test with Data
This web test works well, but it only tests one login. There are actually three different logins that we need to test. Instead of creating three different web tests, one for each login, we are going to use a comma delimited file to feed our web test different user names and passwords.
Configuring The Data-Driven Web Test
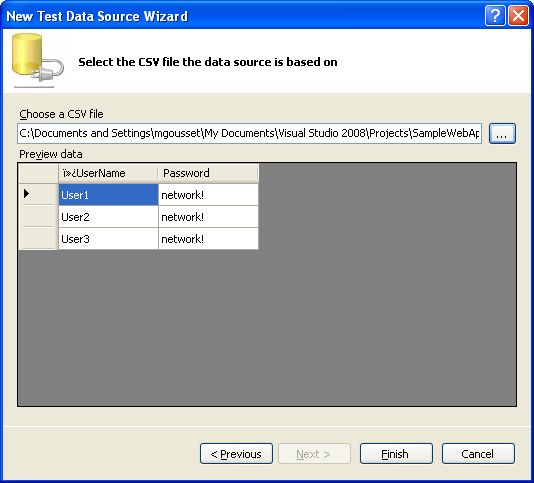
Go back to the MyLoginTest.webtest. Right-click on MyLoginTest and select Add Data Source. This opens the New Test Data Source Wizard. In Visual Studio 2008 you have two new options for data sources. In addition to a regular database, you can use an XML file or a comma delimited file (CSV file). Select the CSV File icon and click the Next button. Navigate to where you unzipped the sample application, go into the WebTestsProject folder, and select the MyUsers.csv file. You should see something similar to the following:
Click the Finish button to end the wizard.
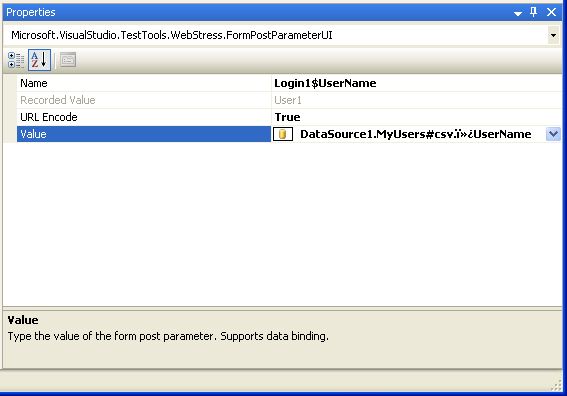
Now that I've added my data source, I need to modify my web test to use the values from the file. In the web test, drill down under the third request (http://localhost:####/login.aspx) to the Form Post Parameters folder. In that folder, select the Login1$UserName=User1 line, and go to the Properties window. In the properties wiindow, in the Value property, click the down arrow to open the drop down list. In the drop down list, drill down to DataSource1 -> MyUsers and select UserName. The Properties window should look something like this:
Do the same thing for the Login1$Password=network! field, selecting the Password value in the drop down list. Select File -> Save All to save your work so far.
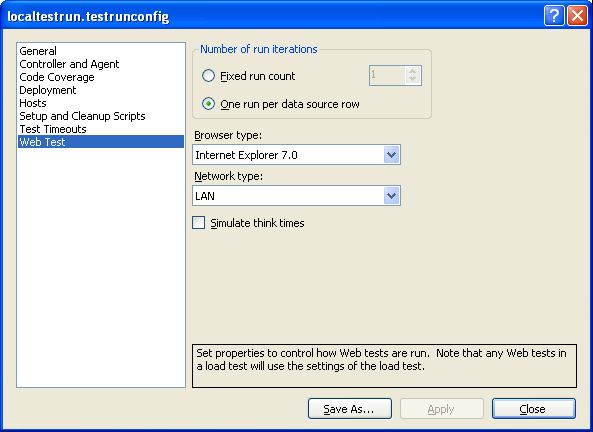
Before you can run your test, you need to modify your test configuration file, to make sure it reads all the rows from your data source. In Solution Explorer, in the Solution Items folder, double-click the LocalTestRun.testrunconfig file. This opens the configuration window. Select Web Test to modify the web test properties. Under Number of run iterations, select the One run per data source row radio button. Click Apply and then Close to close this window.
Running The Data-Driven Web Test
You are now ready to run your data-driven web test. Back in the MyLogintest.webtest, click the green arrow to run the test. But wait, what happened? The test is showing as failed:
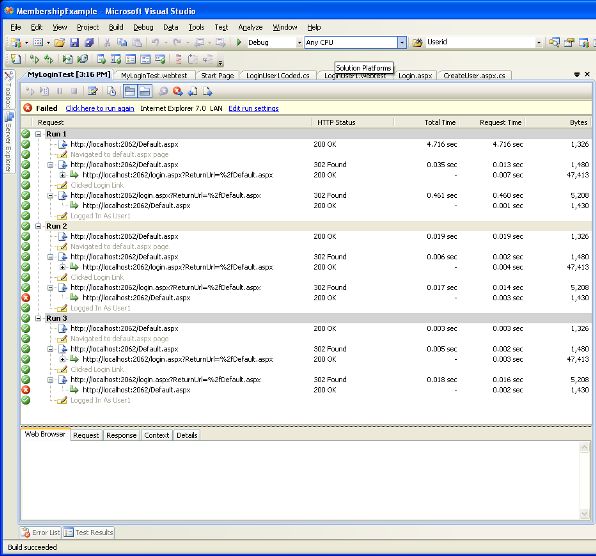
If you select the lines that failed and click the Details tab, you'll see that the validation rule added earlier passes for the first run, but fails on the next two. This makes sense, because the first time through, it is logging in as User1, so the phrase will be correct. But the second and third times through, it logs in as User2 and User3, so the phrase the test is looking for is not going to be there.
You might think we just need to go modify our validation rule, to add the dynamic user name, and you would be right. However, from within the web test GUI, for a validation rule, you can't add a dynamic parameter like that.
So what do you do when the nice GUI doesn't work for you? You get your hands dirty in the code itself that makes up the web test.
The Next Level - Coded Data-Driven Web Tests
We want to generate our web test as C# code, so we can manipulate the code to do what we want. Go back to the MyLoginTest.webtest tab. Right click on MyLoginTest, and select Generate Code. Take the default name, MyLoginTestCoded, and click OK. This creates the MyLoginTestCoded.cs file. This web test is exactly equivalent to the MyLoginTest.webtest web test. This is simply C# code that does the same thing.
Modifying The Coded Web Test
Feel free to poke around in this file to see how the web test works. When you are ready, do a search for Login1$UserName. This should take you to a line of code that looks similar to this:
request3Body.FormPostParameters.Add("Login1$UserName",
    this.Context["DataSource1.MyUsers#csv.?UserName"].ToString());
This line of code sets the Login1$UserName value to the value from the data source. Select
this.Context["DataSource1.MyUsers#csv.?UserName"].ToString()
Right click on it, and select Copy.
Now do a search for Welcome. This should take you to a line of code that looks similar to this:
validationRule2.FindText = "Welcome to our website User1!";
Using the value that you copied earlier, change this line of code to be:
validationRule2.FindText = "Welcome to our website " +
                    this.Context["DataSource1.MyUsers#csv.?UserName"].ToString()
                    + "!";
We are dynamically replacing the name in the string with the data value. Select File -> Save All to save your work so far.
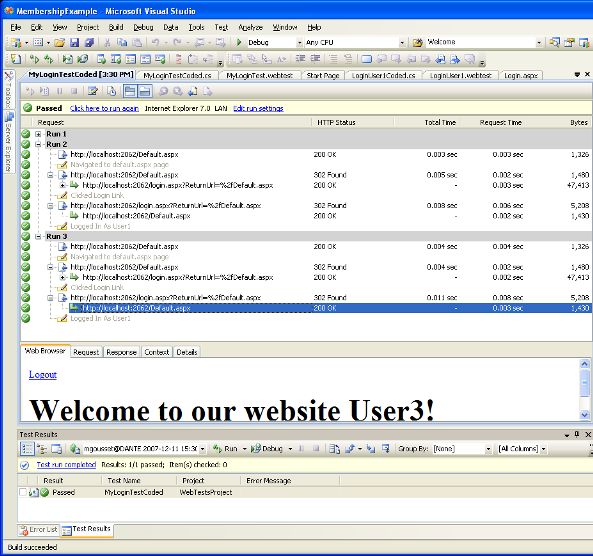
Running The Coded Web Test
From the main menu, select Test -> Windows -> Test View to open the Test View window. Right-click on the MyLoginTestCoded test and select Run Selection. The Test Results window will open at the bottom of your screen, and will show that the test has passed. Double-click the test in the Test Results window to see the test details. As you can see, all three runs of the test have passed.
Conclusion
This article has shown you the basics of web testing and data-driven web testing. We started off by creating a basic web test to test the login functionality of a page, and added validation rule to the web test. Then we made this test a data-driven web test, by passing in multiple users and passwords from a comma delimited file. But we found that this caused our validation rule to fail. Finally, we created a coded web test, to bypass some of the limitations in the GUI, and to allow our data driven web test to complete successfully.
History
12/12/2007 - Initial article was posted. Bear with me, I'm having problems getting the source code to upload.