
Temporary Values in Grid
4.75/5 (9 votes)
Temporary Values in Grid
Introduction
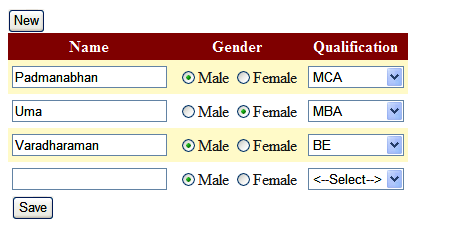
This article is developed in C#. It is about saving temporary values in Grid and adding rows one by one and maintaining the values.
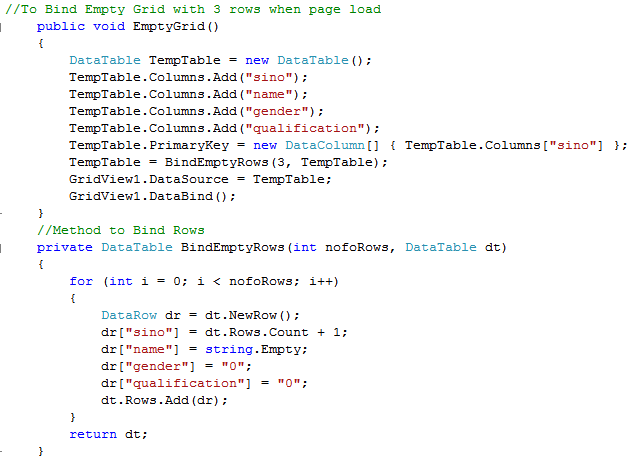
Adding Three Empty Rows in a Grid
The below given code helps to add 3 empty rows inside a grid with four columns:
Saving the Values in a Temporary DataTable in order to Maintain the Values
The below code will save the records given in the grid and also maintain the values in a View state.

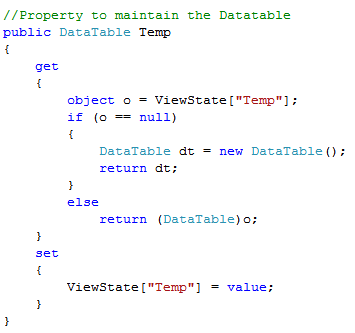
Maintaining Values of the DataTable in ViewState
The below code will maintain the values in the View state:
Copy the Code and Paste it in .ASPX
<%@ Page Language="C#" AutoEventWireup="true"
	CodeFile="TempTable.aspx.cs" Inherits="TempTable" %>
<!DOCTYPE html PUBLIC "-//W3C//DTD XHTML 1.0 Transitional//EN"
	"http://www.w3.org/TR/xhtml1/DTD/xhtml1-transitional.dtd">
<html xmlns="http://www.w3.org/1999/xhtml" >
<head runat="server">
<title>Untitled Page</title>
</head>
<body>
<form id="form1" runat="server">
<div>
<asp:Button ID="btnNew" runat="server" OnClick="btnNew_Click" Text="New" /><br />
<asp:GridView ID="GridView1" runat="server" AutoGenerateColumns="False"
	DataKeyNames="sino" CellPadding="4" ForeColor="#333333" GridLines="None">
<Columns>
<asp:TemplateField HeaderText="Name">
<ItemTemplate>
<asp:TextBox ID="TextBox1" runat="server" Text='<%# Bind("name") %>' ></asp:TextBox>
</ItemTemplate>
</asp:TemplateField>
<asp:TemplateField HeaderText="Gender">
<ItemTemplate>
<asp:RadioButtonList ID="RadioButtonList1" runat="server"
	RepeatDirection="Horizontal" Text='<%# Bind("gender") %>' >
<asp:ListItem Selected="True" Value="0">Male</asp:ListItem>
<asp:ListItem Value="1">Female</asp:ListItem>
</asp:RadioButtonList>
</ItemTemplate>
</asp:TemplateField>
<asp:TemplateField HeaderText="Qualification" >
<ItemTemplate>
<asp:DropDownList ID="DropDownList1"
	runat="server" Text='<%# Bind("qualification") %>'>
<asp:ListItem Value="0"><--Select--></asp:ListItem>
<asp:ListItem Value="1">Bsc</asp:ListItem>
<asp:ListItem Value="2">MCA</asp:ListItem>
<asp:ListItem Value="3">MBA</asp:ListItem>
<asp:ListItem Value="4">BE</asp:ListItem>
<asp:ListItem Value="5">Mcom</asp:ListItem>
</asp:DropDownList>
</ItemTemplate>
</asp:TemplateField>
</Columns>
<FooterStyle BackColor="#990000" Font-Bold="True" ForeColor="White" />
<RowStyle BackColor="#FFFBD6" ForeColor="#333333" />
<PagerStyle BackColor="#FFCC66" ForeColor="#333333" HorizontalAlign="Center" />
<SelectedRowStyle BackColor="#FFCC66" Font-Bold="True" ForeColor="Navy" />
<HeaderStyle BackColor="#990000" Font-Bold="True" ForeColor="White" />
<AlternatingRowStyle BackColor="White" />
</asp:GridView>
 <asp:Button ID="btnSave" runat="server" OnClick="btnSave_Click" Text="Save" />
</div>
</form>
</body>
</html>
Copy the Code and Paste it in .ASPX.CS
using System;
 using System.Data;
 using System.Configuration;
 using System.Collections;
 using System.Web;
 using System.Web.Security;
 using System.Web.UI;
 using System.Web.UI.WebControls;
 using System.Web.UI.WebControls.WebParts;
 using System.Web.UI.HtmlControls;
public partial class TempTable : System.Web.UI.Page
{
protected void Page_Load(object sender, EventArgs e)
{
if (!Page.IsPostBack)
{
EmptyGrid();
}
}

//To Bind Empty Grid with three rows when page loads

public void EmptyGrid()
{
DataTable TempTable = new DataTable();
TempTable.Columns.Add("sino");
TempTable.Columns.Add("name");
TempTable.Columns.Add("gender");
TempTable.Columns.Add("qualification");
TempTable.PrimaryKey = new DataColumn[] { TempTable.Columns["sino"] };
TempTable = BindEmptyRows(3, TempTable);
GridView1.DataSource = TempTable;
GridView1.DataBind();
}

//Method to Bind Rows

private DataTable BindEmptyRows(int nofoRows, DataTable dt)
{
for (int i = 0; i < nofoRows; i++)
{
DataRow dr = dt.NewRow();
dr["sino"] = dt.Rows.Count + 1;
dr["name"] = string.Empty;
dr["gender"] = "0";
dr["qualification"] = "0";
dt.Rows.Add(dr);
}
return dt;
}

//On Clicking Save Button this event fires

protected void btnSave_Click(object sender, EventArgs e)
{
SaveGridDataInTempTable();
}

//Save Grid in Temporary Datatable

private void SaveGridDataInTempTable()
{
DataTable dtTemp = new DataTable();
if (dtTemp == null || dtTemp.Columns.Count <= 0)
{
dtTemp.Columns.Add("sino");
dtTemp.Columns.Add("name", typeof(String));
dtTemp.Columns.Add("gender", typeof(String));
dtTemp.Columns.Add("qualification", typeof(String));
dtTemp.PrimaryKey = new DataColumn[] { dtTemp.Columns["sino"] };
}
foreach (GridViewRow gvRow in GridView1.Rows)
{
DataRow drTemp = dtTemp.NewRow();
drTemp["sino"] = int.Parse(GridView1.DataKeys[gvRow.RowIndex]["sino"].ToString());
drTemp["name"] = ((TextBox)gvRow.FindControl("TextBox1")).Text.Trim();
drTemp["gender"] =
    ((RadioButtonList)gvRow.FindControl("RadioButtonList1")).SelectedValue.ToString();
drTemp["qualification"] =
    ((DropDownList)gvRow.FindControl("DropDownList1")).SelectedValue.ToString();
dtTemp.Rows.Add(drTemp);
}
Temp = dtTemp;
}

//On Clicking New Button this event fires

protected void btnNew_Click(object sender, EventArgs e)
{
SaveGridDataInTempTable();
DataTable dtNew = Temp.Copy();
bool isinsert = true;
foreach (DataRow dr in dtNew.Rows)
{
if (String.IsNullOrEmpty(dr["name"].ToString()) ||
		String.IsNullOrEmpty(dr["gender"].ToString())
|| dr["qualification"].ToString() == "0")
{
isinsert = false;
}
}
if (isinsert)
BindEmptyRows(1, dtNew);
Temp = dtNew;
GridView1.DataSource = dtNew;
GridView1.DataBind();
}

//Property to maintain the Datatable

public DataTable Temp
{
get
{
object o = ViewState["Temp"];
if (o == null)
{
DataTable dt = new DataTable();
return dt;
}
else
return (DataTable)o;
}
set
{
ViewState["Temp"] = value;
}
}
}
Save Button in the Interface
The save button in the interface will save the values in a Temporary datatable and maintain it in a View State. We can also modify the values and save them in a temporary Datatable.
NewButton in the Interface
The new button in the interface will add a new row by checking whether the previous rows are not empty. If the previous rows are empty, then it won't add a new row. If the values are entered in the previous rows, then a new row will be entered.
Summary
This is my first article on The Code Project. I hope this will be useful to you. If you have any suggestions or find any mistakes, please leave a comment below.
History
- 5th May, 2009: Initial post