
How To Host .NET Remoting Objects in Windows Service Application
3.17/5 (15 votes)
A tutorial on how to create a Windows service application and host remoting object in the service application
For sometime, I have been working on Remoting projects using .NET but every time I always end up creating a console application to run as a remote server and host the remoting object in that. This definitely is not going to be the case in real world applications. Most of the time, you will require that your remote object is hosted in a server that is running all the time and does not require any user intervention like in a Console application. You have couple of options for hosting e.g. WebServer, Managed Executables (e.g. Console App) or Component Services.
This article is not about what .NET remoting is. You can read about that in .NET documentation or in my other article .NET Remoting Spied On. This article is a combination of how to write a Windows Service Application formerly known as NT Service and how to host your remoting object in that service.
How To Create Windows Service Application
.NET online documentation has a complete section on “Creating and Configuring Windows Service Applications”. This chapter contains very good information on Introduction, Architecture, Security Issues, Install/Uninstall issues. So it would be a waste of time and space if I start discussing those. But there are certain things that are not very clear in that documentation. So I will try to explain those and show what tools are available are in VS.NET to write Windows Service Applications.
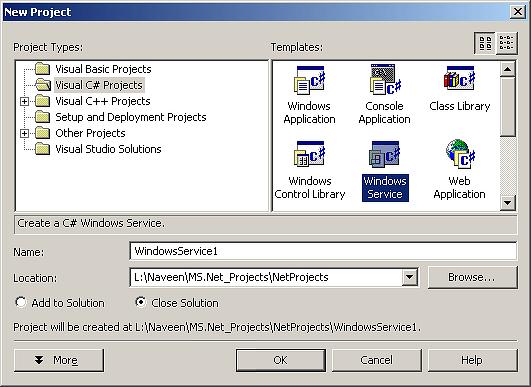
In VS.NET, if you click on New/Project, you will see that under Visual C# Project types, there is one named Windows Service. This is the type you want to pick if you want to write a service application. This does not mean that you can write Windows Service applications using C# only. You can do it in any language. This article is going to focus on using C# only.
.NET Framework provides System.ServiceProcess namespace that contains all the classes you need to write and install service applications. Every Windows Service application class has to be derived from ServiceProcess.SystemBase. For the demo project with this article, the definition looks as follows.
public class PS_RemoteSrvrSrvc : System.ServiceProcess.ServiceBase
By default, the wizard provides you with bare minimum skeleton for service application. It provides OnStart and OnStop methods, which are essential components of a service application. OnStart method gets called when the service starts automatically when the system starts or if it is manually started from Service Control Manager. OnStop gets called when the service stops. There are other methods that your service application can implement but that depends on the architecture and options you set for the application. E.g. you can implement OnPause, OnContinue, OnShutdown methods. But if your service application does not support pause and continue, then there is no need to implement these methods. You can set the characteristics of your application by setting the values for Properties supported by ServiceBase class and I would strongly recommend that you take a look at these properties in the documentation. Since debugging a Windows Service application is not a trivial job, setting of EventLog properties is very important. And I would recommend using EventLog extensively in the initial phase of your project so that you can log your trace messages in the event log.
How To Install Windows Service Application
The section on “Creating and Configuring Windows Service Applications” in the documentation says that you need to add installer components to install the service on your system so that it gets added to Service Control Manager (SCM). .NET Framework documentation covers this topic in “Configuring and Deploying your .NET application”. Lets see what needs to be done to add an installer component for our Windows Service application.
.NET Framework provided installutil. In the folder where the executable for your service application resides, run this utility to install or uninstall the application. Following is the syntax for install and uninstall.
installutil myService.exe
installutil /u myService
When installutil utility runs, it looks for a class with attribute RunInstallerAttribute set to true. Therefore the first step in adding service installer to your application is to add a class with this attribute. In the demo project, I have added PS_ServiceInstall derived from System.Configuration.Install.Installer to PS_RemoteServer namespace and set the RunInstallerAttribute attribute.
[RunInstallerAttribute(true)]
    public class PS_ServiceInstall : Installer
{
.
.
}
In the constructor of this Installer class, you can add the logic for installation. System.ServiceProcess.ServiceInstaller and System.ServiceProcess.ServiceProcessInstaller classes provide the functionality to add the Service and ServiceProcess installer component. Follow the following simple steps to add a bare minimum installer for your Windows Service application.
- Add a class derived from
System.Configuration.Install.Installerclass. - Set the
RunInstallerAttributeattribute for this class toTrue. - In the constructor, create a new instance of
ServiceProcessInstallerper service application and a new instance ofServiceInstallerclass for each service in the application. - Add these installer objects to the
InstallerCollectionof yourInstallerclass.
ServiceInstaller and ServiceProcessInstaller has a bunch of properties that can be used to set the attributes of the service. ServiceInstaller has the following properties:
DisplayName: Sets the friendly name that identifies the service to the user.ServiceName: Sets the name that the system uses to identify the service.ServicesDependedOn: Specifies the services that must be running for this service to run.StartType: Sets how and when the service will be started. The possible values for this property areAutomatic,ManualorDisabledmeaning that service will start automatically when the system starts, the user will manually start the service from SCM or service will start in disabled mode.
ServiceProcessInstaller has some very important properties that concern the security issues with your service application.
RunUnderSystemAccount: Specifies if the service will be run under the computer’s system account or under a certain user’s account. If this property is set totrue, then the service application will start under system account. This means it can start at system reboot without any user being logged on the system. But if this property is set tofalse, then during installation the user will be presented with a login dialog to enter the user name and password that should be used for authentication.UserName: Sets the user name under which the service will run. It is only required ifRunUnderSystemAccountproperty is set asfalse.Password: Sets the password associated with the user account under which the service will run. LikeUserNameproperty, this is only required ifRunUnderSystemAccountproperty is set asfalse.HelpText: Sets the help text displayed for service installation options.
The methods associated with these two classes are called by the Install utility during install and uninstall process. You don't have to specifically call any of these methods in your Installer class.
public PS_ServiceInstall()
{
        this.m_ServiceInstaller = new ServiceInstaller ();
        this.m_ServiceInstaller.StartType = ServiceStart.Manual;
        this.m_ServiceInstaller.ServiceName = "RemoteSystemInfo";
        this.m_ServiceInstaller.DisplayName = "Remote System Info";
        Installers.Add (this.m_ServiceInstaller);

        this.m_ProcessInstaller = new ServiceProcessInstaller ();
        this.m_ProcessInstaller.RunUnderSystemAccount = true;
        Installers.Add (this.m_ProcessInstaller);
}
How to host .NET Remoting Object
For hosting .NET Remoting objects in a server, you need to do the following:
- Create and register the channel of transport, the object used for marshalling, with
ChannelServices. E.g. you can use TCP, HTTP or SMTP channels. - Register your object with RemotingServices.
Before you can access the remote object, the server should be running and the above-mentioned tasks should have been completed. Therefore the best place to do this is in the OnStart method of your service.
protected override void OnStart(string[] args)
{
EventLog.WriteEntry("RemoteSystemInfo: OnStart -- Entering");
        TCPChannel tcpChannel = new TCPChannel (8085);
        EventLog.WriteEntry("RemoteSystemInfo: OnStart -- Created Channel");

        ChannelServices.RegisterChannel (tcpChannel);
        EventLog.WriteEntry("RemoteSystemInfo:" +
                 " OnStart -- Registered Channel");

        RemotingServices.RegisterWellKnownType ("PS_RemoteSrvr",
             "PS_RemoteSrvr.PS_SystemInfoSrvr",
             "PS_SystemInfoSrvr",
             WellKnownObjectMode.SingleCall);
        EventLog.WriteEntry("RemoteSystemInfo:" +
             " OnStart -- RegisterWellKnownType Done");
        EventLog.WriteEntry ("RemoteSystemInfo: OnStart -- Leaving");
}
The above code is all that is required to host a simple .NET remote object in Windows Service Application. You may require some extra steps or procedure depending on the nature of the remoting object and method you will use to configure it. But idea is that you should accomplish all the tasks on OnStart method of service.
How To Use Demo Project
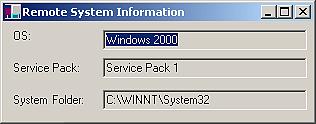
The demo project associated with this article is not doing anything fancy. I wrote a utility class that gets the OS information. I have added a method GetOSInfo to my remoting object PS_SystemInfoSrvr. This method creates a new instance of PS_OSInfo object, which is implemented in the PS_SystemInfoUtil project, and returns to the client. And then the client can call the methods and properties implemented by PS_OSInfo class. I have included the configuration file, PS_SystemInfo.cfg, that the client can use to configure access to the remote server. The client application is implemented in PS_RemoteSystemInfo project. Following code shows how the client application configures and accesses the remoting object.
private void ConfigureRemoteServer ()
{
        try
        {
               RemotingServices.ConfigureRemoting ("PS_RemoteSystemInfo.cfg");
               this.m_RemoteInfoSrvr = (PS_SystemInfoSrvr)
                   Activator.GetObject (typeof (PS_SystemInfoSrvr),
                   "tcp://sultan:8085/PS_SystemInfoSrvr");

               PS_SystemOS sysOS = this.m_RemoteInfoSrvr.GetOSInfo ();
               string strSystemDir = sysOS.SystemFolder;
               string strOS = sysOS.OS;
               string strVersion = sysOS.ServicePack;
        }
        catch (RemotingException e)
        {
               Trace.WriteLine (e.Message);
        }
}
I have used TCP as my transport mechanism and “sultan” is my remote server where the service application hosting the remoting object is running. For your application, you will need to provide the name or IP address of your server in the configuration file or in the GetObject call. If you want to run Client and Service app on the same machine then simply use “localhost” as the server name.
To install the service application, copy PS_RemoteSrvr.exe and PS_SystemInfoUtil.dll to the folder where you want to install it. On the command line, run installutil utility in that folder. Then open the Service Control Manager. There you will see the service application. It will not be started yet, because I have set the start type as Manual. Right click on it and Start it. Now your remoting object has been hosted in the service application. As long as the service application is running, your client application can access it.
On the client machine, you don't need to run the instalutil utility. Simply run the PS_RemoteSystemInfo.exe. Put a break point in the ConfigureRemoteServer method and then you can see Remoting in action.
Do I Need VS.NET To Write a Service Application
You can definitely write a Windows Service Application without VS.NET. You just need to create a class derived from System.ServiceProcess.ServiceBase class. The only advantage of using VS.NET is that it creates a skeleton for a service application.
What Additional References Need To Be Added To the Project
Remoting is implemented in Service.Runtime.Remoting so that needs to be added to your service as well as client application.
History
- 13th May, 2001: Initial post