
Azure Cosmos DB: SQL API getting started tutorial
This tutorial covers: Creating and connecting to an Azure Cosmos DB account, Configuring your Visual Studio Solution, Creating an online database, and more!
Welcome to the Azure Cosmos DB SQL API getting started tutorial! After following this tutorial, you'll have a console application that creates and queries Azure Cosmos DB resources.
This tutorial covers:
- Creating and connecting to an Azure Cosmos DB account
- Configuring your Visual Studio Solution
- Creating an online database
- Creating a collection
- Creating JSON documents
- Querying the collection
- Replacing a document
- Deleting a document
- Deleting the database
Don't have time? Don't worry! The complete solution is available on GitHub. Jump to the Get the complete NoSQL tutorial solution section for quick instructions.
Now let's get started!
Prerequisites
-
An active Azure account. If you don't have one, you can sign up for a free account.
You can Try Azure Cosmos DB for free without an Azure subscription, free of charge and commitments. Or, you can use the Azure Cosmos DB Emulator with a URI of https://localhost:8081. The Primary Key is provided in Authenticating requests.
-
If you don’t already have Visual Studio 2017 installed, you can download and use the free Visual Studio 2017 Community Edition. Make sure that you enable Azure development workload during the Visual Studio setup.
Step 1: Create an Azure Cosmos DB account
Let's create an Azure Cosmos DB account. If you already have an account you want to use, you can skip ahead to Setup your Visual Studio Solution. If you are using the Azure Cosmos DB Emulator, follow the steps at Azure Cosmos DB Emulator to setup the emulator and skip ahead to Setup your Visual Studio Solution.
- In a new browser window, sign in to the Azure portal.
-
Select Create a resource > Databases > Azure Cosmos DB.

-
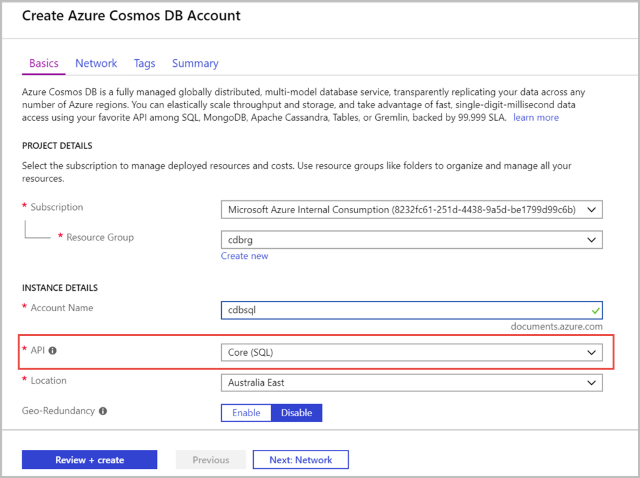
On the Create Azure Cosmos DB Account page, enter the basic settings for the new Azure Cosmos DB account.
Setting Value Description Subscription Your subscription Select the Azure subscription that you want to use for this Azure Cosmos DB account. Resource Group Create new
Then enter the same unique name as provided in IDSelect Create new. Then enter a new resource-group name for your account. For simplicity, use the same name as your ID. Account Name Enter a unique name Enter a unique name to identify your Azure Cosmos DB account. Because documents.azure.com is appended to the ID that you provide to create your URI, use a unique ID.
The ID can only contain lowercase letters, numbers, and the hyphen (-) character. It must be between 3 and 31 characters in length.API Core(SQL) The API determines the type of account to create. Azure Cosmos DB provides five APIs: Core(SQL) for document databases, Gremlin for graph databases, MongoDB for document databases, Azure Table, and Cassandra. Currently, you must create a separate account for each API.
Select Core(SQL) because in this article you create a document database and query by using SQL syntax.
Learn more about the SQL API.Location Select the region closest to your users Select a geographic location to host your Azure Cosmos DB account. Use the location that's closest to your users to give them the fastest access to the data. Select Review+Create. You can skip the Network and Tags section.
-
The account creation takes a few minutes. Wait for the portal to display the Congratulations! Your Azure Cosmos DB account was created page.

Step 2: Setup your Visual Studio solution
- Open Visual Studio 2017 on your computer.
- On the File menu, select New, and then choose Project.
- In the New Project dialog, select Templates / Visual C# / Console Application, name your project, and then click OK.

-
In the Solution Explorer, right click on your new console application, which is under your Visual Studio solution, and then click Manage NuGet Packages...

- In the NuGet tab, click Browse, and type azure documentdb in the search box.
-
Within the results, find Microsoft.Azure.DocumentDB and click Install. The package ID for the Azure Cosmos DB SQL API Client Library is Microsoft Azure Cosmos DB Client Library.

If you get a message about reviewing changes to the solution, click OK. If you get a message about license acceptance, click I accept.
Great! Now that we finished the setup, let's start writing some code. You can find a completed code project of this tutorial at GitHub.
Step 3: Connect to an Azure Cosmos DB account
First, add these references to the beginning of your C# application, in the i file:
using System;
using System.Linq;
using System.Threading.Tasks;

// ADD THIS PART TO YOUR CODE
using System.Net;
using Microsoft.Azure.Documents;
using Microsoft.Azure.Documents.Client;
using Newtonsoft.Json;
Important
In order to complete the tutorial, make sure you add the dependencies above.
Now, add these two constants and your client variable underneath your public class Program.
public class Program
{
    // ADD THIS PART TO YOUR CODE
    private const string EndpointUrl = "<your endpoint URL>";
    private const string PrimaryKey = "<your primary key>";
    private DocumentClient client;
Next, head back to the Azure portal to retrieve your endpoint URL and primary key. The endpoint URL and primary key are necessary for your application to understand where to connect to, and for Azure Cosmos DB to trust your application's connection.
In the Azure portal, navigate to your Azure Cosmos DB account, and then click Keys.
Copy the URI from the portal and paste it into <your endpoint URL> in the program.cs file. Then copy the PRIMARY KEY from the portal and paste it into <your primary key>.

Next, we'll start the application by creating a new instance of the DocumentClient.
Below the Main method, add this new asynchronous task called GetStartedDemo, which will instantiate our new DocumentClient.
static void Main(string[] args)
{
}

// ADD THIS PART TO YOUR CODE
private async Task GetStartedDemo()
{
    this.client = new DocumentClient(new Uri(EndpointUrl), PrimaryKey);
}
Add the following code to run your asynchronous task from your Main method. The Main method will catch exceptions and write them to the console.
static void Main(string[] args)
{
        // ADD THIS PART TO YOUR CODE
        try
        {
                Program p = new Program();
                p.GetStartedDemo().Wait();
        }
        catch (DocumentClientException de)
        {
                Exception baseException = de.GetBaseException();
                Console.WriteLine("{0} error occurred: {1}, Message: {2}", de.StatusCode, de.Message, baseException.Message);
        }
        catch (Exception e)
        {
                Exception baseException = e.GetBaseException();
                Console.WriteLine("Error: {0}, Message: {1}", e.Message, baseException.Message);
        }
        finally
        {
                Console.WriteLine("End of demo, press any key to exit.");
                Console.ReadKey();
        }
Press F5 to run your application. The console window output displays the message "End of demo, press any key to exit." confirming that the connection was made. You can then close the console window.
Congratulations! You have successfully connected to an Azure Cosmos DB account, let's now take a look at working with Azure Cosmos DB resources.
Step 4: Create a database
Before you add the code for creating a database, add a helper method for writing to the console.
Copy and paste the WriteToConsoleAndPromptToContinue method after the GetStartedDemo method.
// ADD THIS PART TO YOUR CODE
private void WriteToConsoleAndPromptToContinue(string format, params object[] args)
{
        Console.WriteLine(format, args);
        Console.WriteLine("Press any key to continue ...");
        Console.ReadKey();
}
Your Azure Cosmos DB database can be created by using the CreateDatabaseIfNotExistsAsync method of the DocumentClient class. A database is the logical container of JSON document storage partitioned across collections.
Copy and paste the following code to your GetStartedDemo method after the client creation. This will create a database named FamilyDB.
private async Task GetStartedDemo()
{
    this.client = new DocumentClient(new Uri(EndpointUrl), PrimaryKey);

    // ADD THIS PART TO YOUR CODE
    await this.client.CreateDatabaseIfNotExistsAsync(new Database { Id = "FamilyDB" });
Press F5 to run your application.
Congratulations! You have successfully created an Azure Cosmos DB database.
Step 5: Create a collection
Warning
CreateDocumentCollectionIfNotExistsAsync will create a new collection with reserved throughput, which has pricing implications. For more details, please visit our pricing page.
A collection can be created by using the CreateDocumentCollectionIfNotExistsAsync method of the DocumentClient class. A collection is a container of JSON documents and associated JavaScript application logic.
Copy and paste the following code to your GetStartedDemo method after the database creation. This will create a document collection named FamilyCollection.
    this.client = new DocumentClient(new Uri(EndpointUrl), PrimaryKey);

    await this.client.CreateDatabaseIfNotExistsAsync(new Database { Id = "FamilyDB" });

    // ADD THIS PART TO YOUR CODE
     await this.client.CreateDocumentCollectionIfNotExistsAsync(UriFactory.CreateDatabaseUri("FamilyDB"), new DocumentCollection { Id = "FamilyCollection" });
Press F5 to run your application.
Congratulations! You have successfully created an Azure Cosmos DB document collection.
Step 6: Create JSON documents
A document can be created by using the CreateDocumentAsync method of the DocumentClient class. Documents are user defined (arbitrary) JSON content. We can now insert one or more documents. If you already have data you'd like to store in your database, you can use the Azure Cosmos DB Data Migration tool to import the data into a database.
First, we need to create a Family class that will represent objects stored within Azure Cosmos DB in this sample. We will also create Parent, Child, Pet, Address subclasses that are used within Family. Note that documents must have an Id property serialized as id in JSON. Create these classes by adding the following internal sub-classes after the GetStartedDemo method.
Copy and paste the Family, Parent, Child, Pet, and Address classes after the WriteToConsoleAndPromptToContinue method.
private void WriteToConsoleAndPromptToContinue(string format, params object[] args)
{
    Console.WriteLine(format, args);
    Console.WriteLine("Press any key to continue ...");
    Console.ReadKey();
}

// ADD THIS PART TO YOUR CODE
public class Family
{
    [JsonProperty(PropertyName = "id")]
    public string Id { get; set; }
    public string LastName { get; set; }
    public Parent[] Parents { get; set; }
    public Child[] Children { get; set; }
    public Address Address { get; set; }
    public bool IsRegistered { get; set; }
    public override string ToString()
    {
        return JsonConvert.SerializeObject(this);
    }
}

public class Parent
{
    public string FamilyName { get; set; }
    public string FirstName { get; set; }
}

public class Child
{
    public string FamilyName { get; set; }
    public string FirstName { get; set; }
    public string Gender { get; set; }
    public int Grade { get; set; }
    public Pet[] Pets { get; set; }
}

public class Pet
{
    public string GivenName { get; set; }
}

public class Address
{
    public string State { get; set; }
    public string County { get; set; }
    public string City { get; set; }
}
Copy and paste the CreateFamilyDocumentIfNotExists method underneath your Address class.
// ADD THIS PART TO YOUR CODE
private async Task CreateFamilyDocumentIfNotExists(string databaseName, string collectionName, Family family)
{
    try
    {
        await this.client.ReadDocumentAsync(UriFactory.CreateDocumentUri(databaseName, collectionName, family.Id));
        this.WriteToConsoleAndPromptToContinue("Found {0}", family.Id);
    }
    catch (DocumentClientException de)
    {
        if (de.StatusCode == HttpStatusCode.NotFound)
        {
            await this.client.CreateDocumentAsync(UriFactory.CreateDocumentCollectionUri(databaseName, collectionName), family);
            this.WriteToConsoleAndPromptToContinue("Created Family {0}", family.Id);
        }
        else
        {
            throw;
        }
    }
}
And insert two documents, one each for the Andersen Family and the Wakefield Family.
Copy and paste the following code to your GetStartedDemo method after the document collection creation.
await this.client.CreateDatabaseIfNotExistsAsync(new Database { Id = "FamilyDB" });

await this.client.CreateDocumentCollectionIfNotExistsAsync(UriFactory.CreateDatabaseUri("FamilyDB"), new DocumentCollection { Id = "FamilyCollection" });


// ADD THIS PART TO YOUR CODE
Family andersenFamily = new Family
{
        Id = "Andersen.1",
        LastName = "Andersen",
        Parents = new Parent[]
        {
                new Parent { FirstName = "Thomas" },
                new Parent { FirstName = "Mary Kay" }
        },
        Children = new Child[]
        {
                new Child
                {
                        FirstName = "Henriette Thaulow",
                        Gender = "female",
                        Grade = 5,
                        Pets = new Pet[]
                        {
                                new Pet { GivenName = "Fluffy" }
                        }
                }
        },
        Address = new Address { State = "WA", County = "King", City = "Seattle" },
        IsRegistered = true
};

await this.CreateFamilyDocumentIfNotExists("FamilyDB", "FamilyCollection", andersenFamily);

Family wakefieldFamily = new Family
{
        Id = "Wakefield.7",
        LastName = "Wakefield",
        Parents = new Parent[]
        {
                new Parent { FamilyName = "Wakefield", FirstName = "Robin" },
                new Parent { FamilyName = "Miller", FirstName = "Ben" }
        },
        Children = new Child[]
        {
                new Child
                {
                        FamilyName = "Merriam",
                        FirstName = "Jesse",
                        Gender = "female",
                        Grade = 8,
                        Pets = new Pet[]
                        {
                                new Pet { GivenName = "Goofy" },
                                new Pet { GivenName = "Shadow" }
                        }
                },
                new Child
                {
                        FamilyName = "Miller",
                        FirstName = "Lisa",
                        Gender = "female",
                        Grade = 1
                }
        },
        Address = new Address { State = "NY", County = "Manhattan", City = "NY" },
        IsRegistered = false
};

await this.CreateFamilyDocumentIfNotExists("FamilyDB", "FamilyCollection", wakefieldFamily);
Press F5 to run your application.
Congratulations! You have successfully created two Azure Cosmos DB documents.

Step 7: Query Azure Cosmos DB resources
Azure Cosmos DB supports rich queries against JSON documents stored in each collection. The following sample code shows various queries - using both Azure Cosmos DB SQL syntax as well as LINQ - that we can run against the documents we inserted in the previous step.
Copy and paste the ExecuteSimpleQuery method after your CreateFamilyDocumentIfNotExists method.
// ADD THIS PART TO YOUR CODE
private void ExecuteSimpleQuery(string databaseName, string collectionName)
{
    // Set some common query options
    FeedOptions queryOptions = new FeedOptions { MaxItemCount = -1 };

        // Here we find the Andersen family via its LastName
        IQueryable<Family> familyQuery = this.client.CreateDocumentQuery<Family>(
                UriFactory.CreateDocumentCollectionUri(databaseName, collectionName), queryOptions)
                .Where(f => f.LastName == "Andersen");

        // The query is executed synchronously here, but can also be executed asynchronously via the IDocumentQuery<T> interface
        Console.WriteLine("Running LINQ query...");
        foreach (Family family in familyQuery)
        {
                Console.WriteLine("\tRead {0}", family);
        }

        // Now execute the same query via direct SQL
        IQueryable<Family> familyQueryInSql = this.client.CreateDocumentQuery<Family>(
                UriFactory.CreateDocumentCollectionUri(databaseName, collectionName),
                "SELECT * FROM Family WHERE Family.LastName = 'Andersen'",
                queryOptions);

        Console.WriteLine("Running direct SQL query...");
        foreach (Family family in familyQueryInSql)
        {
                Console.WriteLine("\tRead {0}", family);
        }

        Console.WriteLine("Press any key to continue ...");
        Console.ReadKey();
}
Copy and paste the following code to your GetStartedDemo method after the second document creation.
await this.CreateFamilyDocumentIfNotExists("FamilyDB", "FamilyCollection", wakefieldFamily);

// ADD THIS PART TO YOUR CODE
this.ExecuteSimpleQuery("FamilyDB", "FamilyCollection");
Press F5 to run your application.
Congratulations! You have successfully queried against an Azure Cosmos DB collection.
The following diagram illustrates how the Azure Cosmos DB SQL query syntax is called against the collection you created, and the same logic applies to the LINQ query as well.

The FROM keyword is optional in the query because Azure Cosmos DB queries are already scoped to a single collection. Therefore, "FROM Families f" can be swapped with "FROM root r", or any other variable name you choose. Azure Cosmos DB will infer that Families, root, or the variable name you chose, reference the current collection by default.
Step 8: Replace JSON document
Azure Cosmos DB supports replacing JSON documents.
Copy and paste the ReplaceFamilyDocument method after your ExecuteSimpleQuery method.
// ADD THIS PART TO YOUR CODE
private async Task ReplaceFamilyDocument(string databaseName, string collectionName, string familyName, Family updatedFamily)
{
     await this.client.ReplaceDocumentAsync(UriFactory.CreateDocumentUri(databaseName, collectionName, familyName), updatedFamily);
     this.WriteToConsoleAndPromptToContinue("Replaced Family {0}", familyName);
}
Copy and paste the following code to your GetStartedDemo method after the query execution, at the end of the method. After replacing the document, this will run the same query again to view the changed document.
await this.CreateFamilyDocumentIfNotExists("FamilyDB", "FamilyCollection", wakefieldFamily);

this.ExecuteSimpleQuery("FamilyDB", "FamilyCollection");

// ADD THIS PART TO YOUR CODE
// Update the Grade of the Andersen Family child
andersenFamily.Children[0].Grade = 6;

await this.ReplaceFamilyDocument("FamilyDB", "FamilyCollection", "Andersen.1", andersenFamily);

this.ExecuteSimpleQuery("FamilyDB", "FamilyCollection");
Press F5 to run your application.
Congratulations! You have successfully replaced an Azure Cosmos DB document.
Step 9: Delete JSON document
Azure Cosmos DB supports deleting JSON documents.
Copy and paste the DeleteFamilyDocument method after your ReplaceFamilyDocument method.
// ADD THIS PART TO YOUR CODE
private async Task DeleteFamilyDocument(string databaseName, string collectionName, string documentName)
{
     await this.client.DeleteDocumentAsync(UriFactory.CreateDocumentUri(databaseName, collectionName, documentName));
     Console.WriteLine("Deleted Family {0}", documentName);
}
Copy and paste the following code to your GetStartedDemo method after the second query execution, at the end of the method.
await this.ReplaceFamilyDocument("FamilyDB", "FamilyCollection", "Andersen.1", andersenFamily);

this.ExecuteSimpleQuery("FamilyDB", "FamilyCollection");

// ADD THIS PART TO CODE
await this.DeleteFamilyDocument("FamilyDB", "FamilyCollection", "Andersen.1");
Press F5 to run your application.
Congratulations! You have successfully deleted an Azure Cosmos DB document.
Step 10: Delete the database
Deleting the created database will remove the database and all children resources (collections, documents, etc.).
Copy and paste the following code to your GetStartedDemo method after the document delete to delete the entire database and all children resources.
this.ExecuteSimpleQuery("FamilyDB", "FamilyCollection");

await this.DeleteFamilyDocument("FamilyDB", "FamilyCollection", "Andersen.1");

// ADD THIS PART TO CODE
// Clean up/delete the database
await this.client.DeleteDatabaseAsync(UriFactory.CreateDatabaseUri("FamilyDB"));
Press F5 to run your application.
Congratulations! You have successfully deleted an Azure Cosmos DB database.
Step 11: Run your C# console application all together!
Hit F5 in Visual Studio to build the application in debug mode.
You should see the output of your get started app in a console window. The output will show the results of the queries we added and should match the example text below.
Created FamilyDB
Press any key to continue ...
Created FamilyCollection
Press any key to continue ...
Created Family Andersen.1
Press any key to continue ...
Created Family Wakefield.7
Press any key to continue ...
Running LINQ query...
    Read {"id":"Andersen.1","LastName":"Andersen","District":"WA5","Parents":[{"FamilyName":null,"FirstName":"Thomas"},{"FamilyName":null,"FirstName":"Mary Kay"}],"Children":[{"FamilyName":null,"FirstName":"Henriette Thaulow","Gender":"female","Grade":5,"Pets":[{"GivenName":"Fluffy"}]}],"Address":{"State":"WA","County":"King","City":"Seattle"},"IsRegistered":true}
Running direct SQL query...
    Read {"id":"Andersen.1","LastName":"Andersen","District":"WA5","Parents":[{"FamilyName":null,"FirstName":"Thomas"},{"FamilyName":null,"FirstName":"Mary Kay"}],"Children":[{"FamilyName":null,"FirstName":"Henriette Thaulow","Gender":"female","Grade":5,"Pets":[{"GivenName":"Fluffy"}]}],"Address":{"State":"WA","County":"King","City":"Seattle"},"IsRegistered":true}
Replaced Family Andersen.1
Press any key to continue ...
Running LINQ query...
    Read {"id":"Andersen.1","LastName":"Andersen","District":"WA5","Parents":[{"FamilyName":null,"FirstName":"Thomas"},{"FamilyName":null,"FirstName":"Mary Kay"}],"Children":[{"FamilyName":null,"FirstName":"Henriette Thaulow","Gender":"female","Grade":6,"Pets":[{"GivenName":"Fluffy"}]}],"Address":{"State":"WA","County":"King","City":"Seattle"},"IsRegistered":true}
Running direct SQL query...
    Read {"id":"Andersen.1","LastName":"Andersen","District":"WA5","Parents":[{"FamilyName":null,"FirstName":"Thomas"},{"FamilyName":null,"FirstName":"Mary Kay"}],"Children":[{"FamilyName":null,"FirstName":"Henriette Thaulow","Gender":"female","Grade":6,"Pets":[{"GivenName":"Fluffy"}]}],"Address":{"State":"WA","County":"King","City":"Seattle"},"IsRegistered":true}
Deleted Family Andersen.1
End of demo, press any key to exit.
Congratulations! You've completed the tutorial and have a working C# console application!
Get the complete tutorial solution
If you didn't have time to complete the steps in this tutorial, or just want to download the code samples, you can get it from GitHub.
To build the GetStarted solution, you will need the following:
- An active Azure account. If you don't have one, you can sign up for a free account.
- An Azure Cosmos DB account.
- The GetStarted solution available on GitHub.
To restore the references to the Azure Cosmos DB .NET SDK in Visual Studio, right-click the GetStarted solution in Solution Explorer, and then click Enable NuGet Package Restore. Next, in the App.config file, update the EndpointUrl and AuthorizationKey values as described in Connect to an Azure Cosmos DB account.
That's it, build it and you're on your way!
Next steps
- Want a more complex ASP.NET MVC tutorial? See ASP.NET MVC Tutorial: Web application development with Azure Cosmos DB.
- Want to perform scale and performance testing with Azure Cosmos DB? See Performance and scale testing with Azure Cosmos DB
- Learn how to monitor Azure Cosmos DB requests, usage, and storage.
- Run queries against our sample dataset in the Query Playground.
- To learn more about Azure Cosmos DB, see Welcome to Azure Cosmos DB.