
How to Create a Visual Studio Add-in that Launches from the Project Window
4.90/5 (3 votes)
A step by step guide on how to create a Visual Studio add-in that launches from the Project window.
Introduction
Within Visual Studio 2010, there are two main ways to install add-ons that allow you to make modifications to a Visual Studio project. The first way is to use Visual Studio templates. Templates are a great way to duplicate work that you would commonly need to do such as add license information to the top of every class. Another way is to use add-ins. Add-ins typically run from the Visual Studio Tools menu and allow you to run a program to do something. In our case, we were writing a component for our customers that would modify the Windows Azure service config file, and add-ins seemed to be the best way to accomplish this. The main issue with add-ins is that they run from the Tools menu so if you want to be able to make changes to a project of the user's choice, there is no way to do this unless you actually ask the user which project to modify. This would give a very bad user experience. What would be best is if a user could right click on a project to launch the add-in. Surprisingly, we could find very little information on the subject. Luckily, it is quite simple. This tutorial will walk you through the process.
Using the Code
To get started, open Visual Studio 2010 and create a new project and choose Other Project Types | Extensibility | Visual Studio Add-in. Leave the Name as the default name MyAddin1, and press OK.

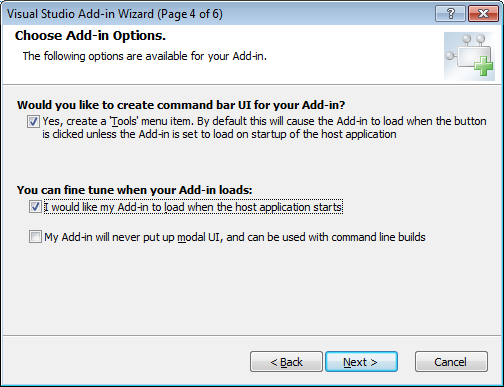
As you walk through the wizard, you can leave the defaults (including choosing C#), except in “Choose Add-in Options”, you will want to ensure that you have selected the first two options:
After you finalize the wizard, it will create a blank Add-in project.
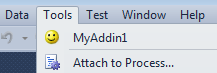
At this point, you have a working add-in. If you were to build the project and run it, you would see the add-in within the Tools menu.
Note: If you find the add-in is not loading, you can manually copy the two files MyAddin1.dll and MyAddin1.Addin to your C:\Users\<USERNAME>\Documents\Visual Studio 2010\Addins directory and reload Visual Studio.
This would be handy in many cases; however, we want to enable this functionality from the Project menu in Solution Explorer. To do this, we will need to modify the Connect.cs file. Open the Connect.cs file from the Solution Explorer. Locate the OnConnection method and replace it with the following code:
public void OnConnection(object application, ext_ConnectMode connectMode,
                         object addInInst, ref Array custom)
{
    _applicationObject = (DTE2)application;
    _addInInstance = (AddIn)addInInst;
    if (connectMode == ext_ConnectMode.ext_cm_UISetup)
    {
        object[] contextGUIDS = new object[] { };
        Commands2 commands = (Commands2)_applicationObject.Commands;
        Microsoft.VisualStudio.CommandBars.CommandBar standardToolBar =
          ((Microsoft.VisualStudio.CommandBars.CommandBars)
          _applicationObject.CommandBars)["Project"];
        try
        {
            Command command = commands.AddNamedCommand2(_addInInstance, "MyAddin1",
                              "My Addin...", "Executes the command for My Addin",
                              true, 59, ref contextGUIDS,
                              (int)vsCommandStatus.vsCommandStatusSupported +
                              (int)vsCommandStatus.vsCommandStatusEnabled,
                              (int)vsCommandStyle.vsCommandStylePictAndText,
                              vsCommandControlType.vsCommandControlTypeButton);
            if ((command != null) && (standardToolBar != null))
            {
                CommandBarControl ctrl =
                  (CommandBarControl)command.AddControl(standardToolBar, 1);
                ctrl.TooltipText = "Executes the command for MyAddin";
            }
        }
        catch (System.ArgumentException)
        {
        }
    }
}
The real trick to this is the part of the code that includes ["Project"]. This tells Visual Studio to load the add-in from the Project menu. This is also how you would change the add-in to be loaded from the Solution menu within Solution Explorer.
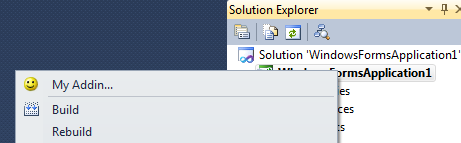
That is all there is to it. Now if you build and run the add-in, it will allow you to launch the add-in from the Project menu. Give it a try by running the add-in. This will launch a new instance of Visual Studio. Create a new Visual Studio project (such as a Windows Form Application). Right click on the Project menu in the Solution Explorer and you should see your new add-in.
Points of Interest
If you would like to change the icon from the default happy face, locate this line and change the value from 59 to one of the other default icon numbers:
Command command = commands.AddNamedCommand2(_addInInstance, "MyAddin1",
                  "My Addin...", "Executes the command for My Addin",
                  true, 59, ref contextGUIDS,
                  (int)vsCommandStatus.vsCommandStatusSupported +
                  (int)vsCommandStatus.vsCommandStatusEnabled,
                  (int)vsCommandStyle.vsCommandStylePictAndText,
                  vsCommandControlType.vsCommandControlTypeButton);
You will also note that when you click on the add-in, the code that is called is the following. You can load your own add-in logic where it says: handled = true;.
public void Exec(string commandName, vsCommandExecOption executeOption,
                 ref object varIn, ref object varOut, ref bool handled)
{
    handled = false;
    if(executeOption == vsCommandExecOption.vsCommandExecOptionDoDefault)
    {
        if(commandName == "MyAddin1.Connect.MyAddin1")
        {
            handled = true;
            return;
        }
    }
}
History
- 27th March, 2011: Initial post