
Creating a simple Facebook Application using WPF
4.79/5 (34 votes)
Aug 16, 2007
3 min read
220149
9426
The following article details how to create a very simple Facebook application using Facebook Platform & WPF
Introduction
Facebook is growing at an incredible pace (already 30 million users registered and doubling every 6 months). The new Facebook platform is an incredible software platform and can easily be extended using the provided SDK. The following Code Project article is an introduction into creating a very simple MSN Messenger or Yahoo! Messenger type application for Facebook.
In this first article, I will provide an overview of how to set up your Facebook application and write a very basic WPF application that connects to Facebook and populates your friends list.
Setting up Facebook
Visit the developer website.
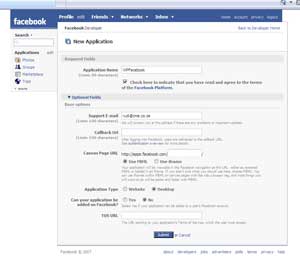
- Click on "Getting started"
- Add
FacebookDeveloper Application - Log into
Facebook - Add Developer Application
- Set up new application
- Application Name: WPFB (Here you can choose any name as long as it doesn't contain the word Face
- Click checkbox to agree with License Agreement and also expand the optional Fields
- Change application type to Desktop (This is very important!)
- Submit
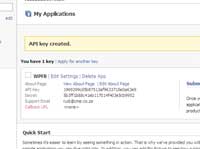
Keep the API Key & Secret provided for use later.
Here is a discussion about whether it is legal to disclose the secret key of your application.
Creating a simple UI
Download the Facebook SDK binaries from here.
Create a WPF Application and add Image & ListBox Controls into a StackPanel.
<StackPanel>
    <Image x:Name="ProfilePicture"Stretch="None"HorizontalAlignment=
                        "Left"VerticalAlignment="Top"/>
    <ListBox x:Name="FriendsListBox"/>
</StackPanel>
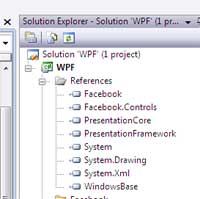
Add the following References to your project:
- Facebook.dll
- Facebook.Controls.dll
Also add the following namespaces:
using Facebook.Components;               //FacebookService

using Facebook.Exceptions;
using Facebook.Entity;                   //User

using System.Windows.Media.Imaging;      //BitmapImage

using System.Collections.ObjectModel;    //Collection
Next, we have to create an instance of the Facebook service.
FacebookService service;
Now, we also need to setup the service with the API Key & Secret recorded earlier. I currently do this in the constructor of my Window.
service = new FacebookService();
service.IsDesktopApplication = true;
service.ApplicationKey = "1969299cd5b87513af9633715e0a63e9";
service.Secret = "5b3ff1b88c41eb117014f403e5cb9952";
Now we are ready to start getting information from Facebook. To download my profile picture from Facebook, add the following code to the SourceInitialized event of the Window.
User me = service.GetUserInfo();
if (me != null)
    ProfilePicture.Source = new BitmapImage(me.PictureSmallUrl);
This basically downloads the small profile picture from the specified URL. This is a good time to save and test your project. Once you have compiled and Run this application, the following logon screen gets displayed:
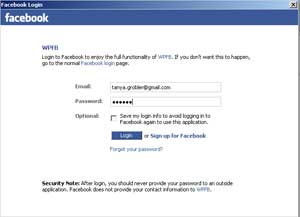
I have also noticed that this currently doesn't work if you are behind an HTTP proxy server. I get a "The underlying connection was closed" exception. Future releases of Facebook SDK would hopefully include support for Proxy servers and allow you to rather log in by using a function to which you can supply a user name and password as opposed to showing the HTML based login screen...
Fill in your user name and password and now click on login. You should hopefully now see a Window with your profile picture displayed!
The next step is to populate the ListBox with all my friends. To get all your friends from Facebook, add the following code to the SourceInitialized Event:
Collection<User> friends = service.GetFriends();
Update the friend's ListBox with the following DataTemplate.
<ListBox x:Name="FriendsListBox" ItemsSource="{Binding}">
   <ListBox.ItemTemplate>
       <DataTemplate>
           <Image Source="{Binding Path=PictureSmallUrl}" />
       </DataTemplate>
   </ListBox.ItemTemplate>
</ListBox>
The final step is to point the ListBox to the friends collection.
FriendsListBox.ItemsSource = friends;
Conclusion
As you can see, to setup and create a simple Facebook application is not very difficult. In the next couple of days, I will expand on this base and update the application. Planned future expansion will include:
- Notifications from
Facebook - More "Beautiful UI" that supports skinning, and
- A send message feature once you double-clicked on a friend

With very little effort and quick beautifying touches, the final application looks like this! (I borrowed Sacha Barber's Glass Button effect for the friends icons)
Please comment on how I can improve my articles (since this is only my second) and also rate this article (even if you thought it was utterly useless!)
Links
History
- 13-Aug-2007 - First draft