
Using ComponentOne Ribbon for .NET as an Interface to Google Maps
3.00/5 (1 vote)
Sep 6, 2007
14 min read
43976
The C1Ribbon control provides a pixel-perfect implementation of the Ribbon UI concept introduced in Office 2007, replacing traditional menus and toolbars with tabs containing groups of related commands. This article describes a ClickOnce application that uses C1Ribbon as an interface to Google Maps.
This is a showcase review for our sponsors at The Code Project. These reviews are intended to provide you with information on products and services that we consider useful and of value to developers.
Overview
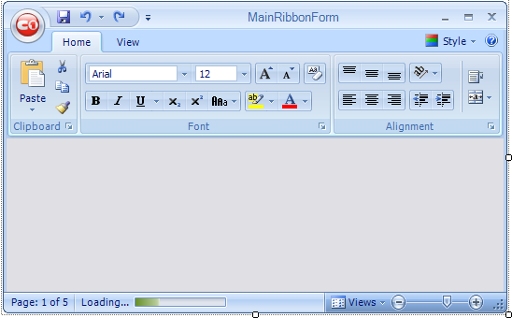
The 2007 v1.5 release of ComponentOne Studio Enterprise introduced a new product, Ribbon for .NET, that provides a pixel-perfect implementation of the Ribbon UI concept introduced in the 2007 release of Microsoft Office. The C1Ribbon component replaces traditional menus and toolbars with a set of tabs at the top of the parent form. Each tab contains groups of related commands that are represented with standard controls such as buttons, check boxes, and dropdown menus.
This article demonstrates the use of the C1Ribbon and C1StatusBar components in a Windows Forms application that provides an interface to Google Maps. In addition to covering design-time layout and event handling, this article illustrates two-way communication between a .NET application and JavaScript running in an HTML page. The sample application is available via ClickOnce install and as a source code download.
Running the Sample Application
To see the above application in action, click the following link to start a ClickOnce installation (requires the .NET Framework 2.0):
http://helpcentral.componentone.com/c1ribbonearth/c1ribbonearth.application
To download the source code for the application (in C#), click the following link:
http://helpcentral.componentone.com/c1kb/upload/c1ribbonearth.zip
You will also need to download an evaluation version of Studio Enterprise 2007 v1.5 (or update an earlier version) in order to build and run the application.
The following sections describe the user interface elements of the C1RibbonEarth application, all of which are provided by the C1Ribbon and C1StatusBar components.
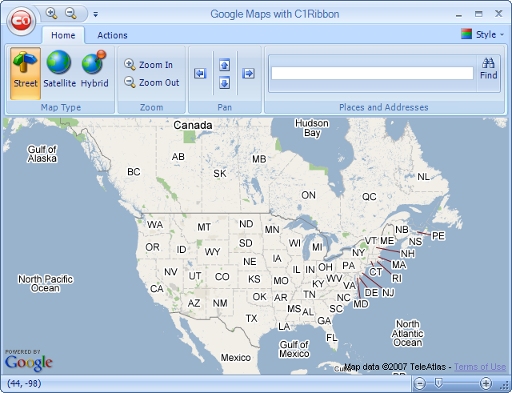
Home Tab
The Home Tab provides access to the most commonly used commands. It consists of four groups:
| Map Type | Contains a set of mutually exclusive toggle buttons for selecting the type of map to display (street maps, satellite images, or a combination of both). |
| Zoom | Contains two command buttons for zooming in and out. |
| Pan | Contains four command buttons for panning the image (Left, Right, Up, Down). |
| Places and Addresses | Contains a text box and a command button for locating a specific street address, place name, or zip code. |
Actions Tab
The Actions Tab controls user preferences and provides access to infrequently used commands. It consists of two groups:
| Mouse | Contains two check boxes that control the behavior of drag and mouse wheel operations. |
| Position | Contains two command buttons for saving/restoring the current map location and zoom level. |
Application Menu
To open the Application Menu, click the C1 logo in the upper left corner of the form. The left pane of the Application Menu contains commands that apply to the entire map:
| Home | Displays the default map. |
| Open | Opens another menu containing examples of location-specific markup. |
| Random | Generates a random latitude/longitude value and resets the map to that point. |
| Opens the standard print dialog. | |
| Send | No action. |
| Close | Closes the Application Menu. |
The following figure shows the Application Menu with the Open commands visible.

When the Open submenu is not visible, the right pane of the Application Menu displays a list of place names previously visited using the Find command, as shown in the following illustration. Click one of these items to reset the map to the corresponding location.
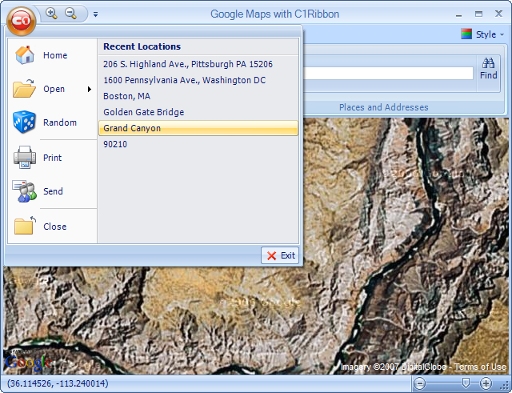
The bottom pane of the Application Menu contains a single button for exiting the application.
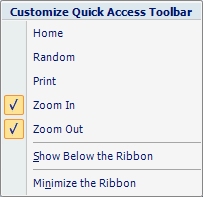
Quick Access Toolbar (QAT)
The Quick Access Toolbar, or QAT, appears to the right of the Application Icon above the Home Tab. Initially, it contains the same two command buttons that appear in the Zoom group on the Home Tab. It also contains a dropdown button that opens a menu for customizing the contents and position of the QAT:
Config Toolbar
The Config Toolbar appears on the right side of the ribbon on the same row as the Tabs. It contains a single dropdown menu named Style for selecting one of the pre-defined color schemes: Blue (the default), Silver, or Black. The following figure shows the Black color scheme:
Status Bar
The Status Bar at the bottom of the form contains a text label on the left side that usually displays the current latitude/longitude of the center of the map. It is also used to display a "Not found" message when the Find command is unable to locate the specified place name.
The right side of the Status Bar contains a track bar control that provides an alternate interface to the zoom commands. Drag the slider to adjust the zoom level continuously, or click the plus/minus buttons to invoke the Zoom In/Out commands. Note that if either extreme is reached, the corresponding command buttons are grayed out in both the Home Tab and the QAT.
Designing the Ribbon Form
There are two ways to go about designing a form that incorporates C1Ribbon. One is to use the ComponentOne Ribbon Application project template that is installed with Ribbon for .NET, which initializes C1Ribbon and C1StatusBar components containing Microsoft Word-like text formatting and viewing commands.
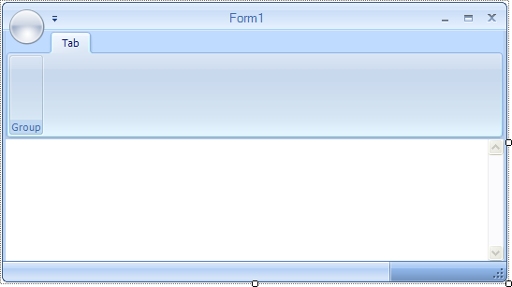
The other way is to add C1Ribbon and C1StatusBar components to an empty form. The ribbon automatically docks to the top, while the status bar docks to the bottom. Next, add a Panel component and set its Dock property to Fill. The Panel serves as a container for the form's content. In the sample application, this is a WebBrowser control.
Note that the main form created by the project template has rounded corners and a visual appearance that differs from a standard form. This is because it inherits from C1.Win.C1Ribbon.C1RibbonForm instead of System.Windows.Forms.Form. To make this change, switch to code view and add the following line:
using C1.Win.C1Ribbon;
Then change the parent class of the form to C1RibbonForm:
public partial class Form1 : C1RibbonForm
After switching back to the designer, the form should look something like this:
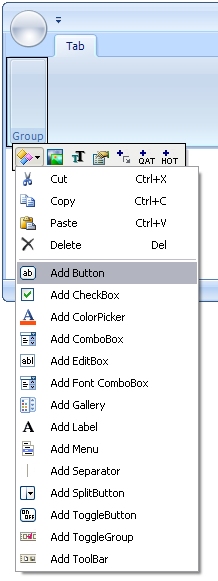
You can use the SmartDesigner feature to add new tabs, add groups to tabs, and add items to groups. For example, clicking a group name opens a toolbar that provides access to various actions and property categories. The first toolbar button, Actions, opens a dropdown menu that lets you add a new item to the group, as shown in the following figure:
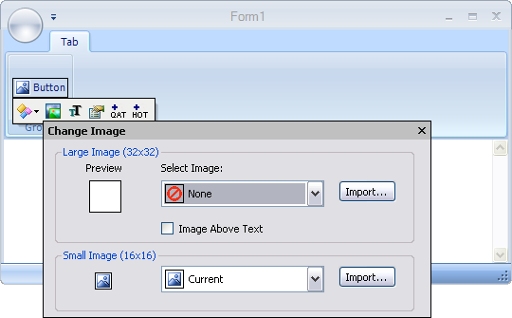
After you have added an item such as a button, you can then click it to open a toolbar with commands that apply to that type of object. For example, the following figure shows how to change the large and small images associated with a newly added ribbon button. The second button on the floating toolbar opens a dialog for selecting built-in Office 2007-style images. You can also use this dialog to import images from project resources or local files.
When you use the SmartDesigner to add tabs, groups, and ribbon controls, they are given unique names such as ribbonButton1, ribbonGroup2, and so forth. Ultimately, you will have to write event handling code that performs a specific action on the form's content whenever a button is clicked or a selection is made from a combo box or dropdown menu. Therefore it is a good idea to assign meaningful names to ribbon controls as you create them, making your code easier to understand and maintain.
Now let's examine the structure of some of the control groups in the Home Tab of the sample application.
Map Type Group
The Map Type group contains a set of three toggle buttons for controlling the display of the map. Only one button can be selected at a time.
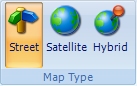
The following controls constitute the Map Type group:
mapGroup |
(RibbonGroup) The Items collection of this group contains one element, mapToggleGroup. |
mapToggleGroup |
(RibbonToggleGroup) The Items collection of this toggle group contains the following three ribbon toggle buttons. |
mapStreetButton |
(RibbonToggleButton) When pressed, displays street maps. The Pressed property is True initially. |
mapSatelliteButton |
(RibbonToggleButton) When pressed, displays satellite imagery. The Pressed property is False initially. |
mapHybridButton |
(RibbonToggleButton) When pressed, displays a combination of street maps and satellite imagery. The Pressed property is False initially. |
Since all three buttons have the LargeImage property set, the buttons are arranged horizontally. The application responds to button clicks by handling the PressedButtonChanged event of the RibbonToggleGroup element:
private void mapToggleGroup_PressedButtonChanged(object sender, EventArgs e)
{
    // One of the buttons in the MapType group was pressed

    InvokeTag(mapToggleGroup.PressedButton);
}
The PressedButton property of the RibbonToggleGroup element returns the RibbonToggleButton that was clicked. InvokeTag is a private member function that uses the Tag property of its RibbonItem argument to perform the desired action. For most RibbonButton and RibbonToggleButton elements in the sample application, the Tag property is set to the name of a JavaScript function in the HTML page displayed in the WebBrowser control. The implementation details are discussed later in this article.
Zoom Group
The Zoom group contains two command buttons for incrementing and decrementing the zoom level. Unlike the toggle buttons in the Map Type group, these buttons do not have a Pressed property.

The following controls constiture the Zoom group:
zoomGroup |
(RibbonGroup) The Items collection of this group contains two buttons, zoomInButton and zoomOutButton. |
zoomInButton |
(RibbonButton) Increments the zoom level. |
zoomOutButton |
(RibbonButton) Decrements the zoom level. |
Since neither button has the LargeImage property set, the buttons are stacked vertically. Both buttons have the ShowInQat and ShowInQatMenu properties set to True, which causes both buttons to appear in the Quick Access Toolbar and the Customize Quick Access Toolbar dropdown menu.
Pan Group
The Pan group contains four command buttons for moving the center point of the map. The structure of the Pan group is similar to that of the Zoom group except that separators are used to gain more control over how the buttons are stacked.

Without the separators, the Left, Up, and Down buttons would be stacked vertically.
Places and Addresses Group
The Places and Addresses group contains a text box and a command button for entering street addresses, place names, or zip codes. These controls are aligned horizontally by being placed inside a toolbar.
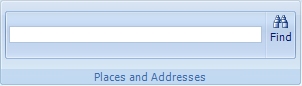
The following controls constitute the Places and Addresses group:
findGroup |
(RibbonGroup) The Items collection of this group contains one element, findToolbar. |
findToolbar |
(RibbonToolBar) The Items collection of this group contains the following two controls. |
findEditBox |
(RibbonEditBox) A text box for specifying locations. This control handles the KeyPress event in order to process the Enter key. |
findButton |
(RibbonButton) Searches for the location specified in the adjacent text box. |
Typically, you would use a RibbonToolBar to present formatting and alignment commands as in Word 2007.
Hosting Google Maps
The Google Maps API is a free beta service that lets you use JavaScript to add maps to public web sites that are free to consumers. At the time of this writing, localhost and file-based URLs are not supported. A complete discussion of the Google Maps API is beyond the scope of this article. For more information, visit the following URL:
http://www.google.com/apis/maps
Note that the current version of the Google Maps API requires registration for an API key (one per site). However, you do not need to register for an API key to run the C1RibbonEarth sample, as the API is already hosted at the following URL:
http://helpcentral.componentone.com/maps
If you visit this site in a browser, you will see a map that supports panning by dragging the mouse, but cannot be manipulated in any other way. The map becomes fully interactive only when it is viewed within the C1RibbonEarth application.
Host Site Implementation
The following listing shows a minimal implementation of a Google Maps host site:
<html>
<head>
<title>Google Maps with C1Ribbon</title>
<script src=
"http://maps.google.com/maps?file=api&v=2.x&key=Your-API-Key"
type="text/javascript"></script>
<script type="text/javascript">
//<![CDATA[
function load()
{
if (GBrowserIsCompatible())
{
var div = document.getElementById("map");
var map = new GMap2(div);
map.setCenter(new GLatLng(44, -98), 3);
}
}
//]]>
</script>
</head>
<body onload="load()" onunload="GUnload()" style="margin:0">
<div id="map" style="width:100%; height:100%"></div>
</body>
</html>
The first <script> tag specifies the URL for the JavaScript API, which includes the software version and API key as part of the query string. The HTML body consists of a single <div> tag named map that occupies the entire area of the browser window without margins. When the page loads, the load() function is called to create and associate a GMap2 object with the <div> tag. The map is then centered about a specific latitude/longitude value (44, -98) at zoom level 3 (the higher the number, the more detailed the image).
In order for our Windows Forms application to be able to do anything interesting with this site, it needs to be able to call methods on the GMap2 object. To facilitate this, we do the following:
- Create a new property called proxy on the
<div>tag by assigning it the value of theGMap2instance. - Create new methods on the
<div>tag by equating them to anonymous functions that use the proxy value to manipulate the map.
For example, the GMap2 object supports parameterless zoomIn() and zoomOut() methods that increment and decrement the current zoom level. The following code mirrors these methods on the <div> element:
div.proxy = map;

div.zoomIn = function()
{
    this.proxy.zoomIn();
}

div.zoomOut = function()
{
    this.proxy.zoomOut();
}
The first assignment statement creates the proxy property. Subsequent references to this property will return the GMap2 instance. Within the body of each anonymous function, the reserved word this denotes the <div> element, so the expression this.proxy returns the same GMap2 instance.
Note that user-defined methods need not mirror the exact syntax of the underlying GMap2 object. For example, the GMap2 object supports a setMapType() method that accepts one argument, a constant value that specifies the type of map to display. For convenience, our host site implementation declares three distinct parameterless methods corresponding to the three toggle buttons in the Map Type group on the Home Tab:
div.setMapTypeStreet = function()
{
    this.proxy.setMapType(G_NORMAL_MAP);
}

div.setMapTypeSatellite = function()
{
    this.proxy.setMapType(G_SATELLITE_MAP);
}

div.setMapTypeHybrid = function()
{
    this.proxy.setMapType(G_HYBRID_MAP);
}
Controlling the Host Site from the .NET Application
The sample application contains a WebBrowser control that navigates to the host site in the Load event of the main form. The application handles the DocumentCompleted event on the WebBrowser control by setting a Boolean flag. Once this flag has been set, the entire page has been loaded and all DOM elements are available for scripting. At this point, the following code can be used within the event handler for a ribbon button to increment the zoom level:
HtmlElement map = webBrowser.Document.GetElementById("map");

if (map != null)
    map.InvokeMember("zoomIn");
The HtmlElement named map refers to the <div> tag, not the GMap2 object. The InvokeMember() method executes the named method without arguments. If arguments are required, use the overloaded version of InvokeMember. For example, the following code centers the map about a random position:
HtmlElement map = webBrowser.Document.GetElementById("map");

if (map != null)
{
    Random r = new Random();
    double lat = (r.NextDouble() * 180.0) - 90.0;
    double lng = (r.NextDouble() * 360.0) - 180.0;
    object[] args = { lat, lng };
    map.InvokeMember("setCenter", args);
}
The corresponding user-defined method on the host site is declared as follows:
div.setCenter = function(lat, lng)
{
    this.proxy.setCenter(new GLatLng(lat, lng), 3);
}
Controlling the .NET Application from the Host Site
The Google Maps API supports event listeners that can be used to execute anonymous JavaScript functions whenever certain actions occur, such as mouse events. In a typical web site, you would handle these events to update DOM elements on the page. In our host site, we use window.external to convey changes in location and zoom level to the Windows Forms application.
For example, the following JavaScript code sets up a listener for the move event, which fires repeatedly while the map view is changing:
GEvent.addListener(map, "move", function()
{
    if (window.external)
    {
        if (typeof(window.external.StatusText) != "undefined")
            window.external.StatusText = map.getCenter().toString();
    }
});
If the host site is opened in a browser outside of the Windows Forms application, window.external will be null, and no action will be taken. Otherwise, if window.external supports the StatusText property, then this event handler sets its value to the string representation of the map's center (latitude/longitude).
In the sample application, the ObjectForScripting property of the WebBrowser control is set to an object that defines window.external for JavaScript code that executes on the HTML page:
webBrowser.ObjectForScripting = new ScriptingObject(this);
In the preceding statement, this is an instance of the main application form (RibbonEarthForm). The ScriptingObject class is defined as follows:
[ComVisible(true)]
[ClassInterface(ClassInterfaceType.AutoDispatch)]
public class ScriptingObject
{
    private RibbonEarthForm me;

    public ScriptingObject(RibbonEarthForm form)
    {
        me = form;
    }

    public string StatusText
    {
        set { me.StatusText = value; }
    }

    public string RecentLocation
    {
        set { me.RecentLocation = value; }
    }

    public int ZoomLevel
    {
        set { me.ZoomLevel = value; }
    }
}
The ScriptingObject class simply saves the value of the RibbonEarthForm argument passed to its constructor and implements three write-only properties as pass-throughs to the saved form. This is necessary because the parent class of the main form (C1RibbonForm) does not have the ComVisible attribute, which is required in order for an object to serve as window.external. If the main form inherited from System.Windows.Forms.Form instead of C1RibbonForm, then the main form could have been given the ComVisible attribute and a separate ScriptingObject class would not have been necessary.
Handling Ribbon Events
The RibbonEvent event is a catchall for responding to user interaction with the C1Ribbon control. In the sample application, this event is used to restore focus to the WebBrowser control whenever the user clicks a button or otherwise gives focus to the ribbon:
private void c1Ribbon_RibbonEvent(object sender, RibbonEventArgs e)
{
    // Restore focus to the browser control after interacting with the ribbon

    switch (e.EventType)
    {
        case RibbonEventType.ChangeCommitted:
        case RibbonEventType.ChangeCanceled:
        case RibbonEventType.Click:
        case RibbonEventType.DialogLauncherClick:
        case RibbonEventType.DropDownClosed:
        {
            if (c1Ribbon.Focused)
                webBrowser.Focus();

            break;
        }
    }
}
Conclusion
The C1Ribbon and C1StatusBar controls make it easy to incorporate the new Office 2007 Ribbon UI in your Windows Forms applications. Intuitive visual designers let you customize ribbon elements directly on the design surface. You can also save ribbon layouts as XML for quick reloading into another form.
Visit the following URL to download a trial version of Ribbon for .NET: