
WPF Master Details MVVM Application
WPF Master Details MVVM Application
It is highly recommended that you walk through the explanations by looking at the source code as it will help you gain a more solid understanding. You can also run the application on your computer. The goal of this project is to show you how to build a flexible and extensible application by using a very simple approach.
This is a WPF Master Detail application using the MVVM pattern at the UI tier. For now, let's just see what the application looks like.
There are a list of customers and each customer can have multiple orders. When you click on a customer, it shows you the list of orders belonging to that customer:

You can add, edit, or delete customers by clicking on the buttons. The Add and Edit Customer window uses the same View so they look the same. Deleting the customer will delete all the orders belonging to that customer:

Similarly, you can add, edit, or delete an order for a customer. The Add and Edit Order window also uses the same View. There are validations to make sure the order information entered is correct. The button is enabled only after it passes the validations.

The UI tier is built using WPF MVVM pattern. It shows you how to:
- Design the
Viewand theViewModel - Handle the user interactions
- Perform validation
- Open new windows using the MVVM pattern with an example of using Dependency Injection
The View and the ViewModel
Below is the diagram that shows you the main classes of the View and the ViewModel:

In the View, we have:
MainWindow-- the main window when the application startsCustomerListView-- lists all thecustomers, and can open theCustomerViewwhen clicked on the Add Customer or Edit CustomerCustomerView-- the view to Add Customer or Edit Customer
OrderListView-- lists all the orders belonging to the selectedcustomer, and can open theOrderViewwhen clicked on the Add Order or Edit OrderOrderView-- the view to Add Order or Edit Order
The ViewModel classes are designed for binding to the views. These classes are not meant to replicate the domain model which is already done in the Business tier.
The MainWindow initializes the DataContext for the application by assigning it to the CustomerListViewModel singleton:

In the XAML of the MainWindow, it specifies the Views to use (CustomerListView and OrderListView) by using DataTemplates:

Notice that the CustomerListView binds to the CustomerListViewModel, and the OrderListView binds to the CustomerListViewModel's SelectedCustomer property, which is a CustomerViewModel that has a reference to the orders belonging to the customer. Below is the UI of the CustomerListView:

The CustomerListView binds to the CustomerListViewModel, and we specify the properties of the ViewModel that we want each UI control to bind:

Notice that the CellTemplate of the GridViewColumn defines the Edit and the Delete buttons. But more importantly, the SelectedItem of the ListView is bound to the SelectedCustomer of the ViewModel, which shows the list of orders belonging to the customer when the user clicks on the customer. This is because OrderListView is also bound to the SelectedCustomer of the ViewModel:

Below is the XAML of the OrderListView:

The button checks to see if the DataContext is null (when no customer is selected), if it is null then the Add Order button is disabled. The ListView binds to the Orders property of the CustomerViewModel to show the list of orders.
The CustomerView window is opened when you click on the Add Customer or the Edit Customer button. Below is the UI of the CustomerView which can be an Add Customer or an Edit Customer window:

The window determines if it is an Add or the Edit window is by looking at the Mode property of the CustomerViewModel. The Mode can be either an Add or an Edit:

The CustomerView displays different texts by looking at the Mode property:

Clicking on the Add or Save button on the window will call the Update() method of the CustomerViewModel, which determines if it should add or edit a customer based on the Mode property:

The same concept is applied to the OrderView.
Execute the Commands
To execute the commands, we write a CommandBase base class that we can use in the ViewModel. The base class merely passes the delegate that will be run when the command is executed:

Then in the ViewModel, we declare the commands that are available for the View to bind. For example, in the CustomerViewModel, we define the command to delete the customer:

Which will run the Delete() method when called. Then in the CustomerListView, we specify the command to execute when the delete button is clicked:

All of the commands are set up this way to facilitate the binding of the commands to the ViewModel.
Setup Automatic UI Update
Next, we need to make sure the entire UI is updated when a property of the ViewModel is changed. This is done by including a ViewModelBase class in which all the ViewModels inherit:
For example, the CustomerViewModel inherits from the ViewModelBase class:

When the FirstName property of the CustomerViewModel changes (such as when editing a customer), the entire UI should reflect such change. In the ViewModel's property, we just call the OnPropertyChanged method with the property name and WPF will take care of the rest:

Undo After an UI Update
When a user cancels a change, you will encounter an issue with data binding. For example, the user may change the first name of a customer in the edit customer window which will update the entire UI...

...then later decide to cancel by pressing the Cancel button. With the default two-way data binding, the UI will retain the changed value even though the user canceled the change.
The first thought may be to use one-way binding and commit the change only if the user clicks on the Save button. This will work except you will encounter a few more issues:
- You will need to pass multiple values to the save command, which clutters up the XAML and you will also need to cast the multi-value being passed from the command from a list of type
object. - You will not be able to use the validation provided by WPF which requires data binding.
The way to solve this is to let WPF proceed with the binding and do a rollback when the cancel button is clicked. We store the original value using MemberwiseClone() in the constructor and the Update() method of the ViewModel (although you can write your own deep copy methods if you have reference type fields):

Then the CancelCommand in the ViewModel will just call Undo() and rollback to the original value and the entire UI will be updated:

The same method is applied to the Edit Order screen.
Validation
Below is the OrderView where the Save button is disabled with the validation message:

The button is disabled based on the Validation.HasError property of the textboxes in the OrderView.xaml:

To perform the validation on the textboxes, we set the ValidatesOnDataErrors, NotifyOnValidationError, and UpdateSourceTrigger properties:

The PropertyChanged value of the UpdateSourceTrigger means that validation is performed on every keystroke in the textbox. We define the UI to show when an error happens in ValidationStyle.xaml:

The AdornedElementPlaceholder shows the control being validated, and the ErrorContent is the validation message string.
The validation check is done in the ViewModel by implementing the IDataErrorInfo interface:

In the implementation of the IDataErrorInfo interface, we specify the message to display based on the condition:

Notice that we set the Quantity property of the OrderViewModel to string instead of int, this is so that we can display a more user friendly message when a non-integer is entered instead of the default message on casting which is not very intuitive to a regular user.
Open New Window
There are 2 ways to open a new window:
- Use the Code-Behind
- Use the ViewModel via Dependency Injection
Using the code-behind creates less code, while using the ViewModel lets you abstract out the details on opening of a window by using an established framework.
Open Window Using the Code Behind
We open the Add/Edit Order window using the code-behind by assigning the DataContext to the new window and open it:

Open Window Using the ViewModel via Dependency Injection
Dependency Injection means you pre-register a type to an interface, and when the interface is requested, the pre-registered type is automatically created for the interface. This is shown in the opening of the Add/Edit Customer window. In the CustomerViewModel, we define the command to open the Edit Customer window, which opens an IModalDialog:
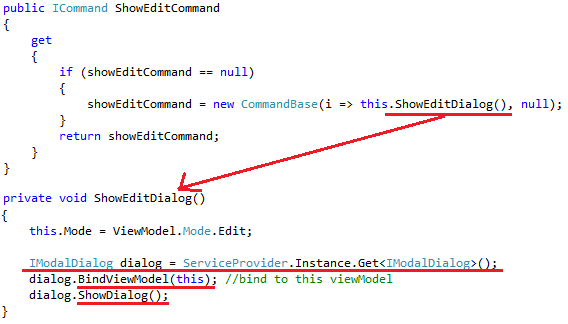
Notice that the ViewModel does not know what is the View being opened. It only needs to get the reference to the pre-registered IModalDialog interface and call its methods to open the window.
The pre-registration of the View to the IModalDialog is done in the BootStrapper when the application starts. In this case, we use the CustomerViewDialog as the IModalDialog when the interface is requested:
Also notice that we use the UnityServiceLocator for managing the registrations, underneath the cover it simply uses the Unity Framework from the Microsoft Enterprise Library (you can use other frameworks if you like):

We hope you find this project useful. Although there are a lot more things you can do, this should give you a good start on how to build a flexible master details application.