
Data Driven Silverlight Pages
2.50/5 (3 votes)
Dynamically Creating Silverlight Controls
Introduction
In this article, we are going to build a data driven application by using Silverlight and XML. Creating controls in XAML code is easy, but it’s not easy to reuse the control for different target objects.
In this article, I will cover some implementation details of how to dynamically generate the Text block, Textbox, Auto Complete Box, Combo Box, Numeric Control and Button controls.
Creating the XML File
The XML file will look like the following:
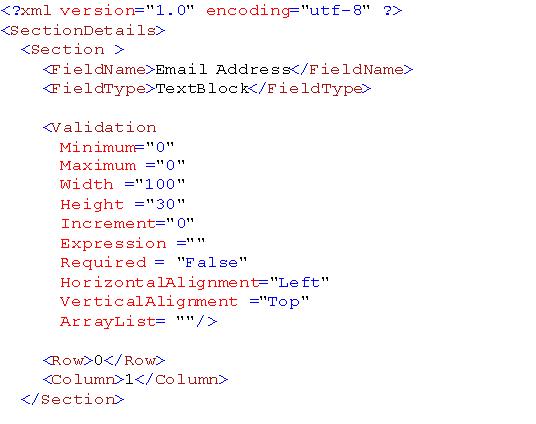
You will notice that the XML file has the following elements:
- Field Name: This element represents the field name.
- Field Type: This element represents the field type. The valid field types are
Textblock,TextBox,AutoCompleteBox, Numeric Control and Button. - Validation: This element represents the validation of the field. The valid attributes are Minimum, Maximum, Width, Height, Increment, Expression, Required, Horizontal Alignment(Left, Right, Centre, Stretch), Vertical Alignment(Top,Bottom,Center) and Array List
- Row: This element represents the row the field should be displayed in the grid.
- Column: This element represents the row the field should be displayed in the grid.
Place the XML file in the \ClientBin folder.
Load the XML File
- Open Page.xaml.cs in your Silverlight Project. Add the following two methods:

- Call the
LoadXMLFile()method after theInitializeComponent()method. - Add a reference to the following DLLs to the Silverlight page:
- System.XML.linq.dll
- SilverlightValidator.dll
- Microsoft.Windows.Controls.dll
- Microsoft.Windows.Controls.Inputs.dll
- Now create the
myBuldPagemethod. This method retrieves the information from XML file and builds the page based on the field type.
-
Now add the Validation Manager to the Silverlight page:

-
Now add the Grid to the Silverlight page:

- Now add the Silverlight controls based on the XML file:

- Now add the grid to the Silverlight page:

Conclusion
In this article, we separate data from content to make a cleaner design and for better maintainability. When XML is combined Silverlight controls become even more powerful. This opens up numerous possibilities for dynamic and robust systems.
History
- 15th April, 2009: Initial post