Model-View-ViewModel in WPF - Part I
This code that I am presenting here is a derivative of the demo application written by Josh Smith, http://joshsmithonwpf.wordpress.com.
Introduction
The Model-View-ViewModel (MVVM) is the current “standard” for developing applications in Windows Presentation Foundation but there seems to be no hard and fast rules. It’s more like a guideline. It took me a long time to figure what was going on in this design pattern. I read the articles written by John Gossman, and Dan Crevier but for the absolute beginner I was not able, or smart enough, to understand the material. After looking at a huge amount of example code and research, I was finally able to decompose one of the example applications and figure out how it worked. This code that I am presenting here is a derivative of the demo application written by Josh Smith. Josh is a WPF God and you can learn a lot from his articles. Anyway, after much frustration the pieces fell together and I began to comprehend what was going on in the MVVM.
The MVVM design pattern is sort of a descendent of the Model-View-Presenter design pattern. I published a series of articles introducing that design pattern starting here. However, the MVVM pattern takes advantage of some advanced features of WPF. I fully expect that this article will evolve into several parts too. Actually, I am just going to make this a two part series.
Goals
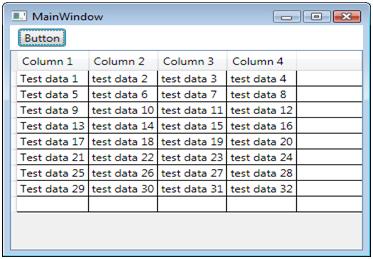
The goal of this article is to explain the MVVM pattern in an easy to understand tutorial manner, exploring the various facets. We will redo the application presented in the MVP article series in WPF. To recap, the final application will read a CSV file and display the data in a data grid in the main view and will turn out to look something like this:
The Players
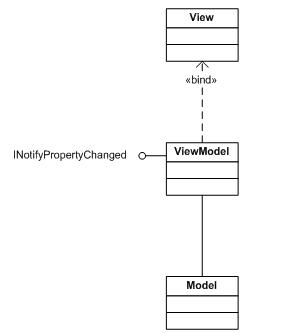
I learn best in a tutorial fashion, so in this section we will introduce the entities that make up the MVVM. A simplified diagram of the design pattern might look something like this:
The View object pretty much remains the same. This is the window and controls that the user sees and interacts with. The major goal in using this pattern is to move as much of the code to the ViewModel as possible making the View code-behind a desolate wasteland.
The ViewModel contains the properties that are used in databinding data to the View and handlers that respond to user input. The ViewModel assumes most of the responsibility of knowing what is going on in the View and handling the Model. I would imagine that most of the code that you are going to write in a real world application would reside in the View Model. The ViewModel implements the INotifyPropertyChanged interface. This is really cool since when the data in the ViewModel changes, the INotifyPropertyChanged updates the databinding and the View magically gets updated with the updated information.
Our friend the Model does not change all that much. It is still responsible for obtaining the requested data and giving it to the ViewModel.
Setting Up
The solution that I describe is what worked for me so that is what I am going to stick to. In no way should this be construed as production code. This is stripped down code that eliminated unnecessary code to get down to the guts of the method. To use this as production code; you would definitely want to implement error handling and checking. Also I will probably not describe how to add projects or classes to the solution as you should know that already.
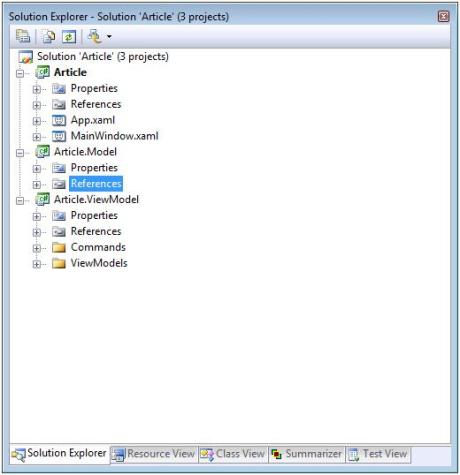
The first thing to do is to create a new WPF application. Being the imaginative soul that I am, I named my solution “Article”. You, of course, are free to name it whatever you want. I habitually rename the generated window class to “MainWindow”. Add to the solution two more projects. The first project I named Article.Model and the second I named Article.ViewModel. In the Article.ViewModel project, add two new folders name on “Commands” and name the other “ViewModels”. When you get all that done, your solution should end up looking something like this:
That is it for Part I. In Part II, we will explore the Model, the View and the ViewModel in depth. It will also include a sample solution illustrating the concepts.


