Introduction
This article explains how to change the controltemplate of a control, and goes further by adding new Dependency Properties and a RoutedEventHandler to it.
Background
When one starts working with WPF, one of the frequent requirements is to give a control a new look & feel and maybe also add some new custom functionality. Some of the example requirements are like making a button behave like a combobox; Pressed for Checked, and unPressed for unChecked. Many of these requirements can just be met by styling the control differently. I ran into a requirement a little more complicated than this.
Here is what we needed: In the First Time setup of our application, there are many screens. One of the comboboxes, that is bound to a list, needs to display a button in its dropdown selection list. The intention of having this button there is to let the user add items to the bound list on the fly (without them having to find and go to the screen where items to this list could be added). I wanted to make the solution reusable through out the application, no matter which list we are binding to. So for example, if there is a combobox which displays a list of students, By the bottom of the list there will be a button with text "Add new Student". And when the user clicks on this, we could may be launch a New Student Popup. So this button should be able to do different things based on which combobox it lives in.
Using the Code
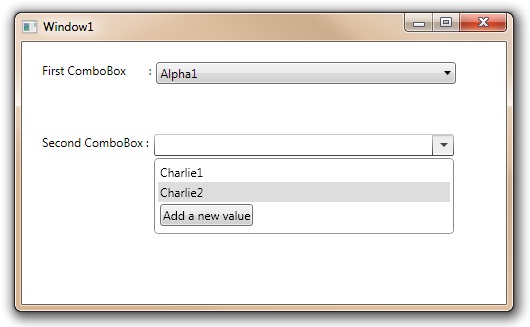
Notice the Dependency Property EnableNewItemAddition, this enables our special button to be visible & functional. The Dependency Property AddNewItemText lets you specify the text you may want to see in the button. The RouterEventHandler AddNewItemButtonClicked lets you decide what you want to do when this button within our combobox is clicked.
<local:EnhancedComboBox x:Name="eComboBox"MinWidth="300" Margin="5,0,0,0"
           ItemsSource="{Binding CharlieCollection}"
           EnableNewItemAddition="True"
           AddNewItemText="Add a new value"
           AddNewItemButtonClicked="EnhancedComboBox_AddNewItemButtonClicked"
           DisplayMemberPath="Name">
Points of Interest
This is how to do this. Once you learn these two simple steps, you should then be able to change ControlTemplate of any control. And hence be able to do all those funny things like making a button look like a radiobutton, or making a checkbox look & behave like a button.
Step 1: Google the keywords "ControlTemplate ComboBox xaml". Of course feel free to choose your specific control instead of ComboBox. The first hit was this link on MSDN :-)
Step 2: The next step is to Add this ControlTemplate into your XAML resources. You could then start playing with the contents of the ControlTemplate here, may be play with the triggers, and notice the change in appearence and behaviour.
Do notice that this is the only change I have made in my ControlTemplate after I copied it over from Microsoft website. So it is this simple. (Yes I did add some triggers too)
<ScrollViewer Margin="4,6,4,6" SnapsToDevicePixels="True">
<DockPanel ...>
</ScrollViewer>
So in this new DockPanel, we add our regular combobox content PLUS a new ComboBoxItem containing our special button!
And Some More Details!
OK, I agree that in my example code, things are a little more complicated in the sense that apart from minor changes in Control Template, I also derive a control from the base control and then add three new Dependency Properties and a Routed Event Handler. This is what helps us get the custom functionality in place. Hence while using it all we have to do is, set the custom text and attach a method to our routed event handler.
History
- Version 1.0: First draft
- Version n.0: Some more explanation on the code added!
This member has not yet provided a Biography. Assume it's interesting and varied, and probably something to do with programming.


 General
  News
News  Suggestion
  Question
  Bug
Bug  Answer
  Joke
Joke  Praise
  Rant
Rant  Admin
Admin 


