Introduction
In this article, I will introduce you to a very customizable control, which can be adjusted to meet many needs.
Background
Our company was searching for a list view control that would support graphics, variable row heights, and controls. After a long search, we found some that came close, but none that could be highly customized… or worked well enough to use. So in a brain storm one day, I came up with the idea of using controls as the rows in a list view. The result was a list view where you could use the VS Forms Designer to design generic rows quickly, or generate them on the fly as complex controls. Through a few generations, the code was customized to compensate for the problems with Windows and how it renders controls through .NET. Of note however, this is not designed to handle lists over 1000. It may do so, but that is beyond what I have used it for.
Using the code
There are five parts in the VivantList Package.
VivantList: The core list control
VivantRow: A generic row for the VivantList control
VivantVerticleScrollbar: A buggy scroll bar created for aesthetic reasons
VivantWrapper: A sample wrapper for VivantList
ThumbPanel: The thumb panel for the scroll bar
VivantList
VivantList has several public methods. I recommend you look at my demo wrapper for what they all are and how to use them. Play with it, but never add anything other than controls inherited from VivantRow to it.
VivantRow
Every control added directly to VivantList must inherit from VivantRow. VivantRow controls can have any other control placed on them using the Forms Designer. To create a simple row, add a new custom control to your project. Then change the inheritance for System.Windows.Forms.UserControl to VivantLabs.VivantList.VivantRow. Now for something to look at, add some Windows controls to your row using the Forms Designer. My results are as follows:

using System;
using System.Collections;
using System.ComponentModel;
using System.Drawing;
using System.Data;
using System.Windows.Forms;
namespace DemoProject
{
public class MyRow : VivantLabs.VivantList.VivantRow
{
... Component Designer generated code and the like ...
}
}
VivantRow has two important properties that make it differ from a common control: RowTop and RowHeight.
RowHeight
This is the height of the row. It must be changed in order to reflect a change in row height in VivantList. Usually, this is the same as the control height of a row. If the row is not rectangular, then this is the height of one row without its overlapping parts.
RowTop
This is the distance in pixels from the top of the control where the 'main' visible region is. In rectangular rows, this is zero.
For a rectangular row:
RowTop = 0;
RowHeight = Control.Height;
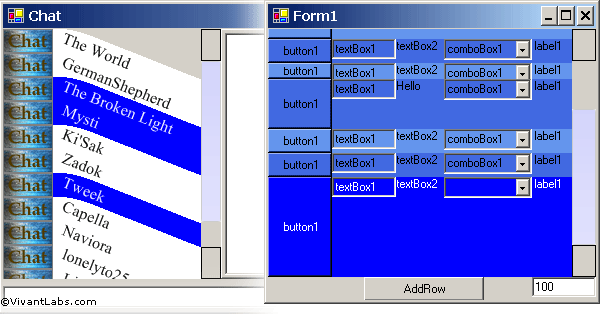
In the example picture above, you can see an example of a non-rectangular row. Should you choose to use a non-rectangular row, you will need to research custom shaped controls.
VivantVerticleScrollbar
This is just a side item I created because we didn’t want the Windows look. You can add some images to it and so forth… I suggest using Windows scroll bars.
VivantWrapper
This is the tricky part. VivantWrapper is a control that has VivantList and a scroll bar. If you decide to use VivantList, you may need to rewrite one of these for yourself. I provide this generic one as a guide for those of you interested. This is where your coulomb headers would be, where scrolling should be done, and where any other add-ons go. I recommend you use .NET’s auto control scrolling on this panel. If you have coulomb headers, you may need to wrap VivantList twice, once for scrolling and once for the headers.
Here are some sample functions from my wrapper which shows some of VivantList's methods as well:
public void AddRow(VivantRow Row)
{
    if ((this.vivantList1.Controls.Count % 2) == 0)
    {
        Row.UnSelectedBackColor = this.UnSelectedBackColor;
        Row.UnSelectedForeColor = this.UnSelectedForeColor;
    }
    else
    {
        Row.UnSelectedBackColor = this.AlternateUnSelectedBackColor;
        Row.UnSelectedForeColor = this.AlternateUnSelectedForeColor;
    }
    Row.SelectedBackColor = this.SelectedBackColor;
    Row.SelectedForeColor = this.SelectedForeColor;

    this.vivantList1.AddRow(Row);
    this.RowtoBottom(this.vivantList1.Controls.Count-1);
    this.verticalScrollBar1.Maximum = this.vivantList1.TotalHeight;
    this.verticalScrollBar1.Value = this.vivantList1.CurrentPostion;
}

public void ClearSelect()
{
    this.vivantList1.ClearSelect();
}

public void RemoveRow(int index)
{
    this.vivantList1.RemoveRow(index);
    this.verticalScrollBar1.Maximum = this.vivantList1.TotalHeight;
    this.verticalScrollBar1.Value = this.vivantList1.CurrentPostion;
    SetRowColors();
}

public void InsertRow(int index, VivantRow Row)
{
    Row.SelectedBackColor = this.SelectedBackColor;
    Row.SelectedForeColor = this.SelectedForeColor;
    Row.UnSelectedBackColor = this.UnSelectedBackColor;
    Row.UnSelectedForeColor = this.UnSelectedForeColor;
    this.vivantList1.InsertRow(index, Row);
    this.verticalScrollBar1.Maximum = this.vivantList1.TotalHeight;
    this.verticalScrollBar1.Value = this.vivantList1.CurrentPostion;
    SetRowColors();
}

public void UnSelectRow(int RowNumber)
{
    this.vivantList1.UnSelectRow(RowNumber);
}

public void ClearRows()
{
    this.vivantList1.ClearRows();
    this.verticalScrollBar1.Maximum = this.vivantList1.TotalHeight;
}
ThumbPanel
Just a Thumb Panel drawn on the scrollbar, done by a friend of mine for one implementation of this.
The Demo Project
To make the demo project, seen in the right hand side of the top image, I started with a blank Windows application. Then I created the control called MyRow (seen above). Following that, I dragged a VivantWrapper onto Form1, added a Button and added the following code to the button click event function:
private void button1_Click(object sender, System.EventArgs e)
{
MyRow tempRow = new MyRow();
tempRow.Height = System.Int32.Parse(this.textBox1.Text);
tempRow.RowHeight = System.Int32.Parse(this.textBox1.Text);
this.vivantWrapper1.AddRow(tempRow);
this.vivantWrapper1.RowtoBottom(this.vivantWrapper1.RowCount - 1);
}
After that, I set a few properties on vivantwrapper1:
this.vivantWrapper1.AlternateRowColors = true;
this.vivantWrapper1.AlternateUnSelectedBackColor = System.Drawing.Color.RoyalBlue;
this.vivantWrapper1.AlternateUnSelectedForeColor = System.Drawing.Color.Black;
this.vivantWrapper1.SelectActiveRow = true;
this.vivantWrapper1.SelectedBackColor = System.Drawing.Color.Blue;
this.vivantWrapper1.SelectedForeColor = System.Drawing.Color.White;
this.vivantWrapper1.UnSelectedBackColor = System.Drawing.Color.CornflowerBlue;
this.vivantWrapper1.UnSelectedForeColor = System.Drawing.Color.Black;
Compile and Run!
One more thing, full vertical tessellation does not work yet. Although I doubt anyone will do this, don’t have controls that slowly change shape but still fit together. While it will be possible to make an Escher out of your list view eventually, right now it's not.
Points of Interest
Some functions seem to be implemented with poor judgment (selection code comes to mind). These are mostly due to the fact that anytime you leave a function block, Windows tries to flush its queue and draw any changes… There is no good way to get around this.
History
- 11/8/04 - Version 2.1 Posted on CodeProject.
- 11/9/04 - Updated article and added demo project.
- 11/15/04 - Updated demo project.


 General
  News
News  Suggestion
  Question
  Bug
Bug  Answer
  Joke
Joke  Praise
  Rant
Rant  Admin
Admin 


 . I have a lot of properties I want to add and I still need to comment
 the old code.
 Thanks... but I only understand the last 3 words