
WPF Loading Splash Screen
Simple animated loading text, like last MSN messenger, show animation and transparent mask in WPF
Introduction
In the last version of MSN messenger, you can notice simple animated text loading when you login to your account. I tried to make something similar to make the application loading look professional.
Step by Step
Create Splash Window
Add a new window to your WPF application. You can call it Splashwindow, to make the window borderless and top most you need to add some properties as follows by adding to XAML in window tag or by using property panel.
WindowStyle="None" WindowStartupLocation="CenterScreen"
	ResizeMode="NoResize" ShowInTaskbar="False" Topmost="True"
Change BackGround
By default, the new window content contains a grid. We can change the grid background using linear gradient brush by adding the following code:
 <Grid.Background>
            <LinearGradientBrush EndPoint="0.5,1" StartPoint="0.5,0">
                <GradientStop Color="#FFB9BBFF" Offset="0" />
                <GradientStop Color="White" Offset="1" />
                <GradientStop Color="White" Offset="0.72" />
            </LinearGradientBrush>
        </Grid.Background>
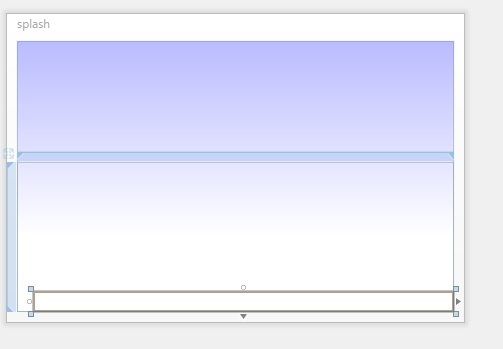
It will look like this:

Add Opacity Mask
To make effect of fading, we need to create a second grid to cover the lower half of the window with opacity mask. That will lead to fading effect when the text moves from the border to the center of the grid, the mask will be transparent in the lower and upper part of the second grid, and adding text to the grid to display the loading message, the sequence of display is moved from down to the middle with the new text then moving to the top to hide.
The following code of XAML creates the masked grid with text box:
 <Grid VerticalAlignment="Bottom" HorizontalAlignment="Stretch"
	Height="150" Background="#00FFFFFF">
            <Grid.OpacityMask>
                <LinearGradientBrush EndPoint="0.5,1" StartPoint="0.5,0">
                    <GradientStop Color="#00000000" Offset="0.283"/>
                    <GradientStop Color="#00000000" Offset="0.778"/>
                    <GradientStop Color="White" Offset="0.491"/>
                </LinearGradientBrush>
            </Grid.OpacityMask>
            <TextBlock x:Name="txtLoading" TextAlignment="Left"
		FontSize="16" FontWeight="Normal"  Foreground="#FF052045"
		Text="Beta 0.9"  TextWrapping="Wrap" VerticalAlignment="Bottom"
		HorizontalAlignment="Right" Width="421" >
            <TextBlock.Effect>
     <DropShadowEffect BlurRadius="6" Color="#FF797979" Direction="201"
		Opacity="0.68" ShadowDepth="3" />
                </TextBlock.Effect>
            </TextBlock>
        </Grid>
The grid background value is =#00FFFFFF which is completely transparent. We don't need to show the grid but without background, the mask will not work. You can notice in the previous XAML that the textblock has shadow effect.
In design view, it will look like this:
Create Animation
In WPF, you can define animation. You don't need to write it yourself. In Microsoft Blend, just add a new storyboard and define key frames and make change like Flash but WPF will generate a readable format for animation. The animation will be defined in window resources tag and accessed by key. The following code shows two storyboards, each one having a one second duration, just change the bottom margin of textblock to move from the hidden region to visible according to opacity mask and vice versa.
<Window.Resources>
        <Storyboard x:Key="showStoryBoard">
            <ThicknessAnimationUsingKeyFrames Storyboard.TargetProperty=
		"(FrameworkElement.Margin)" Storyboard.TargetName="txtLoading">
                <EasingThicknessKeyFrame KeyTime="0:0:0" Value="0,0,0,0"/>
                <EasingThicknessKeyFrame KeyTime="0:0:1" Value="0,0,0,70"/>
            </ThicknessAnimationUsingKeyFrames>
        </Storyboard>

        <Storyboard x:Key="HideStoryBoard">
            <ThicknessAnimationUsingKeyFrames Storyboard.TargetProperty=
		"(FrameworkElement.Margin)" Storyboard.TargetName="txtLoading">
                <EasingThicknessKeyFrame KeyTime="0:0:0" Value="0,0,0,70"/>
                <EasingThicknessKeyFrame KeyTime="0:0:1" Value="0,0,0,150"/>
            </ThicknessAnimationUsingKeyFrames>
        </Storyboard>
    </Window.Resources>
Working with Code Behind
Now we have created what we need in XAML. In code behind, we will create a thread to do loading work and make animation to the text, first we need to access animation, define two storyboard objects to access window resources storyBoards.
 Storyboard Showboard;
 Storyboard Hideboard;
To access the window resource by the following code, just after InitializeComponent() call:
Showboard = this.Resources["showStoryBoard"] as Storyboard;
Hideboard = this.Resources["HideStoryBoard"] as Storyboard;
Create two functions - one to show the text and one to hide as follows:
  private void showText(string txt)
        {
            txtLoading.Text = txt;
            BeginStoryboard(Showboard);
        }
 private void hideText()
        {
            BeginStoryboard(Hideboard);
        }
We need to create delegate for each function to enable calling form the loading thead as follows:
private void load()
{
Thread.Sleep(1000);
this.Dispatcher.Invoke(showDelegate, "first data to loading");
Thread.Sleep(2000);
//do some loading work
this.Dispatcher.Invoke(hideDelegate);
Thread.Sleep(2000);
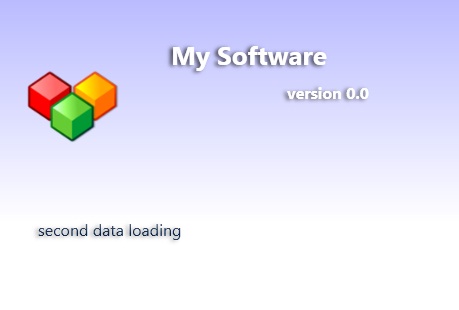
this.Dispatcher.Invoke(showDelegate, "second data loading");
Thread.Sleep(2000);
//do some loading work
this.Dispatcher.Invoke(hideDelegate);
Thread.Sleep(2000);
this.Dispatcher.Invoke(showDelegate, "last data loading");
Thread.Sleep(2000);
//do some loading work
this.Dispatcher.Invoke(hideDelegate);
//close the window
Thread.Sleep(2000);
this.Dispatcher.Invoke(DispatcherPriority.Normal,
(Action)delegate() { Close(); });
}
Displaying the Splash
There are many ways to display the splash screen, but the simplest way I think is just add the following after InitializeComponent in main window:
new SplashWindow().ShowDialog();
I hope you found that useful.
Points of Interest
The main point is using of opacity mask and accessing storyboard form code behind, and the power of animation in WPF.
History
- 10th October, 2010: Initial post