
An XML Schema Definition (XSD) Editor and Strongly-Typed Configuration Class Generator
An editor capable of producing commmon XSD documents and generating strongly-typed configuration class corresponding to the XML schema (XSD) file
Contents
Introduction
This article is an extension of Marc Clifton's article An XML Schema Definition (XSD) Editor, click here for the original article. In addition to the original XML schema editing function, the application now has the ability to generate strongly-typed configuration class based on the selected XML schema file. It's implemented in C# using .NET's CodeDOM Namespaces. You may either generate the strongly-typed configuration class from the application interface or integrate the application into your Visual Studio project to generate the strongly-typed configuration class transparently behind the scene. The second way is most useful because all you need to do is including an XML schema (XSD) file in your project, every time the XSD file is modified, a strongly-typed configuration class will be generated automatically and ready to be used.
Background
I was searching for a way to generate strongly-typed custom configuration class based on an XML schema (XSD) file. Since none the method I found have all the features I listed below, I decided to make a tool to achieve this. I found the XML Schema Definition (XSD) Editor posted here at CodeProject by Marc Clifton is easy to use so I worked on that as a platform and added the additional features I need.
Features
- Can be integrated into VS project seamlessly to automatically generate strongly-typed configuration class.
- The class is generated based on an XML schema file and represents it's structure.
- Use .NET collection classes to make the configuration data easy to access.
How it Works
1. Create an XML Schema (XSD) File
- If you do not have an xml schema file, you may use ConfigClassGen.exe or any of your favorite XML schema editor to create one.
- If you have an xml schema file already, you may also use ConfigClassGen.exe to edit it before using it to generate the configuration class.
- If you have an xml file, you may generate xml schema file from your xml file. To do so, open xml file from Visual Studio, select menu XML then Cerate Schema.
Here is the XML schema file use in the demo project:
<?xml version="1.0" encoding="utf-8"?>

<xs:schema id="ConfigClassGenDemo"
    targetNamespace="http://tempuri.org/ConfigClassGenDemo.xsd"
    elementFormDefault="qualified"
    xmlns="http://tempuri.org/ConfigClassGenDemo.xsd"
    xmlns:mstns="http://tempuri.org/ConfigClassGenDemo.xsd"
    xmlns:xs="http://www.w3.org/2001/XMLSchema"
>
  <xs:element name="DEV">
    <xs:complexType>
      <xs:sequence>
        <xs:element name="ClientID" type="xs:int" />
        <xs:element name="ClientName" type="xs:string" />

        <xs:element name="Province" minOccurs="1" maxOccurs="10">
          <xs:complexType>
            <xs:sequence>
              <xs:element name="Abbreviation" type="xs:string" />
              <xs:element name="Name" type="xs:string" />
              <xs:element name="Population" type="xs:long" />

            </xs:sequence>
          </xs:complexType>
        </xs:element>
        <xs:element minOccurs="0" maxOccurs="unbounded" name="Contact">
          <xs:complexType>
            <xs:sequence>

              <xs:element name="Name" type="xs:string" />
              <xs:element name="EmailAddress" type="xs:string" minOccurs="1"
                  maxOccurs="5" />
              <xs:element name="Address">
                <xs:complexType>
                  <xs:sequence>
                    <xs:element name="StreetAddress" type="xs:string" />

                    <xs:element name="City" type="xs:string" />
                    <xs:element name="Province" type="xs:string" />
                  </xs:sequence>
                </xs:complexType>
              </xs:element>
            </xs:sequence>

          </xs:complexType>
        </xs:element>
      </xs:sequence>
    </xs:complexType>
  </xs:element>
</xs:schema>
2. Include the XML Schema File to your VS Project
3. Setup VS Project to Automatically Generate Configuration Class from XML Schema File
- Copy the ConfigClassGen.exe to your project folder: $(ProjectDir).
- right click on your project name on Solution Explorer window, select Properties menu
- select Build Events tab on Project Properties window
- under Pre-build event command line pane, enter the following command line:
$(ProjectDir)ConfigClassGen.exe $(ProjectDir)$(ProjectName).config.xsd $(ProjectDir)AppConfig.cs $(ProjectName)
This makes ConfigClassGen.exe to generate a configuration file based on your xml schema file every time before you compile your project.
In this case, the first command line parameter of ConfigClassGen.exe is the xml schema file name: $(ProjectName).config.xsd; the second parameter is the configuration class file name: AppConfig.cs; the third parameter is the namespace used in the configuration class: $(ProjectName).
4. Add Automatically Generated Configuration Class to your Project
- After you compile your project the first time, the configuration class will be generated automatically. Add this file (AppConfig.cs in this case) to your project.
5. Create XML Configuration File
- If you have the XML configuration file already, simply add it to your project. Please note it has to be under the \bin\Debug folder, which is the same folder of your application executable.
- If you don't have the XML configuration file, you may use XML schema explorer from VS 2008 to generate a sample XML file from your XML schema file to begin with. To do this, open schema file and right click a node then choose Generate Sample XML file. In VS 2008, you can set your schema file to be your XML file's schema set, then you will have validation and intellisense ability in the XML editor.
Here is the XML configuration file used in the demo project:
<?xml version="1.0" encoding="utf-8" ?>

<AppConfigSettings>

  <ClientID>123</ClientID>

  <ClientName>ABC Company</ClientName>

  <ResponseFile>
    <ScheduledStartTime>12:00</ScheduledStartTime>
    <DataRangeInHours>24</DataRangeInHours>
  </ResponseFile>

  <Province>
    <Abbreviation>ON</Abbreviation>
    <Name>Ontario</Name>
    <Population>12929000</Population>

  </Province>
  <Province>
    <Abbreviation>AB</Abbreviation>
    <Name>Alberta</Name>
    <Population>3585000</Population>

  </Province>
  <Province>
    <Abbreviation>BC</Abbreviation>
    <Name>British Clumbia</Name>
    <Population>4381000</Population>

  </Province>

  <Contact>
    <Name>Contact One</Name>
    <EmailAddress>contact1@abc.com</EmailAddress>

    <Address>
      <StreetAddress>
        100 King St.
      </StreetAddress>
      <City>Mississauga</City>
      <Province>ON</Province>

    </Address>
  </Contact>
  <Contact>
    <Name>Contact Two</Name>
    <EmailAddress>contact2a@abc.com</EmailAddress>

    <EmailAddress>contact2b@abc.com</EmailAddress>
    <Address>
      <StreetAddress>200 Queen St.</StreetAddress>
      <City>Vancouver</City>

      <Province>BC</Province>
    </Address>
  </Contact>

</AppConfigSettings>
6. Add App.config to your Project
- create App.config file and add the following content:
<configuration>
    <configSections>
        <!-- type = <name of the handler class>, <assembly name> -->

        <section name="AppConfig" type="[YourNameSpace].AppConfigHandler, <AssenblyName>"/>
    </configSections>

    <AppConfig>
        <!-- Set the configSource to the custom config file -->
        <AppEnvironment configSource="dev.config.xml"/>

    </AppConfig>
</configuration>
<YourNameSpace> is the third parameter you use in pre-build command line in step 3; dev.config.xml is the config XML file you want to use, when you deploy your application to different environment, you can simply modify this file name in application config file to point to a different custom XML configuration file.
7. Use the Configuration Class in your Code
- The generated configuration class follows the XML schema structure and once you declare the configuration class, you will have intellisense to help you get values you need.
- The generated configuration class is strongly-typed so your code is type safe and you will catch any type mismatch at compilation time.
- The generated configuration class uses .NET collection classes so you can use foreach statement to loop through collections.
- The generated configuration class provides GetIndexBy<ConfigValue> function so you can search a config value based on another associated config value.
                config = AppConfig.GetConfig("AppConfig");

                Console.Out.WriteLine(string.Format("Client ID: {0}", config.ClientID));
                Console.Out.WriteLine(string.Format("Client Name: {0}",
                    config.ClientName));

                Console.Out.WriteLine();
                Console.Out.WriteLine(string.Format("Selected Province: {0}",
                config.ProvinceCollections[config.ProvinceCollections.GetIndexByAbbreviation(
                    "ON")].Name));

                Console.Out.WriteLine();
                foreach (
                    AppConfig.ProvinceCollection.Province p in config.ProvinceCollections)
                {
                    Console.Out.WriteLine(string.Format("Province: {0} - {1} - {2}",
                        p.Abbreviation, p.Name, p.Population));
                }

                Console.Out.WriteLine();
                foreach (
                    AppConfig.ContactCollection.Contact c in config.ContactCollections)
                {
                    Console.Out.WriteLine(string.Format(
                        "Contact: {0} - {1} - {2} - {3} - {4}",
                        c.Name,
                        c.AddressField.City, c.AddressField.Province,
                        config.ProvinceCollections[
                            config.ProvinceCollections.GetIndexByAbbreviation(
                            c.AddressField.Province)].Name,
                        config.ProvinceCollections[
                            config.ProvinceCollections.GetIndexByAbbreviation(
                            c.AddressField.Province)].Population,
                        c.AddressField.StreetAddress));
                }
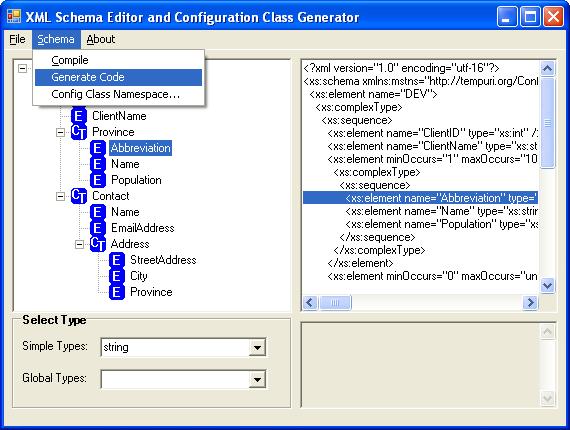
Note: Instead of Visual Studio intigration, you can generate configuration class through the application interface. To do this:
- Start the application ConfigClassGen.exe
- Load or create the XML schema file
- Select menu Schema --> Generate Code to generate the configuration class
Missing Features
- It supports string, int and long type only, need to add support to other types such as bool and datetime
- It can generate C# code only, need to add support to other languages such as VB.NET
- Need to enhance exception handling code in the generated configuration class to deliver more detailed error messages
Files
- source files - contains source files for Configuration Class Generator application, you can find two versions of the project in the download file, one for Visual Studio 2008 and one for Visual Studio 2005.
- demo project - a demo project to show how to integrate the Configuration Class Generator into your project. Again, there're both versions for VS 2005 and 2008 for your convenience.
- EXE files - compiled executables and sample XML schema file and XML file. You may use them to follow the How To steps to create your own project. There are two sets of files, one for .NET 2.0 and one for .NET 3.5
History
- July 20, 2009 - First Release