
How to Easily Insert A New Row (on Top) in WPF (VS & Sublime)
How to use Sublime text editor to help with your VS development
Introduction
How many times did you work with a grid in WPF, and had to insert a new row or column to the top? When this happens, you usually take a deep breath, and start manually changing all the other indexes for the rows and columns, wasting time and introducing small bugs where you forget to do this, or put an invalid value.
The Problem
Usually when designing with grids, we'll have code like this:
<Grid ShowGridLines="true" >
<Grid.RowDefinitions>
    <RowDefinition Height="Auto" />
    <RowDefinition Height="50" />
</Grid.RowDefinitions>
<Grid.ColumnDefinitions>
    <ColumnDefinition Width="Auto" />
     <ColumnDefinition Width="*" />
    <ColumnDefinition Width="200" />
</Grid.ColumnDefinitions>

<Label Grid.Row="0" Grid.Column="0" Content="0 0"/>
<Label Grid.Row="1" Grid.Column="0" Content="1 0"/>

<TextBox Grid.Column="1" Grid.Row="0" Text="1 0"/>
<TextBox Grid.Column="1" Grid.Row="1" Text="1 1"/>

<Button Grid.Column="2" Grid.Row="0" Content="2 0"  />
<Button Grid.Column="2" Grid.Row="1" Content="2 1"  />
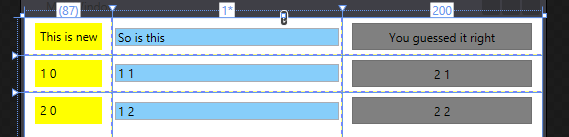
Resulting in something similar to this:

(For the record, yellow is for `Label` light blue for `TextBox` and gray for `Button`).
Now, the powers at be (you / the boss / your girl friend) decides that you must_need_to_have_or_else_the_world_will_collapse a new row at the top.
Now your design should look like:
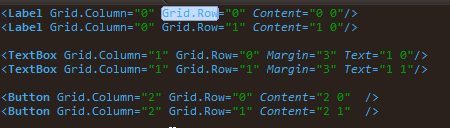
In this simple case, you'll add the row definition, and then proceed to manually change the columns and the rows, ending with something like:
<Grid.RowDefinitions>
    <RowDefinition Height="Auto" /> <!-- this is the new row -->
    <RowDefinition Height="Auto" />
    <RowDefinition Height="Auto" />
</Grid.RowDefinitions>

...

<Label Grid.Column="0" Grid.Row="0" Content="New Label"/>
<Label Grid.Column="0" Grid.Row="1" Content="1 0"/>
<Label Grid.Column="0" Grid.Row="2" Content="2 0"/>

<TextBox Grid.Column="1" Grid.Row="0" Text="New textbox"/>
<TextBox Grid.Column="1" Grid.Row="1" Text="1 1"/>
<TextBox Grid.Column="1" Grid.Row="2" Text="1 2"/>

<Button Grid.Column="2" Grid.Row="0" Content="New Button"  />
<Button Grid.Column="2" Grid.Row="1" Content="2 1"  />
<Button Grid.Column="2" Grid.Row="2" Content="2 2"  />
(In bold: The changes you need to do. Notice that you need to manually start changing all the rows, to keep them in the new correct place (otherwise, your new controls will be hidden behind the others).
This might be ok in this tiny example, but in a real life case, you might have 10 rows, and this starts to be tedious and error prone.

A Solution
First, note that this is "A Solution" and not "The Solution". For "The Solution", please feel free to contact your local witch doctor / shaman, and then read about silver bullets in software development. For extra credit, look at this pretty picture:
Now, go and get yourself a copy of Sublime Text Editor from the Sublime Homepage (you can get a free version, or buy a licence). If you haven't run into this before, it's a text editor with loads of plugins, and multiple cursors. Multiple cursors might take a while to get used to, but once you do, it'll blow your mind. We're gonna use this feature to make our life easier.
A little setup (assuming you have a clean version of sublime and don't have Emmet installed):
Ok, for this, I'm using a plugin called Emmet. It's for web development, and has heaps of other functionalities, which you should check out if you do any kind of web development.
- Go to https://sublime.wbond.net/installation#st2 and follow the simple guide to get the Package control installed. Trust me, this will save you days in the future when you want to install new packages.
- From sublime: type Command + Shift + P and type "Install", press Enter, type "Emmet" and press Enter again. That's it. You now have Emmet Installed.
Back to our tutorial
The steps we'll follow are:
- In Visual studio, add the new
RowDefinitionon top of the others.
Your code should look like:
<Grid.RowDefinitions>
    <RowDefinition Height="Auto" /> <!-- this is the new row -->
    <RowDefinition Height="Auto" />
    <RowDefinition Height="Auto" />
</Grid.RowDefinitions>

...

<Label Grid.Column="0" Grid.Row="0" Content="0 0"/>
<Label Grid.Column="0" Grid.Row="1" Content="1 0"/>

<TextBox Grid.Column="1" Grid.Row="0" Text="1 0"/>
<TextBox Grid.Column="1" Grid.Row="1" Text="1 1"/>

<Button Grid.Column="2" Grid.Row="0" Content="2 0"  />
<Button Grid.Column="2" Grid.Row="1" Content="2 1"  />
Now, copy the components (from <Label... to the last button) into Sublime.
For bonus points, hit: CTRL+SHIFT+P, type: "XML", and hit "Enter". This should set the document type to XML, and give you some color highlighting.

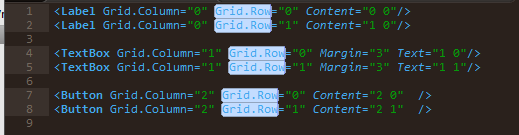
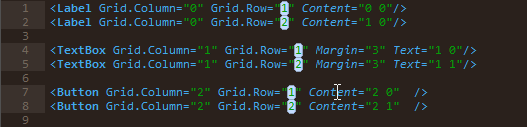
What we want is to increment all the Grid.Row values by 1. Let's select (mouse or cursor, up to you) the first Grid.Row:
Now, hit ALT+F3. This will select all the occurrences of whatever you selected, and set the multiple cursors.
If you'll start typing, all the Grid.Row will simultaneously start changing to what you're typing. This is cool, but not what we wanted to do. What we will do is hit CTRL+RightArrow. This will move the cursors to the next word.
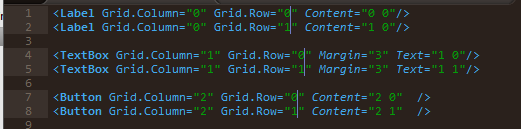
Now, for the grand finale, hit CTRL+UpArrow. This will increment all the values by 1.
From here, all that is left is:
- Copy the code back into Visual Studio
- Add the labels/textboxes/whatever you need in the right places
What's Next?
This is a trivial example, but again, in real projects, this little bit of knowledge might save you lots of time (and nobody has spare time, right?).
I would highly suggest looking into Sublime features. It might not replace VS, but it can make your life oh so much easier for many little things. Here's a good place to start.
Feel free to leave comments and upvote if you've found this useful.
History
April 13, 2014
- Initial release