
WPF Midi Band
4.98/5 (65 votes)
Learn how to play midi files using fun WPF animations
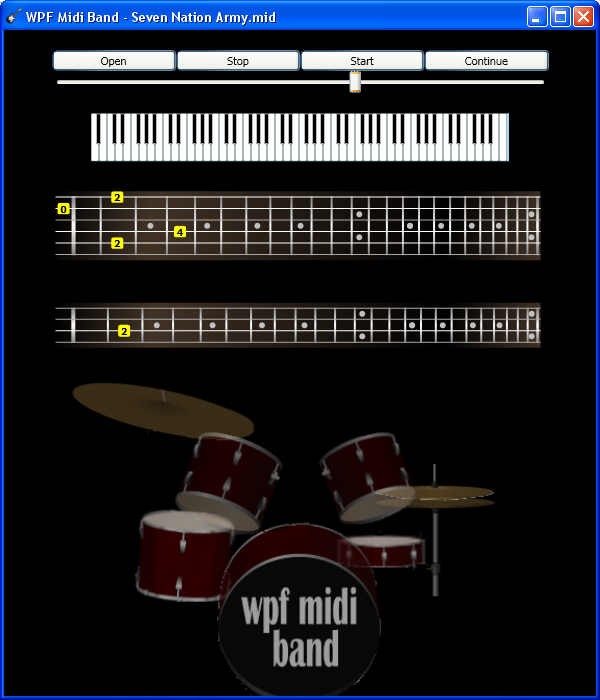
Table of Contents
- Introduction
- Youtube Videos
- System Requirements
- Why Midi?
- The C# Midi Toolkit
- Instruments
- Instrument Selection
- Final Considerations
- History
 Introduction
Since a few months ago, when I started studying WPF, I have noticed that there aren't many articles dealing with WPF and audio features. This is more noticeable when it comes to Midi audio. So, scarce material on the issue became the main motivation for this article. The secondary motivation, of course, is that it is a lot of fun to work with Midi, as I found out later.
Although the following article is not written by an expert on music and audio engineering, I hope to provide developers and users in general at least with the basic concepts involving C# and midi.
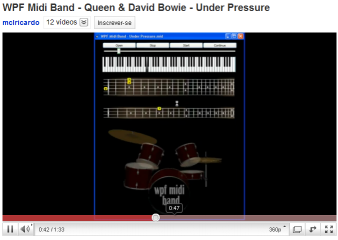
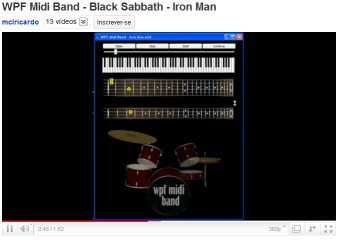
Youtube Videos
To find out quickly how the application works, you can take a look at the Youtube video samples below:

System Requirements
To use WPF Midi Band provided with this article, if you already have Visual Studio 2010, that's enough to run the application. If you don't, you can download the following 100% free development tool directly from Microsoft:
Why Midi?
At this point, you might be wondering why I decided to work Midi. Wouldn't be better to use more high quality music provided by MP3?

Well, to answer that, I must say that, as an IT professional, what made Midi files appealing for me is that they contain lots of data. Quality data. And these data may be processed in many ways, as you can see in this article. That being said, although Midi music often lacks the beauty and depth of traditional instruments, it is in many ways like a programming language (like C#) where we have commands, arguments and enumerations. In short, it is a program that plays music.
 Midi Overview
Midi stands for Musical Instrument Digital Interface. It is an electronic protocol established in 1982 aiming to standardize the growing electronic instruments industry of the time, and adopted widespread until these days. Midi protocol is not about audio signal. Instead, it is based on event messages, and sends commands to electronic devices, such as which instruments to play, which channel, volume, pitch, define tempo, and so on.
I must admit that, before working in this article, I didn't have much love for Midi music. This is because some musics have an instrument, pitch or volume that can be annoying. But there are also many quality midis out there. It's up to you to find them.
The C# Midi Toolkit
This article would not be possible without the priceless contribution of an article published here in The Code Project years ago by Leslie Sanford. Leslie wrote this article entitled C# Midi Toolkit and it became a must read for C# developers wanting to get more out of Midi.

The core of WPF Midi Band application uses Leslie's excellent Toolkit, so if you are really interested in the subject, I strongly recommend reading C# Midi Toolkit.
Basically, you have to follow the steps below to play midi with C# Midi Toolkit:
- Instantiate a
OutputDevice - Instantiate a
Sequence - Instantiate a
Sequencer - Subscribe the
Sequencer.ChannelMessagePlayedevent - In the
Sequencer.ChannelMessagePlayedevent, call theoutDevice.Send, passing the message to the device as an argument - Attach the
Sequenceto theSequencer - Instantiate an
OutputDevice - Call
Sequencer.LoadAsyncpassing a file name as argument - Listen to the music
There are other methods, of course, but these steps are basic ones. The full implementation is as follows:
public partial class MainWindow : Window
{
	...
	private OutputDevice outDevice;
	private Sequence sequence1 = new Sequence();
	private Sequencer sequencer1 = new Sequencer();

	public MainWindow()
	{
		...
		InitializeSequencer();
		...
	}

	private void InitializeSequencer()
	{
		...
		outDevice = new OutputDevice(outDeviceID);
		this.sequence1.Format = 1;
		this.sequencer1.Position = 0;
		this.sequencer1.Sequence = this.sequence1;
		this.sequencer1.PlayingCompleted +=
		new System.EventHandler(this.HandlePlayingCompleted);
		this.sequencer1.ChannelMessagePlayed +=
		new System.EventHandler<sanford.multimedia.midi.channelmessageeventargs>
		(this.HandleChannelMessagePlayed);
		this.sequencer1.Stopped +=
		new System.EventHandler<sanford.multimedia.midi.stoppedeventargs>
		(this.HandleStopped);
		this.sequencer1.SysExMessagePlayed +=
		new System.EventHandler<sanford.multimedia.midi.sysexmessageeventargs>
		(this.HandleSysExMessagePlayed);
		this.sequencer1.Chased +=
		new System.EventHandler<sanford.multimedia.midi.chasedeventargs>
		(this.HandleChased);
		this.sequence1.LoadProgressChanged += HandleLoadProgressChanged;
		this.sequence1.LoadCompleted += HandleLoadCompleted;
	}

	private void HandleChannelMessagePlayed(object sender, ChannelMessageEventArgs e)
	{
		...
		outDevice.Send(e.Message);
		...
	}
}
Instruments
This article will make use of Midi event messages to show how to play the Midi music as a virtual band called WPF Midi Band. Please notice that we are dealing with the Midi data reactively, so instead of opening the file and reading the data directly, we instead tell the Sequencer to open the file asynchronously, and then all we have to do is to wait and listen to Sequencer events. Whenever the Sequencer that a ChannelMessage has been played, we immediately send that message to the OutputDevice, which will cause a sound to be played, or stopped, or distorted, and so on.
Below we have the table containing the "Melodic Sounds" supported by Midi protocol:

The instrument selection done by sending a ProgramChange command in the event message to the output device. When you send ProgramChange to the device, you define also the channel number reserved for that particular instrument.
For example, the snippet below is an XML serialization of a single message, taken from the beginning of "Sweet Child of Mine" Midi:
  <Message>
    <id>10</id>
    <segmentId>0</segmentId>
    <ChannelCommand>ProgramChange</ChannelCommand>
    <MidiChannel>3</MidiChannel>
    <Data1>35</Data1>
    <Data2>0</Data2>
    <MessageType>Channel</MessageType>
  </Message>
Notice that the ProgramChange command selects the instrument with Id 35 (Data1 = 35, so the instrument is Electric Bass - pick) in the Channel #3 (MidiChannel = 3). This single message prepares the output device to process any incoming notes events arriving at the Channel 3 as Electric Bass notes.
Instrument Selection
As the messages sent to the output device trigger the HandleChannelMessagePlayed back in our code behind class, we have to decide which instrument (in the screen) should receive those messages.
The first thing we have to check is whether the ChannelCommand is a ProgramChange command. In this case, we have to feed a dictionary to store the Instrument Id, so that the future messages coming to that particular channel could be directed to the correct instruments:
private void HandleChannelMessagePlayed(object sender, ChannelMessageEventArgs e)
{
	...
	if (e.Message.Command == ChannelCommand.ProgramChange)
	{
		if (!dicChannel.ContainsKey(e.Message.MidiChannel))
		{
			dicChannel.Add(e.Message.MidiChannel, e.Message.Data1);
		}
	}
	...
The second thing to be taken into consideration is whether a drum sound is being played or not. This is done by inspecting the MidiChannel and checking if the message is coming to the 10th Channel. Since MidiChannel is a 0-based data, we look for MidiChannel=9. This particular channel is reserved for drum sounds:
private void HandleChannelMessagePlayed(object sender, ChannelMessageEventArgs e)
{
	...
	if (e.Message.MidiChannel == 9) // Channel 9 is reserved for drums
	{
		this.Dispatcher.Invoke(
		  System.Windows.Threading.DispatcherPriority.Normal,
			new Action(
				delegate()
				{
					drumControl1.Send(e.Message);
				}
			));
	}
	else
	{
Notice above how we send the incoming message to the DrumsControl. Notice also that we have to deal with the execution coming from another thread different from the UI thread.
If the incoming message is not a drum sound, we should check the MidiChannel number. Then, based on the Melodic Sounds table shown earlier in this article, we decide which control (in the screen) should receive that message.
The Keyboard Control
The Piano Control resembles the C# Midi Toolkit original piano. The result is almost the same. The main difference, is that I ported it from Windows Forms to a WPF interface. The Piano Control will play any keyboard-like instrument, such as Grand Piano, Keyboard, Clavinet, etc. It also plays woodwind and tubular instruments such as flute, brass and saxophone. It could be a good idea that WPF Midi Band had one control for each instrument, but this would certainly cause visual confusion. Besides, in most classic rock bands (like WPF Midi Band), such instruments would probably play in an electronic keyboard.

When selecting the instrument, we send the incoming message to the PianoControl based on the following conditions:
switch (dicChannel[e.Message.MidiChannel])
{
	case (int)MIDIInstrument.AcousticGrandPiano://1
	case (int)MIDIInstrument.BrightAcousticPiano://2
	case (int)MIDIInstrument.ElectricGrandPiano://3
	case (int)MIDIInstrument.HonkytonkPiano://4
	case (int)MIDIInstrument.ElectricPiano1://5
	case (int)MIDIInstrument.ElectricPiano2://6
	case (int)MIDIInstrument.Harpsichord://7
	case (int)MIDIInstrument.Clavinet://8
		pianoControl1.Send(e.Message);
			break;
The Guitar Control
The Guitar Control is a UserControl made of a guitar arm, containing 6 strings and a series of frets. It has the traditional guitar tuning (EADGBE), but you could replace it by another tuning if you like. This is not configurable by default, so you should put your hands on the code and recompile the application.
Each of the strings contain a sequence of notes. Each note falls between 2 frets and in a specific string. The application calculates which interval the note belongs to and then decides where the visual element representing the note will be shown.

The messages are sent to the GuitarControl only if the instruments are compatible with the guitar arm:
switch (dicChannel[e.Message.MidiChannel])
{
	...
	case (int)MIDIInstrument.AcousticGuitarnylon://25
	case (int)MIDIInstrument.AcousticGuitarsteel://26
	case (int)MIDIInstrument.ElectricGuitarjazz://27
	case (int)MIDIInstrument.ElectricGuitarclean://28
	case (int)MIDIInstrument.ElectricGuitarmuted://29
	case (int)MIDIInstrument.OverdrivenGuitar://30
	case (int)MIDIInstrument.DistortionGuitar://31
	case (int)MIDIInstrument.GuitarHarmonics://32
		this.Dispatcher.Invoke(
		  System.Windows.Threading.DispatcherPriority.Normal,
			new Action(
				delegate()
				{
					guitarControl1.Send(e.Message);
				}
			));
		break;
	...
The strings data are stored in an array of structure named StringInfo, which contains info about the 6 strings: minimum and maximum note Ids, the corresponding grid row and the Rectangle which represents the visual string on the screen:
    public partial class GuitarControl : UserControl
    {
		...
        struct StringInfo
        {
            public int Row;
            public int Min;
            public int Max;
            public Rectangle Rect;
        }

		StringInfo[] stringInfos;
		...
        public GuitarControl()
        {
            InitializeComponent();

            stringInfos = new StringInfo[6];
            stringInfos[0] = new StringInfo()
		{ Row = 5, Min = 40, Max = 44, Rect = string5 };
            stringInfos[1] = new StringInfo()
		{ Row = 4, Min = 45, Max = 49, Rect = string4 };
            stringInfos[2] = new StringInfo()
		{ Row = 3, Min = 50, Max = 54, Rect = string3 };
            stringInfos[3] = new StringInfo()
		{ Row = 2, Min = 55, Max = 58, Rect = string2 };
            stringInfos[4] = new StringInfo()
		{ Row = 1, Min = 59, Max = 63, Rect = string1 };
            stringInfos[5] = new StringInfo()
		{ Row = 0, Min = 64, Max = 90, Rect = string0 };
        }
		...
When a message is sent to the GuitarControl, the application checks whether the message.Data1 falls between the minimum and maximum notes:
public void Send(ChannelMessage message)
{
    if (message.Command == ChannelCommand.NoteOn &&
        message.Data1 >= LowNoteID && message.Data1 <= HighNoteID)
    {
Next, the application checks message.Data2. If it is greater than zero, then the string is being pressed. Otherwise, it is being released.
//message.Data2 > 0 means the string is being pressed
if (message.Data2 > 0)
{
Then we see if the dicNotesOn dictionary already contains the message.Data1. If so, it means the note is already being played, so we don't do anything. Otherwise, we proceed:
if (!dicNotesOn.ContainsKey(message.Data1))
{
Next, there's an important part, where we use Linq to select the StringInfo structure that matches the note information:
if (!dicNotesOn.ContainsKey(message.Data1))
{
	var row = 0;
	var col = 0;
	var stringId = 0;
	Rectangle stringRect = null;

	//We look for the StringInfo matching the
	//note information
	var stringInfoQuery = from si in stringInfos
	where message.Data1 >= si.Min && message.Data1 <= si.Max
	select si;

	if (stringInfoQuery.Any())
	{
		var stringInfo = stringInfoQuery.First();
		row = stringInfo.Row;
		col = message.Data1 - stringInfo.Min;
		stringRect = stringInfo.Rect;
		stringId = stringInfo.Row;
	}
Then we create the visual elements representing the note being played:
if (stringRect != null)
{
	stringRect.Stroke =
	stringRect.Fill = stringOnColor;
	stringRect.Height = 1;
}

//This border shows which note
//is being played
var noteOn = new Border()
{
	Width = 12,
	Height = 12,
	Background = innerColor,
	BorderBrush = outerColor,
	Tag = stringId,
	CornerRadius = new CornerRadius(2,2,2,2)
};

//This text block displays
//the fret number
var txt = new TextBlock()
{
	Text = col.ToString(),
	Foreground = fontBrush,
	HorizontalAlignment = System.Windows.HorizontalAlignment.Center,
	VerticalAlignment = System.Windows.VerticalAlignment.Center,
	FontWeight = FontWeights.Bold,
	FontSize = 10
};

noteOn.Child = txt;

if (stringRect != null)
{
	stringRect.Stroke =
	stringRect.Fill = stringOnColor;
	stringRect.Height = 1;
}

noteOn.SetValue(Grid.RowProperty, row);
noteOn.SetValue(Grid.ColumnProperty, col);
dicNotesOn.Add(message.Data1, noteOn);
grdArm.Children.Add(noteOn);
Finally, we also must handle the situations where the note is being released. In this case, we remove the selected StringInfo from the dicNotesOn dictionary, and remove the visual elements from the Grid:
                }
                else if (message.Data2 == 0)
                {
                    if (dicNotesOn.ContainsKey(message.Data1))
                    {
                        var noteOff = dicNotesOn[message.Data1];
                        dicNotesOn.Remove(message.Data1);
                        grdArm.Children.Remove(noteOff);

                        var stringId = (int)noteOff.Tag;
                        TurnOffString(stringId);
                    }
                }
            }
            else if (message.Command == ChannelCommand.NoteOff)
            {
                if (dicNotesOn.ContainsKey(message.Data1))
                {
                    var noteOff = dicNotesOn[message.Data1];
                    dicNotesOn.Remove(message.Data1);
                    grdArm.Children.Remove(noteOff);

                    var stringId = (int)noteOff.Tag;
                    TurnOffString(stringId);
                }
            }
We also have a method for clearing all the notes from dictionary and "turning off" all strings:
    public void Clear()
        {
            dicNotesOn.Clear();
            for (var i = grdArm.Children.Count - 1; i >= 0; i--)
            {
                if (grdArm.Children[i] is Border)
                {
                    var ell = grdArm.Children[i] as Border;
                    if (ell.Tag != null)
                    {
                        grdArm.Children.RemoveAt(i);
                    }
                }
            }

            for (var i = 0; i < 6; i++)
            {
                TurnOffString(i);
            }
        }

    private void TurnOffString(int stringId)
        {
            var stringInfo = stringInfos[stringId];
            Rectangle stringRect = null;

            switch (stringId)
            {
                case 0:
                    stringRect = string0;
                    break;
                case 1:
                    stringRect = string1;
                    break;
                case 2:
                    stringRect = string2;
                    break;
                case 3:
                    stringRect = string3;
                    break;
                case 4:
                    stringRect = string4;
                    break;
                case 5:
                    stringRect = string5;
                    break;
            }
            stringRect.Height = 1;
            stringRect.Stroke =
            stringRect.Fill = stringOffColor;
        }
The Bass Control
The Bass Control is much like the Guitar Control. The basic differences: it has 2 less strings (the high-pitched ones), and the positions in the instrument's arm correspond to different range of note values.
![]()
Here goes the code that decides if the message should be sent to the BassControl:
	switch (dicChannel[e.Message.MidiChannel])
	{
		...
		case (int)MIDIInstrument.AcousticBass://33
		case (int)MIDIInstrument.ElectricBassfinger://34
		case (int)MIDIInstrument.ElectricBasspick://35
		case (int)MIDIInstrument.FretlessBass://36
		case (int)MIDIInstrument.SlapBass1://37
		case (int)MIDIInstrument.SlapBass2://38
		case (int)MIDIInstrument.SynthBass1://39
		case (int)MIDIInstrument.SynthBass2://40
			this.Dispatcher.Invoke(
			  System.Windows.Threading.DispatcherPriority.Normal,
				new Action(
					delegate()
					{
						bassControl1.Send(e.Message);
					}
				));
			break;
		...
The Drums Control
The Drums Control is probably the most appealing of all. At first, it seemed very difficult to represent a real drum playing in real time. But then an idea came to me, that I could use animations to creating "pulsating" animations for each individual part of the drums. Fortunately, it gave the application a very interesting result.

Bass drum, Toms and Snare Drum
 |
 |
 |
 |
|
| Bass Drum | Floor Tom | Tom 1 | Tom 2 | Snare Drum |
Here goes a short description of each instrument: (source: Wikipedia)
- Bass Drum: In music, the bass drum is used to mark or keep time. In marches, it is used to project tempo (marching bands historically march to the beat of the bass). A basic beat for rock and roll has the bass drum played on the first and third beats of a bars of common time, with the snare drum on the second and fourth beats, called "back beats".
- Floor Tom: A floor tom is a double-headed tom-tom drum which usually stands on the floor on three legs. However, they can also be attached to a cymbal stand with a drum clamp.
- Tom-toms: A wide variety of configurations are commonly available and in use at all levels from advanced student kits upwards. Most toms range in size between 6" and 20", though floor toms can go as large as 24". Two "power" depth tom-toms of 12x10 (12" diameter by 10" depth) and 13x11 is a common hanging tom configuration. Also popular is the "fusion" configuration of 10x8 and either 12x8 or 12x9, and the again popular "classic" configuration of 12x8 and 13x9, which is still used by some jazz drummers. A third hanging tom is often used instead of a floor tom.
- Snare Drum: The snare drum is a drum with strands of snares made of curled metal wire, metal cable, plastic cable, or gut cords stretched across the drumhead, typically the bottom. Pipe and tabor and some military snare drums often have a second set of snares on the bottom (internal) side of the top (batter) head to make a "brighter" sound, and the Brazilian caixa commonly has snares on the top of the upper drumhead. The snare drum is considered one of the most important drums of the drum kit.
The 3 classes of drums instruments above were grouped in this section because they share the same kind of Animations. Whenever a sound come to those instruments, the drums control triggers an animation on their ScaleTransform, so the instruments appear as if they were "pulsating". Of course real drums would never do that, but in the end effect captures well the feeling of the drumbeat.
Besides the "pulsating" animation, these instruments also become more or less transparent when beaten.
Here goes a XAML code example showing how these animations are set up for one instrument:
<UserControl x:Class="WPFMidiHero.Controls.DrumControl"
	...
    <UserControl.Resources>
	...
        <Storyboard x:Key="sbSnareDrum" Duration="0:0:0.500">
            <DoubleAnimation From="1.0" To="1.8"
            Storyboard.TargetName="imgSnareDrum"
            Storyboard.TargetProperty="(Grid.RenderTransform).(ScaleTransform.ScaleX)">
                <DoubleAnimation.EasingFunction>
                    <ElasticEase Oscillations="1" EasingMode="EaseIn" />
                </DoubleAnimation.EasingFunction>
            </DoubleAnimation>
            <DoubleAnimation From="1.0" To="1.8"
            Storyboard.TargetName="imgSnareDrum"
            Storyboard.TargetProperty="(Grid.RenderTransform).(ScaleTransform.ScaleY)">
                <DoubleAnimation.EasingFunction>
                    <ElasticEase Oscillations="1" EasingMode="EaseIn" />
                </DoubleAnimation.EasingFunction>
            </DoubleAnimation>
            <DoubleAnimation From="0.5" To="1.0" Storyboard.TargetName="imgSnareDrum"
            Storyboard.TargetProperty="Opacity" AutoReverse="True"/>
	...
Notice in the snippet above that we apply ElasticEase function to the animations. This gives up an interesting, more natural effect to the animations.
Since the animations are set in the resources directly in the XAML, when the midi message arrives we must look for the StoryBoard corresponding to the correct instrument resource and execute it:
public void Send(ChannelMessage message)
{
	if (message.Command == ChannelCommand.NoteOn &&
		message.Data1 >= LowNoteID && message.Data1 <= HighNoteID)
	{
		if (message.Data2>0)
		{
			string sbName = "";
			switch (message.Data1)
			{
				case (int)DrumInstrument.AcousticSnare: //38,
				case (int)DrumInstrument.ElectricSnare: //40,
					sbName = "sbSnareDrum";
					break;
				case (int)DrumInstrument.LowFloorTom: //41,
				case (int)DrumInstrument.HighFloorTom: //43,
					sbName = "sbFloorTom";
					break;
				case (int)DrumInstrument.LowTom: //45,
				case (int)DrumInstrument.LowMidTom: //47,
					sbName = "sbTom1";
					break;
				case (int)DrumInstrument.HiMidtom: //48,
				case (int)DrumInstrument.HighTom: //50,
					sbName = "sbTom2";
					break;
				case (int)DrumInstrument.AcousticBassDrum: //35,
				case (int)DrumInstrument.BassDrum: //36,
					sbName = "sbBassDrum";
					break;
				case (int)DrumInstrument.ClosedHiHat: //42,
				case (int)DrumInstrument.PedalHiHat: //44,
				case (int)DrumInstrument.OpenHiHat: //46,
					sbName = "sbHiHat";
					break;
				case (int)DrumInstrument.CrashCymbal: //49,
				case (int)DrumInstrument.RideCymbal: //51
					sbName = "sbRideCymbal";
					break;
			}
			if (!string.IsNullOrEmpty(sbName))
			{
				Storyboard sb = (Storyboard)FindResource(sbName);
				sb.Stop();
				sb.Begin();
			}
		}
	}
Hi-Hat and Ride Cymbal
 |
 |
| Hi-Hat | Ride Cymbal |
Here goes a short description of each instrument: (source: Wikipedia)
- Hi-Hat:The hi-hat consists of two cymbals that are mounted on a stand, one on top of the other, and clashed together using a pedal on the stand. A narrow metal shaft or rod runs through both cymbals into a hollow tube and connects to the pedal. The top cymbal is connected to the rod with a clutch, while the bottom cymbal remains stationary resting on the hollow tube. The height of the top-cymbal (open position) is adjustable. When the foot plate of the pedal is pressed, the top cymbal crashes onto the bottom cymbal (closed hi-hat). When released, the top cymbal returns to its original position above the bottom cymbal (open hi-hat). A tension unit controls the amount of pressure required to lower the top cymbal, and how fast it returns to its open position.
- Ride Cymbal: The ride cymbal is a type of cymbal that is a standard part of most drum kits. Its function, very similar to the hi-hat it is an alternative to[1], is to maintain a steady rhythmic pattern, sometimes called a ride pattern rather than to provide accents as with, for example, the crash cymbal. The ride can fulfil any function or rhythm the hi-hat does, with the exclusion of an open and closed sound[1]. In rock and popular music another percussion instrument such as a shaker or maraca may be substituted for the cymbal in a ride pattern, especially in quieter styles such as soft-ballads or bossa-nova
These 2 drums instruments have different animations. While the others have that "pulsating" effect, in the Hi-Hat the top cymbal crashes onto the bottom cymbal when the pedal is pressed. This is done by a DoubleAnimation targeting the Y coordinate of the TranslateTransform of the top cymbal:
        <Storyboard x:Key="sbHiHat" Duration="0:0:0.250">
            <DoubleAnimation From="-10.0" To="-35"
            Storyboard.TargetName="imgHiHatTop"
            Storyboard.TargetProperty="(Grid.RenderTransform).(TranslateTransform.Y)">
                <DoubleAnimation.EasingFunction>
                    <ElasticEase Oscillations="1" EasingMode="EaseIn" />
                </DoubleAnimation.EasingFunction>
            </DoubleAnimation>
            <DoubleAnimation From="0.5" To="1.0" Storyboard.TargetName="imgHiHatTop"
            Storyboard.TargetProperty="Opacity" AutoReverse="True"/>
        </Storyboard>
On the other hand, the Ride Cymbal rotates slightly and quickly 20 degrees:
<DoubleAnimation From="0.0" To="20.0"
    Storyboard.TargetName="imgRideCymbal"
    Storyboard.TargetProperty="(Grid.RenderTransform).(RotateTransform.Angle)">
        <DoubleAnimation.EasingFunction>
            <ElasticEase Oscillations="1" EasingMode="EaseIn" />
        </DoubleAnimation.EasingFunction>
    </DoubleAnimation>
Final Considerations
Thank you for reading WPF Midi Band. I hope you have enjoyed it as much as I had. And I also hope the article and the application could be useful for you in some way. And please leave a comment! If you have any complaints, suggestions or doubts, your feedback will be very important, not just for this article, but also for future articles.
History
- 2010-12-31: Initial version
- 2011-01-01: Youtube video added
- 2011-01-02: YouTube videos added, source code changed, Guitar control explained