
dotNetInstaller - Setup Bootstrapper for .NET Application
4.96/5 (84 votes)
With this tool the developer can define the application prerequisites and install the correct version of these components in the correct order based on the user operating system type and language, allow the user to download these components from the web or install these components directly.

Introduction
This application doesn't replace tool like InstallShield, Wise or Visual Studio Setup and Deployment Project; my goal is to create an application to help the users to installing the correct prerequisites components. Today applications often need to install several components to work properly: Windows Service Pack, Internet Explorer, MDAC, .NET Framework etc. With this tool the developer can define the application prerequisites and install the correct version of these components in the correct order based on the user operating system type and language, allow the user to download these components from the web or install these components directly from his media (usually a CDROM).
This project is composed with these components:
- dotNetInstaller.exe + Source Code: Main bootstrapper application, written with Visual Studio 2003 C++ and MFC.
- InstallerEditor.exe + Source Code: Application for editing configurations files and edit dotNetInstaller.exe resources, written with Visual Studio 2003 C#
- Configuration samples and SupportFiles template.
This project is based on Microsoft bootstrapper and Kevin Moore bootstrapper 'Enhanced .NET Bootstrap Setup' (http://www.codeproject.com/managedcpp/dotnetsetup.asp).
All the settings are stored in a XML file parsed with a little XML parser by Cho, Kyung-min (XMLite: simple xml parser. http://www.codeproject.com/useritems/xmlite.asp
A special thanks to Kevin Moore and Cho, Kyung-min for theirs works.
I build this project with Windows XP, Visual Studio 2003 (C++ and C#) and Microsoft .NET Framework 1.1 . Check for the latest version at: http://dotnetinstaller.codeplex.com/.
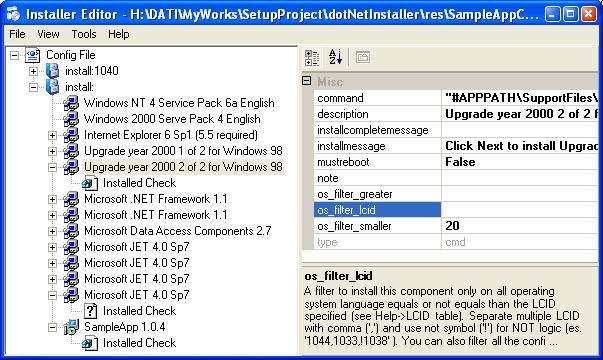
The editor: InstallerEditor.exe
You can create two type of configuration file with the editor:
- Standalone Configuration: A configuration that runs the components setups from a specified path, usually a relative path of the dotNetInstaller.exe file. Select this configuration if you want to distribute your application with a CDROM.
- Web Configuration: A configuration that download and execute the required components from a specified web site. Select this configuration if you want to distribute the configuration over the web.
With the editor you can create these configurations files and then include these files in the dotNetInstaller resources. With this solution you can only distribute one exe file.
Another solution is to distribute in the same path of the dotNetInstaller.exe the configuration file using the name 'configuration.xml' and if you want you can also distribute a bitmap with the name 'banner.bmp'. dotNetInstaller first checks for this configuration file, if the file doesn't exist the application use the configuration embedded into the exe.
In the XML configuration file you can use some path variables in all command or path settings. Is recommended to use " symbol in all the command attributes that contains one or more space, in msi component the " symbol is not supported and if needed the application add this symbol automatically. Is recommended to use #APPPATH variable in all the attributes with path value (like command, dialog_bitmap, package), this constant allows to write relative path string from the dotNetInstaller.exe folder otherwise all the path are relative to the system current directory.
If you configure the application to download the components, I recommend to download the components using the #TEMPPATH variable and the run the components from the same path.
For example if you want to launch a file ('My App.exe') in the same folder of dotNetInstaller.exe you can write in the command string: "#APPPATH\My App.exe"
In this release you cannot change the order of the components from the editor, if you need this feature you must change the XML manually.
Tutorials
How to create a Standalone Setup to install .NET Framework and your msi setup:
We create a CDROM with your MSI package, SupportFiles (like .NET Framework), configuration file configuration.xml) and a bitmap (banner.bmp). All these components are installed directly from the CDROM.
- Create a folder that represents your final distribution CDROM, for example 'c:\MyRelease\' .
- Copy under 'c:\MyRelease\' the directory 'SupportFiles' that you can find in the project .zip .
- In the SupportFiles replace all the readme.txt files with the real components files that your installation need; for example replace the 'SupportFiles\dotNet\v1.1\English\dotnetfx.exe.readme.txt' with the real dotnetfx.exe file that you can download from microsoft web site.
- Copy your msi package (that you can create with Visual Studio .NET, InstallShield or others installation tool) under the 'c:\MyRelease\'.
- Copy dotNetInstaller.exe under 'c:\MyRelease\'.
- Create a bitmap (banner.bmp 110x208 pixels) with the name 'c:\MyRelease\banner.bmp' with the logo of your application.
- Execute the InstallerEditor.exe file.
- Select the menu 'File'->'New...' and create a new file with the name 'c:\MyRelease\configuration.xml' .
- Select from the menu 'Tools'->'Language for New Item' the user interface language that you want. (for now there are only English and Italian, but you can write your custom messages editing manually the properties.)
- Right click on the 'Config File' node and select 'Add'->'Setup Configuration'
- Select the just created 'install:' node and customize the properties 'dialog_caption', 'dialog_message' and 'installation_completed' with the name of your application.
- Right click on the 'install:' node and select 'Add'->'Component Wizard...'
- Select 'Microsoft .NET Framework 1.1', 'Distributed with dotNetInstaller' and click the OK button.
- Right click on the 'install:' node and select 'Add'->'Msi Component'
- Select the just created node and customize the properties 'description', 'installmessage' and 'package' with the name of your setup and msi package name. In the package path I use #APPPATH variable that represents the dotNetInstaller.exe path.
- Select the menu 'File'->'Save'.
- Write all the contents of the 'c:\MyRelease\' directory on your CDROM. If you want you can also create a 'autorun.inf' file that execute dotNetInstaller.exe.
For others informations in the .zip you can find an example of a configuration.xml file configured to install these components for Windows 98, 98 SE, Millennium, NT4, 2000, XP, 2003:
- Windows Service Pack required to install .NET Framework, MDAC and Internet Explorer (Windows 2000 Sp4, Windows NT 4 Sp6a, Year 2000 Updates for Windows 98)
- Internet Explorer 6 Sp1
- .NET Framework 1.1
- Microsoft Data Access Component 2.7 (MDAC 2.7)
- Microsoft JET 4.0 Service Pack 6
- Sample application
I included a SupportFiles directory with the required structure and some readme.txt files where you can find a link to download the required components (usually from microsoft web site).
How to create a Web Setup to install .NET Framework and your msi setup:
Create the support files directory
We create a web site with your MSI package and all the support files (like .NET Framework).
- Create a folder that represents your final distribution web site, for example 'http://www.mysite.com/MyRelease/' .
- Copy under 'http://www.mysite.com/MyRelease/' the directory 'SupportFiles' that you can find in the project .zip .
- In the SupportFiles replace all the readme.txt files with the real components files that your installation need; for example replace the 'SupportFiles\dotNet\v1.1\English\dotnetfx.exe.readme.txt' with the real dotnetfx.exe file that you can download from microsoft web site.
- Copy your msi package (that you can create with Visual Studio .NET, InstallShield or others installation tool) under the 'http://www.mysite.com/MyRelease/'.
Create the main configuration file
We create a configuration file that download and install the components from a web site (for .NET Framework and one MSI package).
- Execute the InstallerEditor.exe file.
- Select the menu 'File'->'New...' and create a new file with the name 'configuration.xml' .
- Select from the menu 'Tools'->'Language for New Item' the user interface language that you want. (for now there are only English and Italian, but you can write your custom messages editing manually the properties.)
- Right click on the 'Config File' node and select 'Add'->'Setup Configuration'
- Select the just created 'install:' node and customize the properties 'dialog_caption', 'dialog_message' and 'installation_completed' with the name of your application.
- Right click on the 'install:' node and select 'Add'->'Component Wizard...'
- Select 'Microsoft .NET Framework 1.1', 'Downloaded from Internet', and replace 'http://www.myWebSite.com/MyApp/SupportFiles' with your web site for example 'http://www.mysite.com/MyRelease/SupportFiles' and click the OK button.
- Right click on the 'install:' node and select 'Add'->'Msi Component'
- Select the just created node and customize the properties 'description', 'installmessage' and 'package' with the name of your setup and msi package name. Replace the #APPPATH\mysetup.msi with #TEMPPATH\MyApplicationName\mysetup.msi, this is download destination of the package.
- Right click on the msi component and select 'Add'->'Download Dialog'
- Select the just created node 'Download Dialog' and customize the properties 'dialog_caption' and 'dialog_message' with the name of your application.
- Right click on the 'Download Dialog' node and select 'Add'->'Download File'
- Select the just created node under 'Download Dialog' and customize the properties 'componentname', 'destinationpath' (write for example '#TEMPPATH\MyApplicationName\', must be the same path of the 'package' property) and 'sourceurl' (write 'http://www.mysite.com/MyRelease/mysetup.msi') .
- Select the menu 'File'->'Save', and copy this configuration.xml file under 'http://www.mysite.com/MyRelease/'.
Create the bootstrapper
We create an executable that download and execute the main configuration file from a web site, changing the dotNetInstaller resources with our custom xml and bitmap.
- Create a bitmap (banner.bmp 110x208 pixels) with the logo of your application.
- Execute the InstallerEditor.exe file.
- Select the menu 'File'->'New...' and create a new file with the name 'reference.xml' .
- Select from the menu 'Tools'->'Language for New Item' the user interface language that you want. (for now there are only English and Italian, but you can write your custom messages editing manually the properties.)
- Right click on the 'Config File' node and select 'Add'->'Web Configuration'
- Select the just created node 'reference:' and customize the properties 'referencefile' for example write '#TEMPPATH\MyApplicationName\configuration.xml'.
- Select the node 'Download Dialog' under 'reference:' and customize the properties 'dialog_caption' and 'dialog_message'.
- Right click on the 'Download Dialog' node and select 'Add'->'Download File'
- Select the just created node under 'Download Dialog' and customize the properties 'componentname', 'destinationpath' (write for example '#TEMPPATH\MyApplicationName\', must be the same path of the 'referencefile' property) and 'sourceurl' (write 'http://www.mysite.com/MyRelease/configuration.xml', must be the URL where you can download the previously created configuration file) .
- Select the menu 'File'->'Save'.
- Select the menu 'File'->'Create Exe'; in the 'Template dotNetInstaller.exe file' select the path of your 'dotNetInstaller.exe', in the 'Banner Bitmap' select the bitmap created previously. Click Make button and select a file name of the new dotNetInstaller, for example 'MyWebSetup.exe'.
- Copy 'MyWebSetup.exe' under your 'http://www.mysite.com/MyRelease/'.
Now the user must only download the 'MyWebSetup.exe' (310 Kb) and this application automatically download and install the required components, in this example .NET Framework and one MSI package.
Path variables
These are the variables that can be used in all the attribute that contains a path (dialog_bitmap,command, ...):
#APPPATH- This string is replaced with the directory of dotNetInstaller.exe program.#SYSTEMPATH- This string is replaced with the windows system directory (usingGetSystemDirectory()API, usually c:\WINNT\System32 ).#WINDOWSPATH- This string is replaced with the windows directory (usingGetWindowsDirectory()API, usually c:\WINNT ).#TEMPPATH- This string is replaced with the temp directory (usingGetTempPath()API, usually C:\Documents and Settings\[User]\Local Settings\Temp ).
Check if the component is already installed
You can use the installedcheck element to check if a component is already installed, for example you can check if the .NET Framework 1.1 is installed by reading this registry key SOFTWARE\Microsoft\NET Framework Setup\NDP\v1.1.4322\Install = 1.
For now there are two type of install check:
- 'check_registry_value' - Check for a specific registry value.
- 'check_file' - Check for a specific file with a specific version.
You can look at the example to see the check used with the most common components: .NET Framework, Internet Explorer, MDAC, JET and more.
Check the operating system version
This is the operating system table used to install a component only in a specific operating system version.
| Operating System Name | Enum | Numeric Identifier |
|---|---|---|
| Not Valid | winNotValid | 0 |
| Windows 95 | win95 | 5 |
| Windows 95 OSR2 | win95osr2 | 10 |
| Windows 98 | win98 | 15 |
| Windows 98 Second Edition | win98se | 20 |
| Windows Millennium | winME | 25 |
| Windows NT4 | winNT4 | 30 |
| Windows NT4 Service Pack 6 | winNT4sp6 | 35 |
| Windows NT4 Service Pack 6a | winNT4sp6a | 40 |
| Windows 2000 | win2000 | 45 |
| Windows 2000 Service Pack 1 | win2000sp1 | 50 |
| Windows 2000 Service Pack 2 | win2000sp2 | 55 |
| Windows 2000 Service Pack 3 | win2000sp3 | 60 |
| Windows 2000 Service Pack 4 | win2000sp4 | 65 |
| Windows XP | winXP | 75 |
| Windows XP Service Pack 1 | winXPsp1 | 80 |
| Windows Server 2003 | winServer2003 | 90 |
| Next .... | winLater | 100 |
Same examples:
- Install a component only in Windows XP (with no service pack check) :
os_filter_greater='74',os_filter_smaller='90' . - Install a component only in Windows 2000 or later :
os_filter_greater='44',os_filter_smaller='' . - Install a component only in Windows 98 (not in Windows 98 SE):
os_filter_greater='14',os_filter_smaller='16' . - Install a component always:
os_filter_greater='',os_filter_smaller='' .
Usually is best to use an install check to see if the component is already installed, but for some components is necessary to check the operating system version (especially for service pack or windows update).
XML Elements help:
Warning: the XML parser is not fully compatible with the standard xml specification; it supports only the basic features. Do not include XML comments and use a normal XML sintax like the examples provided in the .zip. Is recommended to use the editor InstallerEditor to create or modify your configuration files or I suggest to use a normal text editor. If you want to insert the " char in the XML manually you must write " .
| configurations | ||
|---|---|---|
| Root element | ||
| ATTRIBUTES: |
|
|
| CHILDREN: |
|
|
| configuration (type='install') | |||||||||||||||||||||||||||||||||
|---|---|---|---|---|---|---|---|---|---|---|---|---|---|---|---|---|---|---|---|---|---|---|---|---|---|---|---|---|---|---|---|---|---|
| A configuration used to install a collection of components. | |||||||||||||||||||||||||||||||||
| ATTRIBUTES: |
|
||||||||||||||||||||||||||||||||
| CHILDREN: |
|
||||||||||||||||||||||||||||||||
| configuration (type='reference') | |||||
|---|---|---|---|---|---|
| A configuration used to download a configuration file from a specific URL. | |||||
| ATTRIBUTES: |
|
||||
| CHILDREN: |
|
||||
| configfile | |||
|---|---|---|---|
| The path to the configuration file downloaded. | |||
| ATTRIBUTES: |
|
||
| CHILDREN: |
|
||
| components | ||
|---|---|---|
| A collection of elements of type 'component'. | ||
| ATTRIBUTES: |
|
|
| CHILDREN: |
|
|
| component (see also specific help based on the 'type' attribute) | |||||||||||||||||||
|---|---|---|---|---|---|---|---|---|---|---|---|---|---|---|---|---|---|---|---|
| A component to be installed. | |||||||||||||||||||
| ATTRIBUTES: |
|
||||||||||||||||||
| CHILDREN: |
|
||||||||||||||||||
| component (type='cmd') | |||||||
|---|---|---|---|---|---|---|---|
| A component that can be used to execute an .exe file like a setup application. | |||||||
| ATTRIBUTES: |
|
||||||
| CHILDREN: |
|
||||||
| component (type='msi') | |||||||||
|---|---|---|---|---|---|---|---|---|---|
| A component that can be used to install an msi package. | |||||||||
| ATTRIBUTES: |
|
||||||||
| CHILDREN: |
|
||||||||
| component (type='openfile') | |||||||
|---|---|---|---|---|---|---|---|
| A component that can be used to open a web page, a readme file or execute any file during the installation process. | |||||||
| ATTRIBUTES: |
|
||||||
| CHILDREN: |
|
||||||
| downloaddialog | |||||||||||||
|---|---|---|---|---|---|---|---|---|---|---|---|---|---|
| Represents a list of files to download and the configurations of the download dialog. | |||||||||||||
| ATTRIBUTES: |
|
||||||||||||
| CHILDREN: |
|
||||||||||||
| downloads | ||
|---|---|---|
| A collection of elements of type 'download'. | ||
| ATTRIBUTES: |
|
|
| CHILDREN: |
|
|
| download | |||||||||
|---|---|---|---|---|---|---|---|---|---|
| Represent a single file to download. | |||||||||
| ATTRIBUTES: |
|
||||||||
| CHILDREN: |
|
||||||||
| installedcheck (type='check_file') | |||||||||
|---|---|---|---|---|---|---|---|---|---|
| The application check if a component is installed looking for the specified registry information or file. | |||||||||
| ATTRIBUTES: |
|
||||||||
| CHILDREN: |
|
||||||||
| installedcheck (type='check_registry_value') | |||||||||||||
|---|---|---|---|---|---|---|---|---|---|---|---|---|---|
| The application check if a component is installed looking for the specified registry information or file. | |||||||||||||
| ATTRIBUTES: |
|
||||||||||||
| CHILDREN: |
|
||||||||||||
Notes
- If a component needs to restart the system the application automatically add a key in the HKEY_LOCAL_MACHINE\SOFTWARE\Microsoft\Windows\CurrentVersion\Run to reload the application at the next startup.
- You must run this application with Administrator privilege.
- I have tested this setup with Windows 98, 98 SE, Millennium, 2000, XP. (not yet tested with Windows NT 4 and with Terminal Server).
- Is useful that also your setup write a little registry value where you can put some information about the installed version, this allows this application to check if your setup is already installed using a 'installedcheck' element.
- The setup of .NET Framework 1.1 (dotNetFx.exe) automatically installs Windows Installer 2.0 .
- In order to install MDAC 2.7 in Windows 98 you must first install the updates for year 2000 compatibility. In my sample configuration files I added a component for this files, you can download these updates from Windows Update Catalog web site.
- In Windows 98 after installing .NET Framework I must force a reboot of the computer (with the 'mustreboot' attribute) otherwise some .NET Framework or Windows Installer components or not installed correctly.
- The only way that I found to check if JET 4.0 is already installed is to search for Msjet40.dll file in the system directory with the version 4.0.7328.0 (JET 4.0 Sp7).
- You can use this project also to launch multiple MSI or others setup at the same time, and can be used also for not .NET project (like Visual Basic, VC++, ...).
- In Windows Millennium I had some strange problems if I rename the dotNetInstaller.exe to Setup.exe . If I launch Setup.exe I cannot detect anymore the right operating system version ( return Windows 98 version instead of Windows Millennium ). Anyway all you have to do is to leave the executable name dotNetInstaller.exe or use a name different from Setup.exe.
- In my configuration file I also added components for installing Service Pack and others system components, but warning installing this kind of components is always an unsafe operation.
- To find the operating system installed LCID I use the information provided in this article: Microsoft Knowledge Base Article - 181604. HOWTO: Determine Default Language ID of Windows 95 or WinNT
- To download the components I use
URLDownloadToFileAPI. - For now I don't delete the downloaded components, for this reason I recommended to use the TEMP path as a destination folder.
- To change the resources of the exe file I use
BeginUpdateResourceW,UpdateResourceWandEndUpdateResourceWAPI. These API are available only on Windows NT, 2000 and XP for this reason the editor cannot be used on Windows 98 (the bootstrapper is supported also on Windows 98 ).
Summary of future works
- Silent mode and command line support.
History
1.1.0.2 (02 January 2004)
- Added ability to download required components from the web.
- Added #TEMPPATH path variable.
- Editor to create and modify XML configuration file.
- Many changes to the XML structure, old files are not compatible.
- Fixed a bug on the function that read the operating system LCID and others small bugs fixing.
1.0.8.0 (05 November 2003)
- Added #WINDOWSPATH path constant.
1.0.7.0 (28 September 2003)
- Bug fixed on MDAC and JET components configuration file (registry check to REG_SZ and language support for JET).
1.0.7.0 (27 September 2003)
- First public release.
License
dotNetInstaller - C++ Setup bootstrapper for .NET
Copyright (c) 2003, Davide Icardi
All rights reserved.
Redistribution and use in source and binary forms, with or without modification, are permitted provided that the following conditions are met:
- Redistributions of source code must retain the above copyright notice, this list of conditions and the following disclaimer.
- Redistributions in binary form must reproduce the above copyright notice, this list of conditions and the following disclaimer in the documentation and/or other materials provided with the distribution.
- Neither the name of the ORGANIZATION nor the names of its contributors may be used to endorse or promote products derived from this software without specific prior written permission.
THIS SOFTWARE IS PROVIDED BY THE COPYRIGHT HOLDERS AND CONTRIBUTORS "AS IS" AND ANY EXPRESS OR IMPLIED WARRANTIES, INCLUDING, BUT NOT LIMITED TO, THE IMPLIED WARRANTIES OF MERCHANTABILITY AND FITNESS FOR A PARTICULAR PURPOSE ARE DISCLAIMED. IN NO EVENT SHALL THE COPYRIGHT OWNER OR CONTRIBUTORS BE LIABLE FOR ANY DIRECT, INDIRECT, INCIDENTAL, SPECIAL, EXEMPLARY, OR CONSEQUENTIAL DAMAGES (INCLUDING, BUT NOT LIMITED TO, PROCUREMENT OF SUBSTITUTE GOODS OR SERVICES; LOSS OF USE, DATA, OR PROFITS; OR BUSINESS INTERRUPTION) HOWEVER CAUSED AND ON ANY THEORY OF LIABILITY, WHETHER IN CONTRACT, STRICT LIABILITY, OR TORT (INCLUDING NEGLIGENCE OR OTHERWISE) ARISING IN ANY WAY OUT OF THE USE OF THIS SOFTWARE, EVEN IF ADVISED OF THE POSSIBILITY OF SUCH DAMAGE.