
Tutorial: Creating a Lookless WPF Custom Rotate Control
A tutorial on how to create a lookless WPF custom control for rotating another element
Introduction
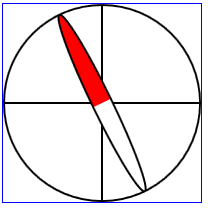
I needed a control that would allow the user to specify the angle for use in a rotate transform of some other element. At first I used a slider, but I wanted a more intuitive control, looking something like a compass arrow. The user should be able to set the angle by dragging the arrow around.
Note: You need NUnit to build the sample project.
The following is a tutorial on how this can be done.
Specification
- The control has a dependency property,
Angle, which can have values from 0 to 360. - Clicking on the control and moving the mouse while holding the mouse button updates the
Angleproperty. - The visual is an arrow on a dial that indicates the current
Angle. - The control is lookless.
Creating the Control
The control was created using Visual Studio (2008) WPF Custom Control Library template:
- Select File/New Project
- Select Project type Windows
- Select the WPF Custom Control Library template
- Rename the created control class to
RotateControl
Implementing the Angle Dependency Property
The Angle dependency property behaviour lends itself easily to a Test Driven approach, so we start with a simple unit test:
using System.Windows;
using NUnit.Framework;

namespace TSoftControlLibrary
{
    [TestFixture]
    public class RotateControlTest
    {
        /// <summary>
        /// Test that the angle is coerced to a value between 0
        /// (inclusive) and 360 (exclusive) no matter what it is set to
        /// </summary>
        [Test]
        public void AngleIsBetweenZeroAnd360()
        {
            RotateControl control = new RotateControl();

            control.Angle = 180;
            Assert.AreEqual(180, control.Angle);
            control.Angle = 359;
            Assert.AreEqual(359, control.Angle);
            control.Angle = 360;
            Assert.AreEqual(0, control.Angle);

            control.Angle = -1;
            Assert.AreEqual(359, control.Angle);

            control.Angle = -180;
            Assert.AreEqual(180, control.Angle);

            control.Angle = -360;
            Assert.AreEqual(0, control.Angle);
            control.Angle = -361;
            Assert.AreEqual(359, control.Angle);

            control.Angle = 720;
            Assert.AreEqual(0, control.Angle);
            control.Angle = 721;
            Assert.AreEqual(1, control.Angle);
        }
    }
}
The implementation of the Angle dependency property is then straightforward:
public class RotateControl : Control
{
    ...

    public static readonly DependencyProperty AngleProperty =
          	DependencyProperty.Register("Angle", typeof(double),
		typeof(RotateControl), new FrameworkPropertyMetadata(0.0,
		FrameworkPropertyMetadataOptions.BindsTwoWayByDefault, null,
		coerceValueCallback));

    public double Angle
    {
        get { return (double)GetValue(AngleProperty); }
        set { SetValue(AngleProperty, value); }
    }

    static object coerceValueCallback(DependencyObject d, object baseValue)
    {
        var angle = (double)baseValue % 360;
        if (angle < 0)
            return angle + 360;
        else
            return angle;
    }

    ...
}
Notice how the CoerceValueCallback is used to constrain the range of the Angle value. Also notice that BindsTwoWayByDefault option is set in the DependencyProperty.Register call.
Implementing the Control Template
I like to start with a simple unit test that just shows the control. Setting the BorderBrush and Thickness properties makes it easier to see the extent of the control.
[Test]
public void ShowInWindow()
{
    Window w = new Window();
    w.Content = new RotateControl() { Width=200, Height=200,
	BorderBrush=Brushes.Blue, BorderThickness=new Thickness(1)};
    w.ShowDialog();
}
I run this manually from Visual Studio. When I am ready to run it in an automated environment, I change the ShowDialog() to Show().
Below is the content of the generic.xml file.
Some points of interest:
- The arrow is just an ellipsis painted in red and white as a compass needle. It is very easy to replace with any image.
- The arrow is rotated by a rotate transform with its
Angleproperty bound to the controls'Angleproperty. TemplateBindingdoes not work for this binding sinceRotateTransformis a freezable.Update: I found this explanation in a book, but it does not really explain it, does it? The transform is not part of the visual or logical tree so the
TemplateBindingdoes not find the parent. So how does the Binding withRelativeSourcefind theTemplatedParent? I believe it is using the inheritance context (see http://blogs.msdn.com/nickkramer/archive/2006/08/18/705116.aspx) andTemplateBindingdoes not support this.- Notice the
RenderTransformOriginon the arrow image. It makes the arrow rotate around its center rather than around its upper left corner. - Tip: Try setting it to 0 1 instead and observe.
<ResourceDictionary
    xmlns="http://schemas.microsoft.com/winfx/2006/xaml/presentation"
    xmlns:x="http://schemas.microsoft.com/winfx/2006/xaml"
    xmlns:local="clr-namespace:TSoftControlLibrary">

    <LinearGradientBrush x:Key="RedWhiteBrush" StartPoint="0,0" EndPoint="0,1">
        <LinearGradientBrush.GradientStops>
            <GradientStop Color="Red" Offset="0"></GradientStop>
            <GradientStop Color="Red" Offset="0.5"></GradientStop>
            <GradientStop Color="White" Offset="0.5"></GradientStop>
            <GradientStop Color="White" Offset="1"></GradientStop>
        </LinearGradientBrush.GradientStops>
    </LinearGradientBrush>

    <Pen x:Key="BlackPen1" Thickness="1" Brush="Black"></Pen>

    <Style TargetType="{x:Type local:RotateControl}">
        <Setter Property="Template">
            <Setter.Value>
                <ControlTemplate TargetType="{x:Type local:RotateControl}">
                    <Border Background="{TemplateBinding Background}"
                            BorderBrush="{TemplateBinding BorderBrush}"
                            BorderThickness="{TemplateBinding BorderThickness}">
                        <Grid>
                            <!-- Image for the dial -->
                            <Image>
                                <Image.Source>
                                    <DrawingImage>
                                        <DrawingImage.Drawing>
                                            <GeometryDrawing Pen=
					"{StaticResource BlackPen1}" >
                                                <GeometryDrawing.Geometry>
                                                    <GeometryGroup>
                                                        <EllipseGeometry RadiusX="50"
						  RadiusY="50"></EllipseGeometry>
                                                        <LineGeometry StartPoint="-50 0"
						  EndPoint="50 0"></LineGeometry>
                                                        <LineGeometry StartPoint="0 -50"
						  EndPoint="0 50"></LineGeometry>
                                                    </GeometryGroup>
                                                </GeometryDrawing.Geometry>
                                            </GeometryDrawing>
                                        </DrawingImage.Drawing>
                                    </DrawingImage>
                                </Image.Source>
                            </Image>
                            <!-- Image for the arrow -->
                            <Image RenderTransformOrigin=".5 .5">
                                <Image.RenderTransform>
                                    <RotateTransform Angle="{Binding RelativeSource=
				{RelativeSource TemplatedParent}, Path=Angle}">
				</RotateTransform>
                                </Image.RenderTransform>
                                <Image.Source>
                                    <DrawingImage>
                                        <DrawingImage.Drawing>
                                            <GeometryDrawing Brush=
					"{StaticResource RedWhiteBrush}"
					Pen="{StaticResource BlackPen1}" >
                                                <GeometryDrawing.Geometry>
                                                    <EllipseGeometry RadiusX="5"
						RadiusY="50"></EllipseGeometry>
                                                </GeometryDrawing.Geometry>
                                            </GeometryDrawing>
                                        </DrawingImage.Drawing>
                                    </DrawingImage>
                                </Image.Source>
                            </Image>
                        </Grid>
                    </Border>
                </ControlTemplate>
            </Setter.Value>
        </Setter>
    </Style>
</ResourceDictionary>
Now it looks something like a compass, so let's see if it obeys the Angle property:
[Test]
public void ShowAndRotate()
{
    Window w = new Window();
    var ctrl = new RotateControl() { Width = 200, Height = 200,
	BorderBrush = Brushes.Blue, BorderThickness = new Thickness(1) };
    w.Content = ctrl;
    DispatcherTimer timer = new DispatcherTimer()
	{ Interval = TimeSpan.FromMilliseconds(50)};
    timer.Tick += delegate {
        ctrl.Angle += 10;
    };
    timer.Start();
    w.ShowDialog();
}
Implementing the Mouse Handling
We start by overriding the OnMouseDown() method. Here we record the direction from the arrow center to the current mouse position as a vector. The arrow center is calculated in advance in the OnRenderSizeChanged() method override. We also capture the mouse and put the control in the mouse rotating state. Capturing the mouse lets our control receive the mouse events even when the mouse is not over the control.
protected override void OnMouseDown(MouseButtonEventArgs e)
{
    var mouseDownPoint = e.GetPosition(this);
    mouseDownVector = mouseDownPoint - arrowCenterPoint;
    mouseDownAngle = Angle;
    e.MouseDevice.Capture(this);
    isMouseRotating = true;
    base.OnMouseDown(e);
}

protected override void OnRenderSizeChanged(SizeChangedInfo sizeInfo)
{
    base.OnRenderSizeChanged(sizeInfo);
    arrowCenterPoint = new Point(ActualWidth / 2, ActualHeight / 2);
}
Next, we override the OnMouseMove() method. If we are in the rotating state, we calculate a new angle based on the mouse movement since the button down event.
protected override void OnMouseMove(MouseEventArgs e)
{
    if (isMouseRotating)
    {
        Point curPos = e.GetPosition(this);
        Vector currentVector = curPos - arrowCenterPoint;
        Angle = Vector.AngleBetween(mouseDownVector, currentVector) + mouseDownAngle;
        Debug.WriteLine("Angle: " + Angle.ToString());
    }
    base.OnMouseMove(e);
}
Finally, we must allow the control to leave the rotating state and release the mouse capture when the mouse button is released. We must also handle the possibility of losing mouse capture:
protected override void OnMouseUp(MouseButtonEventArgs e)
{
    if (isMouseRotating)
    {
        e.MouseDevice.Capture(null);
        isMouseRotating = false;
    }
    base.OnMouseUp(e);
}

protected override void OnLostMouseCapture(MouseEventArgs e)
{
    isMouseRotating = false;
    base.OnLostMouseCapture(e);
}
Running the ShowInWindow() test again lets us test this interactively.
Testing with databinding
The purpose of the control is to allow it to control the rotation of another element, so let's test that. In addition, we should test that the databinding works equally well with the Angle property as the source and target. A good way to test this is to have two instances of the control and bind their Angle property together. Here is the XAML for a simple test window that does all this:
<Window x:Class="TSoftControlLibrary.RotateControlTestWindow1"
    xmlns="http://schemas.microsoft.com/winfx/2006/xaml/presentation"
    xmlns:x="http://schemas.microsoft.com/winfx/2006/xaml"
    xmlns:local="clr-namespace:TSoftControlLibrary"
    Title="RotateControlTestWindow1" SizeToContent="WidthAndHeight">
    <StackPanel>
        <TextBox Text="{Binding ElementName=rtc2, Path=Angle}" FontSize="20"></TextBox>
        <local:RotateControl x:Name="rtc1"
		Angle="{Binding ElementName=rtc2, Path=Angle}"
		Height="100" Width="100"></local:RotateControl>
        <local:RotateControl x:Name="rtc2" Height="100" Width="100"></local:RotateControl>
        <Rectangle Margin="150" Width="200" Height="50"
		Fill="Green" RenderTransformOrigin=".5 .5">
            <Rectangle.RenderTransform>
                <RotateTransform Angle="{Binding ElementName=rtc2,
		Path=Angle}"></RotateTransform>
            </Rectangle.RenderTransform>
        </Rectangle>
    </StackPanel>
</Window>
And here is the unit test for running it:
[Test]
public void ShowRotateControlTestWindow1()
{
    RotateControlTestWindow1 w = new RotateControlTestWindow1();
    w.ShowDialog();
}
History
- 28th March, 2010: Initial post