
Creating Custom Directives in AngularJS - Part I
4.61/5 (12 votes)
Creating custom directives in AngularJS
Introduction
The AngularJS framework provides a fascinating array of features and functionalities for the client side web developer. From the day I started looking into this framework, I have been amazed at the depth and the sheer vastness of the entire framework. The framework has tried to bring some server side features which we took for granted or thought to be easier developed for the server, to the client side development environment. There have been client side JavaScript UI components before or even libraries like JQuery to speed up your client side development, but AngularJS brings a whole new perspective to the term client side development by re-inventing the wheel around how HTML and JavaScript interact and can work together.
This does mean that, as developers we have to change the way we think about a problem domain and its solution(s). At first, it is difficult to think this way, as most of us are brought up on a healthy server side diet, but we can soon get used to it as we start to appreciate what AngularJS brings to the table.
One particular feature of the framework, which is really of interest and which no one can ignore is – a directive, rather custom directive and how to create one.
This text (Part I) will present the steps required for creating a very simple custom directive. A fiddle for which is created here.
This part will try to present the following:
- Basic workings and options of the Directive Definition Object (DDO) – how the directive is structured and the internal plumbing to make the directive work.
- Data sharing/Data binding, between the page and the Directive.
- Executing expression or function on the parent of the Directive.
Note: A basic understanding of AngularJS and its build in directives is required for you to proceed.
So We Begin
To begin, we create a new project in Visual Studio, named - StarRating-Directive. The project template would be ASP.NET Empty Web Application. Here, the use of Visual Studio is optional as we would be using none of the .NET features. Codes are provided with and without Visual Studio shell.
In the newly created project, we create the following folder structure:
/StarRating-Directive

      /app

           /directives

           /controllers

           /views

      /Images

      /Scripts

      /Style
The app folder will contain our AngularJS application, with the contained folders containing different components of the application.
The Scripts folder will contain the AngularJS library files - angular.js and angular.min.js
The Images folder will contain the images used in our directive - star-empty-lg.png and star-fill-lg.png
And finally, in the Style folder, I have copied the bootstrap distributable.
Once we are done, our Solution Explorer will look like this:

Now as our project skeleton is created, we start with our application.
The Code
The Application
We add a new file app.js to the root of our app folder. The file will contain our applications module (‘app’), to which all other application components would be bound.
/// <reference path="../Scripts/angular.js" />

'use strict';
var app = angular.module('app', []);
All the .js files in the application are using <reference path=[file path] /> tag for IntelliSense support for JavaScript, described here.
We add our Controller, to the module – by adding a new file appController.js to the controllers folder. To begin, the controller will have a single property starRating added to its $scope with a value of 3.
/// <reference path="../Scripts/angular.js" />
/// <reference path="../app.js" />

'use strict';
app.controller('appController', ['$scope', function ($scope) {
    $scope.starRating = 3;
}]);
The Directive
A Directive is defined on the module with the following syntax and returns an object literal which defines the Directives options. The object being returned is hence called the Directive Definition Object (DDO).
app.directive('starRating', function () {
    return {
       . . .
});
At a minimum, the Directive Definition Object, defines the following options…
template: The User Interface defined in HTML to be shown as the directive. As an alternative, the template attribute can be replaced with templateUrl for complex User Interface. The templateUrl points to .html file.
restrict: Value can be one of or all of the following:
E: Directive defined as an element. <star-Rating rating=”rating”></star-Rating>
A: Directive applied as an attribute on existing element. <div star-rating rating=”rating”></div>
C: Directive applied as a css class to existing element <div class="star-rating" rating="rating "></div>
M: Directive applied as comment.
controller: The controller is the link between the view and the scope (where the scope is the model for the directive). This being the controller of the directive, controls the functionally of the directive and is responsible for updating the internal DOM elements and communicating with the outside world.
Ok, so let’s build our directive with what we have learnt so far and create a minimalistic directive definition for your StarRating Directive.
app.directive('starRating', function () {
    return {
        restrict: 'EA',
        template:
            "<div style='display: inline-block; margin: 0px;
            padding: 0px; cursor:pointer' ng-repeat='idx in maxRatings track by $index'> \
                <img ng-src='{{(rating <= $index) &&
                \"Images/star-empty-lg.png\" || \"Images/star-fill-lg.png\"}}' \
                ng-Click='click($index + 1)'></img> \
            </div>",
        controller: function ($scope) {
            $scope.maxRatings = [];

            for (var i = 1; i <= 5; i++) {
                $scope.maxRatings.push({});
            };

            $scope.click = function (param) {
                $scope.rating = param;
            };
        }
    };
});
The above Directive has a restrict option with a value of ‘EA’, telling us that this directive can be applied on an Element as well as an Attribute.
The template of the directive has a div with an ng-repeat directive looping on an array - maxRatings which is defined on the $scope. The template is thus producing five stars on the user interface. The ng-src of the img is being set to either an empty star or a filled star depending on the rating.
The ng-src directive is evaluated as: ng-src = {{ condition && true || false}} : where condition is checking if rating is less or equal to $index of the ng-repeat.
There is also a ng-click directive on the img tag, which is calling a click() function on the $scope.
Then finally we have the controller, which will be responsible for the functioning of, and will be executed for each instance of our directive.
In the controller, we are creating an array $scope.maxRatings of size 5. We need this array to make the ng-repeat work. The click() function on our $scope is also created here, which is called on the click of the img, changing the $scope.rating.
The StarRating directive is used as below:
<div class="container"
ng-app="app" ng-controller="appController">
    <div>
        <div class="alert alert-success">
        <span class="label label-info">Star Rating: {{rating}}</span>
            <star-rating rating></star-rating>
        </div>
    </div>
</div>
And is rendered as:

Here, we can see our directive working. It initializes with a rating of 3, which we defined in our page controller above. We can also change the rating by clicking on the stars. We can see the rating change as it is displayed to the left of the directive, conforming that the two-way binding between the directive and the outside world is working as it should. And the best part, we archived this in a single line.
<star-rating rating></star-rating>
Now let us add one more copy of the directive to our page, as shown here.
As we can see in the fiddle, when we change the rating on one directive, the other also changes.
Problem
- We have used the Rating from the page controller (parent scope) in our directive. There is currently no way to pass two different Ratings, viz.
Rating1andRating2to our Directive copies. - Both the directive copies are sharing a single copy of the
Ratingvariable which is on the parent scope. - When one directive changes its rating, it updates the value in the parent scope - and as the parent scope has a two-way binding with the directive, it makes the other directive change its rating too.
Solution: Provide a Private Scope for our directive, so each instance of the directive can have a private copy of Scope, which can be initiated from the parent. In AngularJS, this private scope is called Isolated Scope.
Note: There are places where we can make an exception and use the parent scope in directives. An example can be a UserName directive. Whenever the logged in user changes, the UserName directive reflects that change everywhere it is being used.
Isolated Scope
The type of Isolated Scope is set by passing one of the following values to the scope parameter.
| = | Sets bidirectional binding between a local scope property and the parent scope property. |
| @ | Binds a local scope property to the string value of the DOM attribute. This value is also uni-directional and is passed from the parent to the isolated scope. |
| & | Provides a way to execute an expression in the context of the parent scope. The value passed to this attribute in the DOM is always expected to be a function or an expression. |
Note: There are other options for defining a scope properties, not mentioned above but can be found here.
Bidirectional/ Two Way Binding
The way to add an Isolated Scope to a directive is to add a scope option to the Directive Definition Object.
scope: {
     rating: '='
}
Here the scope option is being created with one property – rating with a value of ‘=’.
What this translates to is, the isolated scope has a property called rating and its value of ‘=’ signifies that it will have a two way object binding with the parent scope of the same name – ‘rating’.
Let's see this in action. The Fiddle created here shows the working example.
In the Fiddle, as we add the above mentioned, scope option - { } to the directive, we make the following changes to our page controller.
app.controller('appController', ['$scope', function ($scope) {
    $scope.rating1 = 2;
    $scope.rating2 = 3;
}]);
We make the following changes to page markup.
<div class="container"
ng-app="app" ng-controller="appController">
    <div>
        <div class="alert alert-success">
        <span class="label label-info">Star Rating: {{rating1}}</span>
            <star-rating rating='rating1'></star-rating>
        </div>
        <div class="alert alert-info">
        <span class="label label-info">Star Rating: {{rating2}}</span>
            <star-rating rating='rating2'></star-rating>
        </div>
    </div>
</div>
In the page controller, we have created two properties, rating1 and rating2 on its scope and are passing them to a rating attribute in our directive markup as below:
<star-rating rating='rating1'></star-rating>
<star-rating rating='rating2'></star-rating>
The rating attribute in the DOM represents a bridge between the page controller and the directives isolated scope. The value passed to the attribute is passed over this bridge to the directive and the communication travels in both directions.

So now we have two working directives which can coexist independently and can have and change their ratings as expected.
Unidirectional Binding
There are cases when you might need to send data from the parent to the directives scope and won’t expect that data to be returned back. For such situations, we can define unidirectional scope properties on the directives isolated scope.
Our current starRating directive shows a maximum of five stars. What if we want to make the number of stars dynamic? We can add a property maxRating to the directives scope. Naturally, the directive won’t be changing this property from within!
Such a property can be defined with a ‘@’ value to the scope property. This scope property expects a string value from the DOM attribute and does not have a two way binding with the parent scope.
scope: {
    rating: '=',
    maxRating: '@',
}
This makes us change the way we initialize the $scope.maxRatings array in the directives controller. Rather than a size five array, now the array is dynamic and based on the value of maxRating passed from the parent.
$scope.maxRatings = [];

for (var i = 1; i <= $scope.maxRating; i++) {
    $scope.maxRatings.push({});
};

Calling and executing an expression or method on the parent from the Directive
One final trick the Isolated Scope can do is execute an expression or method on the parent scope. This comes in very handy and is very important when the directive wants to execute some code on the parent.
As an example, we will call a function on the parent, on each click of the stars and pass the changed rating value to the parent.
Such a property can be defined with a ‘&’ value to the scope property. This scope property expects a function or an express from the DOM attribute.
The changed isolated scope in the directive will be:
scope: {
    rating: '=',
    maxRating: '@',
    click: '&',
}
The template of the directive will be changed to listen to a clicks using a ng-click directive and call a function isolatedClick(), which is local to the directive which in turn calls the parent function declared in the DOM, thus broadcasting the click outside of the directive.
"<div style='display: inline-block; margin: 0px;
padding: 0px; cursor:pointer;' ng-repeat='idx in maxRatings track by $index'> \
    <img ng-src='{{(rating <= $index) && \"Images/star-empty-lg.png\"
    || \"Images/star-fill-lg.png\"}}' ng-Click='isolatedClick($index + 1)'></img> \
</div>"
The function in our directive receiving the initial notification of the click will look something like this and will call the click function on the parent bound to its isolated scope.
$scope.isolatedClick = function (param) {
    $scope.rating = param;
    $scope.click({ param: param });
};
On our page, the directive now looks like this, where the attribute click is bound to the directives scope property of the same name. The value of the attribute is a function click1(param) which will be called, when the directive invokes its isolated click function.
<div star-rating rating="starRating1" click="click1(param)"></div>
The page controller has the click1 function, currently just logging the rating value, but obviously can be used for more!
$scope.click1 = function (param) {
    console.log('Click(' + param + ')');
};
Confusing? Trust me this is confusing at first. I hope the workflow below helps it understand better.

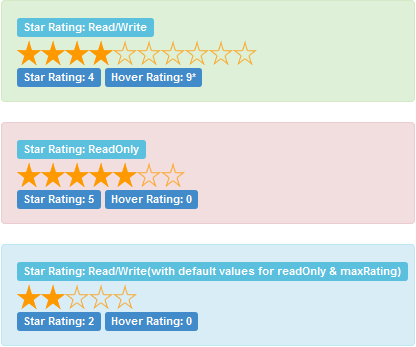
I have added three more properties to the directives isolated scope:
readOnly: A unidirectional property added to the scope to make the directive read only.mouseHover: A function to be executed on the parent just like theclickfunction described above, this time telling the parent which star is currently having the mouse hover.mouseLeave: A function to be executed on the parent, notifying that parent which star has lost the mouse hover.
scope: {
    rating: '=',
    maxRating: '@',
    readOnly: '@',
    click: "&",
    mouseHover: "&",
    mouseLeave: "&"
}
The working of the types of isolated scope has been discussed above, so not explaining the newly added scope properties for the sake of keeping the article short!
The entire working directive can be found at this fiddle here.
Conclusion
We have seen a fairly simple directive been created here.
From the code, we can see that the entire directive was created in about 60 lines of code and is contained in a single portable file, which includes the html template, the data and the behaviours of the directive. The structure of the directive resembles a similar venture on the server side, say a user control with public properties and events.
Something similar to be created in JQuery would have been definitely more complex and the fact that the end user can use the directives with a single line of markup is astonishing in its own way, saving time and effort in creating and testing such components.
In the next part, we will see more options of the DDO and will try to create a more complex directive!