Introduction
GUI Designers need colors — lot of colors! Sometimes you may find nice set of colors in magazines, pictures or simply in nature.
So: take a picture, scan the picture and pick the colors which you like. The problem is that the quality of the picture may not be so good: any pixel from the roster may not be as good as the general perception of the color from a wide surface. To obtain even better results, artists know that is advisable to combine adjacent colors (kill contrast). Averaging the entire picture may result in a color suitable for the background (or may not...).
The program that I'm presenting here is able to do exactly that: separate a rectangular area from an image and average its color. Using nice pictures, you may produce interesting set of colors and use them in your graphical interfaces.
Background
This program was produced with Visual Studio 2008 Beta 2. It exhibits features as XAML GUI design: designing menus and context menus, working with image, canvas, scroll-view, grid and List Box WPF controls, and manipulating shapes and image content with the old GDI+. The result may be extracted to the Clipboard.
Design
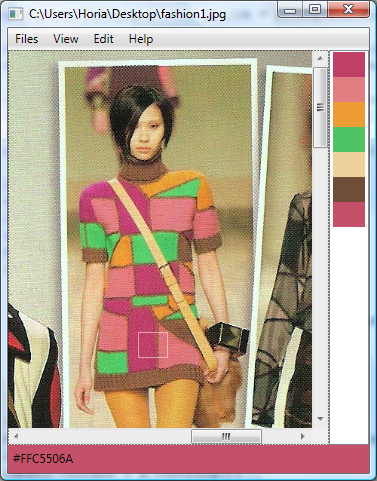
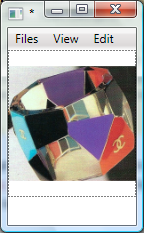
I expect the interface to have a big area for displaying a loaded image, a menu, eventually a status bar and a list of selected colors. The program will be able to manipulate the image through a scroll-view and by changing the zoom factor. The available functions will allow loading the image from a file, cropping the part of interest from the image (and eventually saving it back on the disk,) and averaging the color of a selected rectangle. The extracted colors would go in a list box, and would be available as hex strings to be added in other code files or documents. The main functions (load, save, zoom, crop and pick colors) will be available in the main menu grouped in categories: "Files", "View" and "Edit", while extracting functions will come as a popup menu on each color item in the list of selected colors. Finally, the last selection will be available in the status bar.
To start, open VS2008 and create a new "WPF Project". The project contains already a main window which it presents in a designer. In the XAML part of the designer we may change the title of the window (it is possible to change the name of the window too, but since I don't expect to create more windows, it will stay as it is: "Window1" as a class in the "PickColor" project.)
To accommodate various controls for the UI, WPF provided a very versatile control: the Grid. Add a grid to the main form and split the main area in three rows: the menu row, the content row and the status-bar row. Note that some dimensions are post fixed with a "*" – those will be variable accommodating more or less content as the grid resizes with the form. I have added also two columns, mainly for the image and the selected-color list.
<Window x:Class="PickColor.Window1"
    xmlns="http://schemas.microsoft.com/winfx/2006/xaml/presentation"
    xmlns:x="http://schemas.microsoft.com/winfx/2006/xaml"
    Title="Pick Fashion" Height="481" Width="377">

    <Grid Name="grid1" >
    <Grid.ColumnDefinitions>
        <ColumnDefinition Width="315*" Name="Col0"/>
        <ColumnDefinition Width="40" Name="Col1"/>
    </Grid.ColumnDefinitions>
    <Grid.RowDefinitions>

        <RowDefinition Height="22" />
        <RowDefinition Height="395*" Name="Row1"/>
        <RowDefinition Height="28" />
    </Grid.RowDefinitions>
For working with the image, we anticipate the image to be bigger than the provided real estate space in the form. For this reason in Row1 and Col0 we add a ScrollView control; then in the scroll view — a Canvas which will hold the image and a shape — the selecting rectangle. This last will be added by code.
<ScrollViewer Grid.Row="1" Grid.Column="0" Name="scrollViewer1"
    SizeChanged="scrollViewer1_SizeChanged"
    HorizontalScrollBarVisibility="Auto"
    VerticalScrollBarVisibility="Auto">
    <Canvas Name="canvas1" Height="393" Width="315">
    <Image Name="image1" Cursor="Cross" ForceCursor="True"
        MouseDown="image1_MouseDown" MouseMove="image1_MouseMove"
        MouseUp="image1_MouseUp" Canvas.Top="0" Canvas.Left="0"
        HorizontalAlignment="Left" VerticalAlignment="Top"
        SizeChanged="image1_SizeChanged" Height="18" Width="66" />
    </Canvas>
</ScrollViewer>
Main Menu
To populate the image, as well as for the other functions, we need a MainMenu: In the Edit, View and Zoom menus observe the SubmenuOpened event handlers: These events are activated before the submenu opens and gives a chance to the code for cheching or enabling other menu items:
- the edit menu enables the
PickColor and Crop menu items only when the private variable FileName is not null and the selectedRectangle shape was initialized; - the
Zoom and View menus just check corresponding menu items before those are activated.
To show, or hide the Color List Box, the Colors_Click handler just changes the Col1 width:
Col1.Width = new GridLength((Colors.IsChecked) ? 0.0 : 40.0);
Note the
MouseDown,
MouseUp and
MouseMove events; they are responsible for drawing the rectangle which delimits the area to be cropped or averaged:
private void image1_MouseDown(object sender, MouseButtonEventArgs e)
{
if (!image1.IsMouseCaptured)
{
image1.CaptureMouse();
MouseDownPoint = e.GetPosition(image1);
}
}
private void image1_MouseMove(object sender, MouseEventArgs e)
{
if (image1.IsMouseCaptured)
{
Point current = e.GetPosition(image1);
if (selectedRectangle == null)
{
selectedRectangle = new Rectangle();
selectedRectangle.Stroke = new SolidColorBrush(
System.Windows.Media.Colors.White);
selectedRectangle.Opacity = 0.50;
canvas1.Children.Add(selectedRectangle);
}
selectedRectangle.Width = Math.Abs(MouseDownPoint.X - current.X);
selectedRectangle.Height = Math.Abs(MouseDownPoint.Y - current.Y);
Canvas.SetLeft(selectedRectangle, Math.Min(MouseDownPoint.X,
current.X));
Canvas.SetTop(selectedRectangle, Math.Min(MouseDownPoint.Y,
current.Y));
}
}
private void image1_MouseUp(object sender, MouseButtonEventArgs e)
{
if (image1.IsMouseCaptured)
{
image1.ReleaseMouseCapture();
}
}
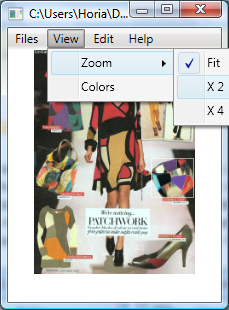
Changing Size
By default the image will fit inside the Canvas and will resize with the window without changing the aspect ratio. However, some may find working at this size difficult, unless maximizing the window to the entire screen. To make this issue easier, I've introduced the concept of the zoom factor: there is no 100%, 200%... fit to page zoom; instead, the image will fit completely at zoom factor 1.0, just half — either the height or the width, whichever is appropriate, and so on. Zoom factor less than 1 does not make sense. For 1.0 — the scroll view does not display any scroll bars, while for bigger factors, the control displays whatever scroll bar is appropriate (at least one,) so the user may go to whatever section s/he wants.
Because the selection rectangle shape is inside the same Canvas with the image, and the canvas is inside the ScrollView control, the rectangle moves around with the image, however resizing the image with a zoom factor needs adjustments. This goes like this:
double zoomFactor = 2.0;
private void doZoom(double zoom)
{
zoomFactor = zoom;
image1.Width = Col0.ActualWidth * zoomFactor;
image1.Height = Row1.ActualHeight * zoomFactor;
}
private void scrollViewer1_SizeChanged(object sender, SizeChangedEventArgs e)
{
doZoom(zoomFactor);
}
private void ZoomX_Click(object sender, RoutedEventArgs e)
{
doZoom(Convert.ToDouble(((MenuItem)sender).Tag));
}
private void image1_SizeChanged(object sender, SizeChangedEventArgs e)
{
canvas1.Width = image1.ActualWidth;
canvas1.Height = image1.ActualHeight;
if (selectedRectangle != null)
{
double scaleX = e.NewSize.Width / e.PreviousSize.Width;
double scaleY = e.NewSize.Height / e.PreviousSize.Height;
selectedRectangle.Width = scaleX * selectedRectangle.Width;
selectedRectangle.Height = scaleY * selectedRectangle.Height;
Canvas.SetLeft(selectedRectangle, scaleX * Canvas.GetLeft(
selectedRectangle));
Canvas.SetTop(selectedRectangle, scaleY * Canvas.GetTop(
selectedRectangle));
}
}
When the image size should change as a result of window resizing or a ZoomX menu item click, the image size is calculated as a multiplication of the zoomFactor with the corresponding grid cell (Col0, Row1). As a result of changing the size of the image, the canvas is readjusted to match the Actual Size of the image, and the selectedRectangle (if any) is rescaled.
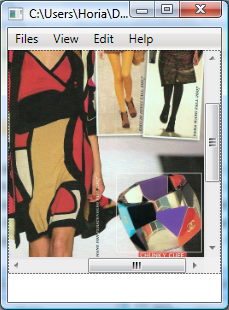
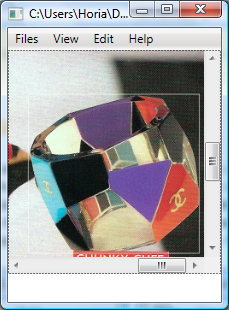
Ah – Crop! ...GDI
As an alternative to using the Zoom Factor, the user may choose to crop the selected rectangle and continue working on a smaller image.
Unfortunately, I did not find any better way to work my way to cropping and averaging the rectangle's pixels without the good, old GDI library. Two routines from the internet proved themselves very useful for this process:
(From Forum)
public BitmapSource ConvertGDI_To_WPF(System.Drawing.Bitmap bm,
Int32Rect rect)
{
BitmapSource bms = null;
if (bm != null)
{
IntPtr h_bm = bm.GetHbitmap();
bms = Imaging.CreateBitmapSourceFromHBitmap(h_bm, IntPtr.Zero, rect,
BitmapSizeOptions.FromEmptyOptions());
}
return bms;
}
(Reference page)
private System.Drawing.Bitmap BitmapSource2GDI(BitmapSource source)
{
int width = source.PixelWidth;
int height = source.PixelHeight;
int stride = width * ((source.Format.BitsPerPixel + 7) / 8);
byte[] bits = new byte[height * stride];
source.CopyPixels(bits, stride, 0);
unsafe
{
fixed (byte* pBits = bits)
{
IntPtr ptr = new IntPtr(pBits);
System.Drawing.Bitmap bitmap = new System.Drawing.Bitmap(
width, height, stride,
System.Drawing.Imaging.PixelFormat.Format32bppPArgb,
ptr);
return bitmap;
}
}
With these, the crop goes as follows:
private void Crop_Click(object sender, RoutedEventArgs e)
{
using (System.Drawing.Bitmap source = BitmapSource2GDI(
(BitmapSource)image1.Source))
{
Int32Rect rect = new Int32Rect();
double scaleX = source.Width / image1.ActualWidth;
double scaleY = source.Height / image1.ActualHeight;
rect.X = (int)(scaleX * Canvas.GetLeft(selectedRectangle));
rect.Y = (int)(scaleY * Canvas.GetTop(selectedRectangle));
rect.Width = (int)(scaleX * selectedRectangle.Width);
rect.Height = (int)( scaleY * selectedRectangle.Height);
image1.Source = ConvertGDI_To_WPF(source, rect);
canvas1.Children.Remove(selectedRectangle);
selectedRectangle = null;
FileName = "*";
this.Title = FileName;
}
}
Note that we could have read the System.Drawing.Bitmap from its file; however that method would have been inconvenient in the case of successive crops — unless we care to save and rename the new images. In the end, I cared to clear the selectedRectangle, as per the new image it does not make any sense, and to reset the FileName variable, so the Save menu item would know to default to SaveAs.
The same goes averaging the colors in the selected rectangle:
private void PickColor_Click(object sender, RoutedEventArgs e)
{
using (System.Drawing.Bitmap source = BitmapSource2GDI(
(BitmapSource)image1.Source))
{
double scaleX = source.Width / image1.ActualWidth;
double scaleY = source.Height / image1.ActualHeight;
int x0 = (int)(Canvas.GetLeft(selectedRectangle) * scaleX);
int y0 = (int)(Canvas.GetTop(selectedRectangle) * scaleY);
int x1 = x0 + (int)(selectedRectangle.Width * scaleX);
int y1 = y0 + (int)(selectedRectangle.Height * scaleY);
long n = 0;
long r = 0; long g = 0; long b = 0;
for (int y = y0; y < y1; y++)
{
for (int x = x0; x < x1; x++)
{
System.Drawing.Color c = source.GetPixel(x, y);
n++;
r += c.R;
g += c.G;
b += c.B;
}
}
System.Windows.Media.Color a = System.Windows.Media.Color.FromArgb(
255, (byte)(r / n), (byte)(g / n), (byte)(b / n));
label1.Background = new SolidColorBrush(a);
label1.Content = a.ToString();
Shape s = new Rectangle();
s.Width = 32;
s.Height = 25;
s.Fill = new SolidColorBrush(a);
s.ContextMenu = ColorItemMenu;
s.ToolTip = a.ToString();
ColorListBox.Items.Add(s);
}
}
Average Results
After getting the source as a System.Drawing.Bitmap the code just iterates on rows and columns of pixels in the selected rectangle area and averages each component. In the end, it produces a System.Windows.Media.Color from these components and color and label the status bar. With the same color it creates a new Shape object and adds it in the ColorListBox on the right hand, near the image. The new list element has a tool tip which shows its color hex-value, and a context menu which allows extracting the color value(s) in the Clipboard, and deleting the unwanted elements. The ContextMenu is one for all elements and has been created in the constructor of the window:
public Window1()
{
InitializeComponent();
Col1.Width = new GridLength(0.0);
MenuItem miCopy = new MenuItem();
miCopy.Header = "Copy to Clipboard";
miCopy.Click += new RoutedEventHandler(miCopy_Click);
ColorItemMenu.Items.Add(miCopy);
MenuItem miCopyAll = new MenuItem();
miCopyAll.Header = "Copy All to Clipboard";
miCopyAll.Click += new RoutedEventHandler(miCopyAll_Click);
ColorItemMenu.Items.Add(miCopyAll);
MenuItem miDelete = new MenuItem();
miDelete.Header = "Delete";
miDelete.Click += new RoutedEventHandler(miDelete_Click);
ColorItemMenu.Items.Add(miDelete);
}
void miCopy_Click(object sender, RoutedEventArgs e)
{
Clipboard.SetData("Text",
((SolidColorBrush)(((Rectangle)(
ColorListBox.Items[ColorListBox.SelectedIndex])).Fill)).Color.ToString());
}
void miCopyAll_Click(object sender, RoutedEventArgs e)
{
StringBuilder sb = new StringBuilder();
for (int i = 0; i < ColorListBox.Items.Count; i++)
{
sb.AppendLine(((SolidColorBrush)(
((Rectangle)(ColorListBox.Items[i])).Fill)).Color.ToString());
}
Clipboard.SetData("Text", sb.ToString());
}
void miDelete_Click(object sender, RoutedEventArgs e)
{
ColorListBox.Items.Remove(ColorListBox.Items[ColorListBox.SelectedIndex]);
}
I have hidden the ColorListBox in code, because is more convenient to have it open during the design time.
Right-clicking any list item and selecting "Copy All to Clipboard", the clipboard will be filled with the following text:
#FFBE3F67
#FFE07E82
#FFED9C35
#FF56CD6A
#FFE9C787
#FF73513C
Which was the targeted goal of this project!
Points of Interest
So much for the WPF and GDI in this project! I wish I could remove the GDI round-trips from this program — maybe someone will provide us with a better way, but until then, I hope these methods will come in handy for lot of us.
Note that the Save and SaveAs functions are not yet implemented (who cares?!)
Also I wish to implement a command pattern for cropping/outcropping, selecting/unselecting etc.
Stay tuned — I might come back with some improvements, among them — form persistence with XML.
Horia Tudosie is Master of Sciences from the Polytechnic University of Bucharest - Computer Sciences.
Horia came in Canada in 1994 and have work in US 4 years since 2003.
He was working with various peculiar languages as Delphi and Forth, but mainly with C++, C#, WPF, and JavaScript. He mainly develops applications and Extensions for GIS.


 General
  News
News  Suggestion
  Question
  Bug
Bug  Answer
  Joke
Joke  Praise
  Rant
Rant  Admin
Admin 


