
WPF Commands
4.10/5 (23 votes)
Overview of WPF commands and how to use them to improve your WPF code
Introduction
WPF commands are a really nice way by which one can re-use functionality of an application. In the demo project that is supplied with this article, I have built an example of a project that uses the WPF Commands Pattern in order to be able to sort customers. The application has different controls that invoke the same functionality and for this reason, the WPF Command Pattern fits perfectly. WPF commands can also be used for other scenarios where you want to disable a control if the input is incorrect as we will see further on in the article with the CanExecute.
Creating a Command
To use the WPF commands, you have to declare the command that you are going to use with a static declaration. When you declare the command, you can also specify "Input Gestures" that can invoke the command. You can think of input gestures as shortcuts. These are basically a key or even a combination of keys. In the demo project, for example, I use the F3 key as input gesture.
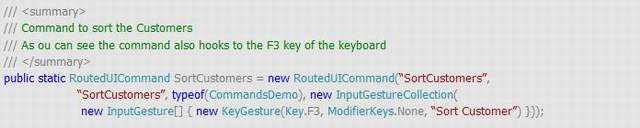
In the demo project, I created the command in the same class as my user interface window(CommandDemo.cs). In a real life project, I would suggest that the command is declared somewhere more central so that other Windows/Components can use the same command declaration. For example, if in the project I had another window that can sort customers, I would have created a class that has the command inside. By doing this, the command would be accessibly from the other window as well. You can think of commands as being similar to events. Someone executes the command and someone handles the command. The way I picture this in my head is…
"There are 3 guys Jon, Mark and Patrick that work in a store. The manager of the store decides that Patrick should wash the floor. Jon says “Wash Floor” and Patrick does it. Mark says “Wash Floor” and Patrick does it. So basically Patrick is the Command Handler and Jon, Mark are executing the command causing Patrick (the command handler) to do the operation. The manager that said that Patrick should wash the floor is the Command Binding."
This is a very basic explanation of how this pattern works. Maybe even a more confusing one. By the way, I was going to forget.... The RoutedCommand in WPF is similar to RoutedEvents. The caller raises (executes) the command and the command routes up in the WPF Visual Tree until a CommandBinding handles the command. You can stop the route by setting the e.Handled = true in the command handler.
Now let us continue on. So after defining the command, what you have to do is create the command binding. Basically, this implies that you need to specify who is going to do the operation. You do this by creating the following:
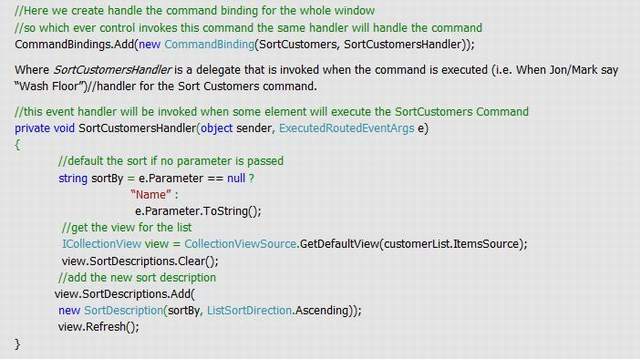
So what is left for us to do is to create the Mark and Jon that are actually executing the command. Some controls like the button have a command property where you can specify what command to use when the button is clicked (you can even pass a parameter to the command by using the CommandParameter property).
>Command=”local:CommandsDemo.SortCustomers”
You can even execute the command manually from C# by using the following code:
ICommand command = SortCustomers;
command.Execute(”Name”);
Part 2 - CanExecute
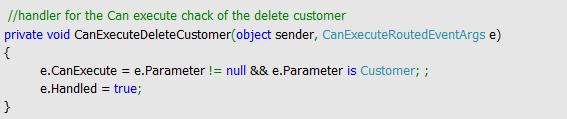
The WPF command has another cool feature, the CanExecute. Basically this is a way in which you can check if the command can execute or not. This is a very handy feature if you have a command that can only be executed under certain conditions. For example, you have a list of users in a ListBox >> You want to be able to delete a user >> You define a command that as a parameter takes the user id >> You determine which user to delete by getting the selected item of a ListBox and passing that id as the command parameter >> You want the command to execute only if a user is selected.
All controls that support the Command Pattern (such as the Button) handle the result of the CanExecute by disabling the control if CanExecute is false. If the control which invokes the command does not support the Command Pattern, don't worry because a command will only execute if the CanExecute is true. Yet there can be cases where you want to do an action if the command cannot be executed (for example, change the visibility of the control or change the text of the control). You can do this be handling the CanExecuteChanged event of the command. In the event handler of the CanExecuteChanged you have to call the CanExecute method of the ICommand in order to check what the current state of the command is.
bool canExecute = command.CanExecute(paramterForCommand);
I created a helper method that accepts an ICommandSource and gives back the CanExecute state of the command.
public static bool CanExecuteCommandSource(ICommandSource commandSource)
{
    ICommand baseCommand = commandSource.Command;
    if (baseCommand == null)
        return false;

    object commandParameter = commandSource.CommandParameter;
    IInputElement commandTarget = commandSource.CommandTarget;
    RoutedCommand command = baseCommand as RoutedCommand;
    if (command == null)
        return baseCommand.CanExecute(commandParameter);
    if (commandTarget == null)
        commandTarget = commandSource as IInputElement;
    return command.CanExecute(commandParameter, commandTarget);
}
You can use this method to verify the state of the command as shown in the demo. Ok.... I think that's it for now… I hope that this post gives you a better understanding of how commands work and how you can use them to make your application code better. Feel free to download the demo project that I have created for this post in order for you to visualize better how you can use the Command Pattern of WPF.
History
- 19th December, 2007: Initial post